Windows 10 file explorer keeps all recent searches saved in the form of history. The moment you start typing something, a dropdown of preexisting searches appears in front of you. But, at times it might be better to delete this search history in Windows 10? You may wonder why?
Let’s consider a scenario when you have to find a very specific file (the name of which you already know) using the file explorer search. You start typing in the name of a very important file that you wish to find in a drive or a folder and what happens next, you are swarmed by several different searches. These can be good at times but when you are in a hurry, the same can be really painful.
In this blog, we shall discuss ways with which you will be able to delete all history in file explorer or some searches.
- Using Search Tools In File Explorer In Windows 10 To Clear Search History
- Clearing The File Explorer Search History Using The Folder’s Option
- Using The Group Policy Editor For Completely Disabling File Explorer Search History
Quick Ways Of Getting Rid Of Search History In File Explorer In Windows 10
1. Using Search Tools In File Explorer In Windows 10 To Clear Search History
One way of deleting all the existing search history is using the “Clear Search History” option.

- Open File Explorer
- Towards the right hand side locate the Search bar icon. Type anything that you wish to search for
- Also, as soon as you will click on the Search bar you will see Search Tools popping up appearing in pink color
- Click on the Recent searches from the Search tab
- And, then click on Clear search history
Once you are through with these steps you will no longer be able to see recent searches in the file explorer search history.
2. Clearing The File Explorer Search History Using The Folder’s Option

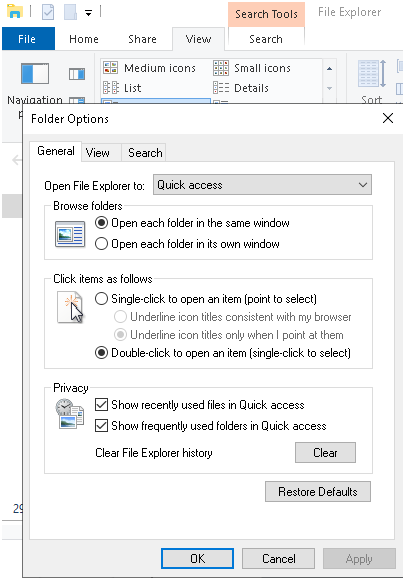
You can easily clear your file explorer search history using the Folder’s option. We are going to discuss how you are going to reach there –
- Click on the View tab
- When you’ll do that, a bar would appear with several other functions. Click on the Options dropdown located at the farthest end and then click on Change folder and search options
- Last but not the least, in the box that opens, click on Clear against Clear File Explorer History
Once you have done this step all your previous history will be gone and you will have a brand new search box where you will be able to enter all your fresh queries.
3. Using The Group Policy Editor For Completely Disabling File Explorer Search History

- Press Windows key + R which will open the Run command
- Type gpedit.msc and hit enter. This will open the Local Group Policy Editor
- Now, once you are in the Group Policy Editor browse and follow the path mentioned below –
User Configuration > Administrative Templates > Windows Components > File Explorer
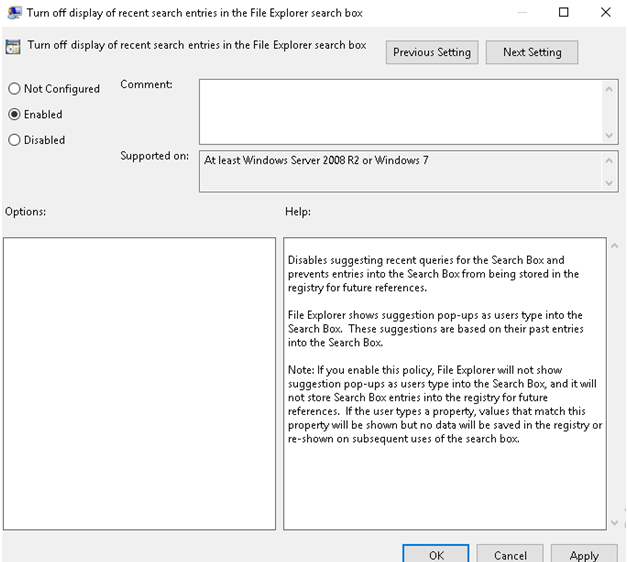
- On the right-hand side window double click on the Turn off display of recent search entries in the File Explorer search box policy
- When you will double click, a new window will pop up. Check the enabled radio button
- Click first on Apply and the click on OK
In The End
We hope that now you won’t be swarmed by zillion other searches in your Windows 10 File Explorer search history and will be able to zero down on exactly the search you want to type and see. We come up with several such Windows 10 hacks and tricks on a regular basis. So, if you wish to have more of these, stay tuned to Tweak Library. Not so much into blogs and stuff, you might like our YouTube Channel. And, yes! If you loved reading this blog and think it can be useful to a loved one, make sure you share it with them.
Next Read:
Tips To Free Up RAM on Your Windows 10 Computer
Best Free PC Cleaner Software For Windows 10,8,7


Leave a Reply