
At this very moment tell us what all programs are running on your computer’s desktop? Probably many.
Let’s take a regular scenario – you probably have games, office-related applications, word processors, browsers, everything running on the same desktop. This means to access one program, you will have to minimize the other. You might even snap Windows, but even that won’t let you enjoy a program’s maximum view or functionality. Plus, there are countless other downsides to running different programs on the same desktop. How about we tell you that you can now have a separate Virtual Desktop for each application in Windows 11. This way you can keep your personal and professional applications separate, probably assign a separate desktop to your favorite games, and so on.
What is a Virtual Desktop in Windows 11? How Different Is It From Windows 10’s Virtual Desktop?
To improve productivity and to provide a distinct desktop for individual tasks, you can now create separate desktops in Windows 11. You can have an individual set of programs on each virtual desktop and you can even have a separate background for each.
How is Windows 11 Virtual Desktop Different From Windows 10?
You must be wondering that when the Virtual Desktop feature even exists in Windows 10 so how is it any different in Windows 11? Microsoft has revamped the Virtual Desktop in Windows 11. With Windows 11, Microsoft has removed the Windows Timeline and in its place, it has put a much simpler and sleeker Desktops icon.
How To Create A Virtual Desktop in Windows 11?
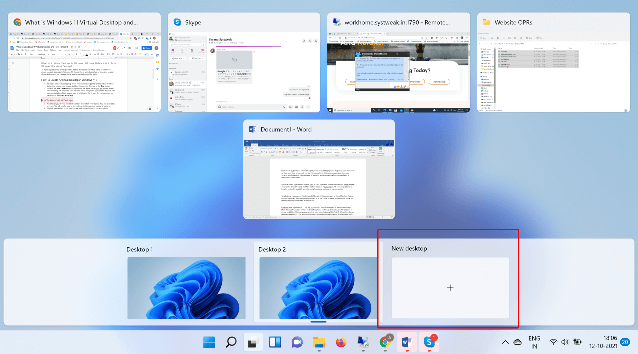
1. To create a new virtual desktop hover over your mouse pointer on the Task View button or for this blog, we can address it as Virtual Desktops button that you can see on your taskbar. You can find this next to the Search icon.
![]()
2. Click on the New Desktop option signified by the + icon. When you do this, a new virtual desktop will open and it will have no active foreground applications. You can add as many virtual desktops as you want by clicking on the + icon. Or, you can even use the shortcut Windows + Ctrl + D
How To Switch Virtual Desktops?
1. Hover over your mouse on virtual desktops present on your taskbar. You can even click on them. You will now be able to see multiple desktop screens instead of just one
2. Choose your desired virtual desktop and switch over from your current desktop.
Alternatively, You Can Even Use Shortcut To Switch Between Virtual Windows
3. You can even use a shortcut to switch between virtual desktops. All you have to do is press Windows and Tab keys simultaneously on your keyboard. When you will do this a Task View interface will open
4. Next, using arrow keys you can choose your desired desktop
5. When you are sure of the desktop you want to choose, press the Enter key
How To Close A Virtual Desktop
Let’s presume that you no more need a virtual desktop or find that several virtual desktops are cluttering your workspace. In that scenario, you can close a desired virtual desktop. To do that –
1. Hover over your mouse pointer or click the Virtual Desktops button on your Windows Taskbar. Alternatively, to open the Task View Interface, you can even use the shortcut, Windows + Tab keys
2. Next, hover over your mouse on a virtual desktop that you want to close. You will instantly see X icon (close button) indicating that you can close the virtual desktop.
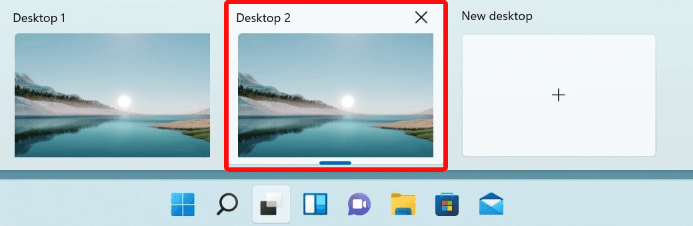
3. Close the virtual desktop by clicking on the close button
But, If I Close A Virtual Desktop Where Will The Foreground Programs Go?
Even if you close a virtual desktop, you don’t have to worry about losing your workflow because when you close the virtual desktop in Windows 11, all the foreground programs will move to the virtual desktop preceding the closed virtual desktop.
How Can I Change The Order of Virtual Desktops In Windows 11 or Have A Separate Background?
You can change the order of your Virtual Desktops by simply dragging one Virtual Desktop over the others. You can also right-click on a virtual desktop and then select Move to left or Move to the right. Quite similarly, you can also Rename your Virtual Desktop as well as Choose the background of your choice.
Wrapping Up
Windows 11 Virtual Desktop can too an extent eliminate the need of having a second monitor which may subsequently put a lot of financial and space-wise load on you. What do you think? And, also if you have been using Windows 11, how has your experience been so far? Do let us know in the comments section below. If you enjoyed what you read, do share it with other fellow users as well.


Leave a Reply