We always look for secured transactions be it monitory or file exchange. Encryption and password protection on files and folders are important and maybe the best way to keep our secrets confidential.
Here in this article we are not only going to make Encryption and Decryption simple but also going to disclose a few secrets tips and tricks which you might not be aware of or using to keep your Data, Files, and folders secured. Let’s start with the most basic one.
Password Protect a Word Document
With third-party software, there can be hundreds of ways to password protect a word document or a spreadsheet however the fun is protecting them without software.
“Warning: This encryption method is AES-256 encryption and if you forget the password, Word can’t recover your data.”
Step 1. Once you are done with editing the document, click on File Menu.
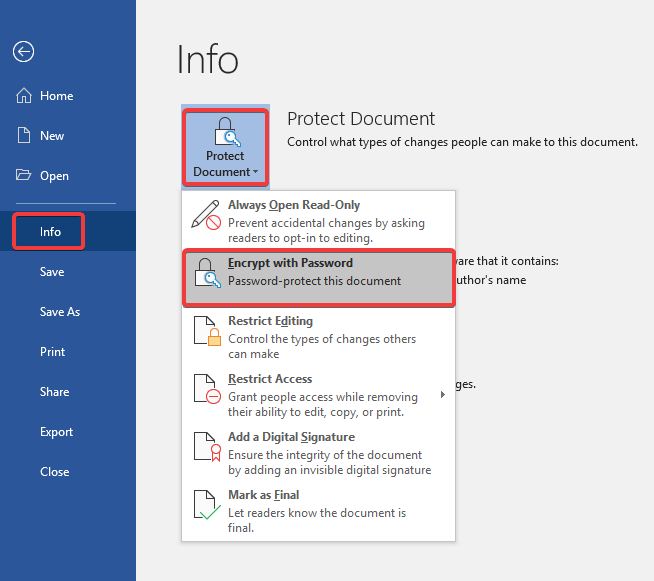
Step 2. Go to the ‘Info’ tab on the left-hand side options and click on ‘Protect Document’.
Step 3. From the drop-down menu, click on ‘Encrypt with Password’.
Step 4. It will prompt for a password and confirmation password, enter a strong password and click on ‘Okay’.
Step 5. Once your document is password protected, it will show you a message stating, “A Password Is Required To Open This Document”.
Step 6. To remove the password, you will need to follow the same steps and this time leave the password blank and click on ‘Okay’. The applied password will be removed.
It is advisable to send the file over and Email and password over a text message or through a different mode for the highest level of security.
“Note: If you encrypt a file with password protection and share it with someone, He/She won’t be able to open the file until the right password is entered.”
Also Read: WhatsApp and the Myth Behind End to End Encryption
Password Protect Excel Spreadsheets
You can password protect Excel spreadsheets in various ways. The above steps to password protect a Word document is the easiest way to password protect Excel Sheets as well, though there are other smart ways available at a cost.
Protect Opening the Workbook
Step 1. Once you are done with editing the worksheet, click on File Menu.
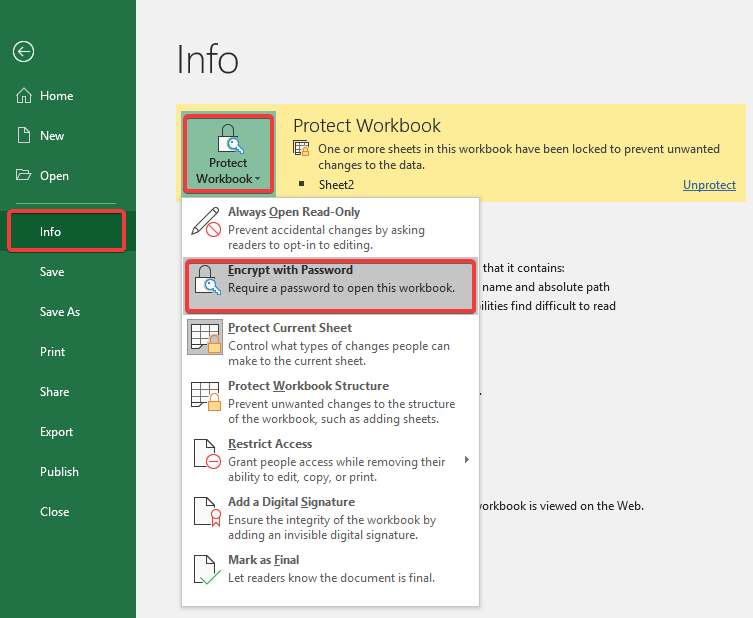
Step 2. Go to the ‘Info’ tab on the left-hand side options and click on the ‘Protect Workbook’.
Step 3. From the drop-down menu, click on ‘Encrypt with Password’.
Step 4. It will prompt for a password and confirmation password, enter a strong password and click on ‘Okay’.
Step 5. Once your password protect Excel workbooks, it will show you a message stating, “A Password Is Required To Open This Workbook”.
Step 6. To remove the password, you will need to follow the same steps and this time leave the password blank and click on ‘Okay’. The applied password will be removed.
Protect Editing the Worksheet
If you want that the other person can open the workbook but can’t make changes to the data, you can also protect the worksheet.
Follow Step 1 & 2
Step 3. To protect the worksheet, you can select ‘Protect Current Sheet’.
Step 4. Step 4, 5 and 6 will remain the same.
“Note: Password protecting Excel worksheet will restrict the user to make any sort of or selected changes to the sheet.”
Also Read: A Brief Introduction To Data Encryption
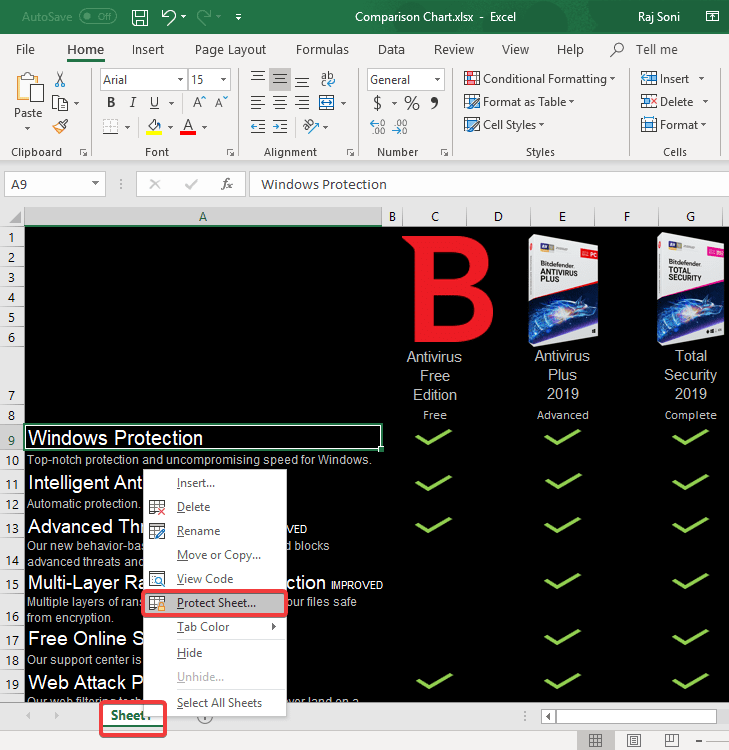
You can also protect the worksheet with selective options with the below-mentioned steps.
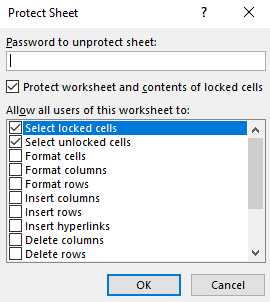
Step 1. Right-click on the sheet name and click on ‘Protect Sheet’.
Step 2. Enter a password and put a check in front of the available choices to ALLOW.
Every selection will have a different impact on the kind of encryption you select.
Step 3. Confirm password and click on ‘Okay’ to set up the encryption.
Now whenever someone will try to make changes, it will restrict the user to format, add, delete data or Add, Delete and Format rows and columns. Putting a check will allow that individual task on the sheet.
Password Protect a Folder in Windows 10
I don’t expect you to be a Coder to password protect a folder in Windows 10. This is a very simple process to hide all your files and folders in a secure password protected folder. It’s like creating a vault for self so that no intruder can get in without a password.
Here we are going to create a .BAT (Batch) file to execute password encryption.
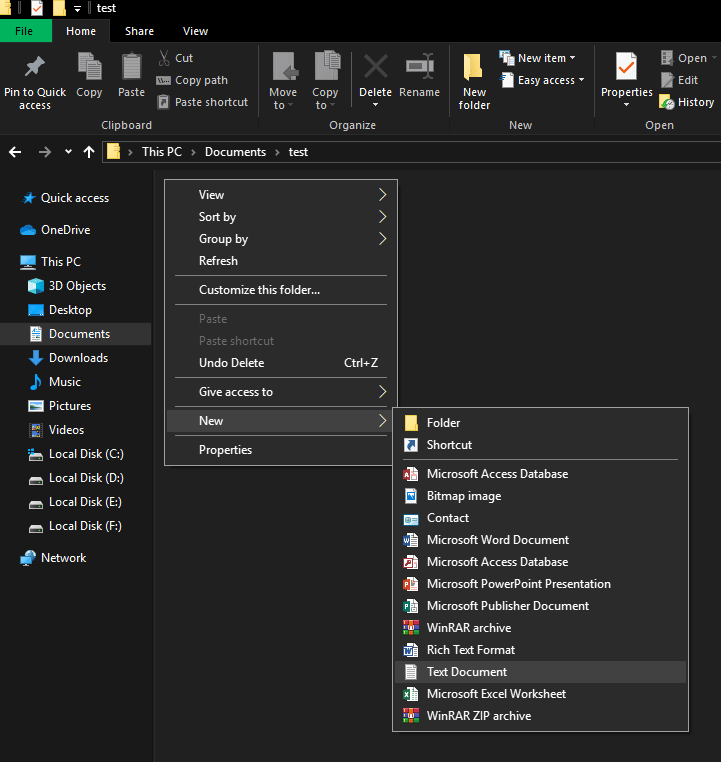
Step 1. Right-click on the location where you want to store secured files and folders.
Step 2. Go to ‘New’ and create a new ‘Text Document’. You may rename the file or leave it as it is.
Step 3. Open the file and copy-paste the below-mentioned code in the text document. (Starting from ‘cls’ to ‘:end’) This will create a locker, a vault to password protect folders.
cls

@ECHO OFF

title Folder Locker

if EXIST "Control Panel.{21EC2020-3AEA-1069-A2DD-08002B30309D}" goto UNLOCK

if NOT EXIST Locker goto MDLOCKER

:CONFIRM

echo Are you sure u want to Lock the folder(Y/N)

set/p "cho=>"

if %cho%==Y goto LOCK

if %cho%==y goto LOCK

if %cho%==n goto END

if %cho%==N goto END

echo Invalid choice.

goto CONFIRM

:LOCK

ren Locker "Control Panel.{21EC2020-3AEA-1069-A2DD-08002B30309D}"

attrib +h +s "Control Panel.{21EC2020-3AEA-1069-A2DD-08002B30309D}"

echo Folder locked

goto End

:UNLOCK

echo Enter password to Unlock folder

set/p "pass=>"

if NOT %pass%==Your-Password-Here goto FAIL

attrib -h -s "Control Panel.{21EC2020-3AEA-1069-A2DD-08002B30309D}"

ren "Control Panel.{21EC2020-3AEA-1069-A2DD-08002B30309D}" Locker

echo Folder Unlocked successfully

goto End

:FAIL

echo Invalid password

goto end

:MDLOCKER

md Locker

echo Locker created successfully

goto End

:End
Here comes the real trick.
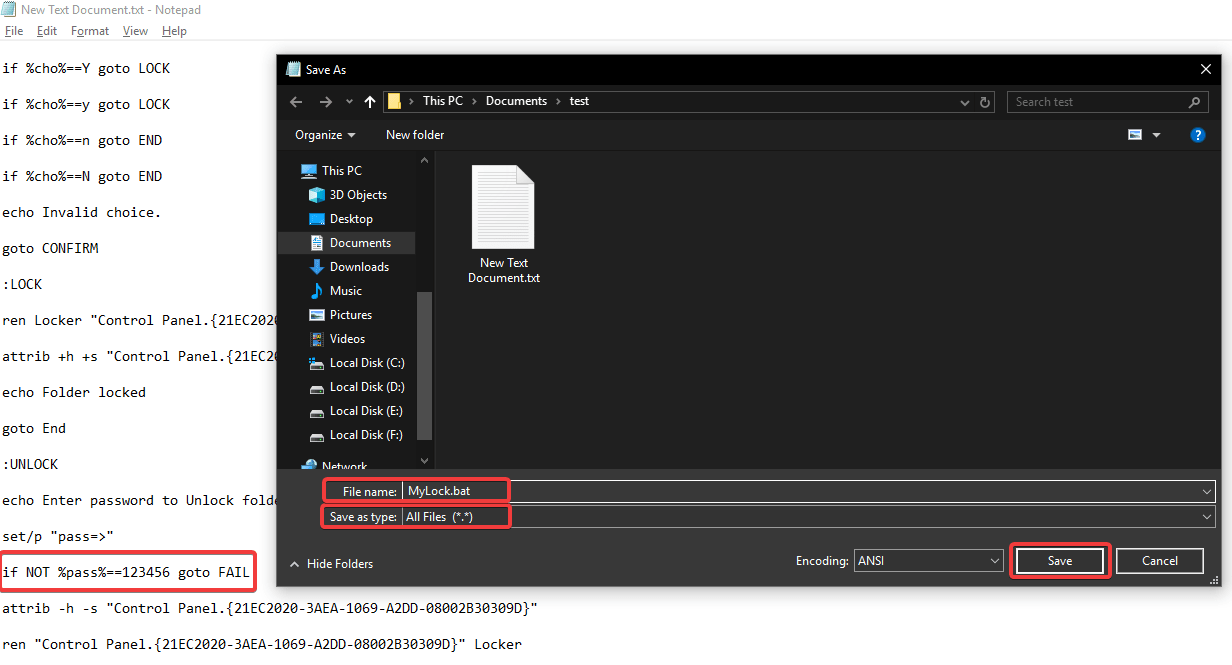
Step 4. Look for the code where it says “Your-Password-Here” and replace it with your real password.
Step 5. Click on the ‘File’ menu and select ‘Save As’ option.
Step 6. Change ‘Save As Type’ from ‘Text Document’ to ‘All Files’.
Step 7. Change the ‘File Name’ to ‘MyLock.bat’ and click on the ‘Save’ button.
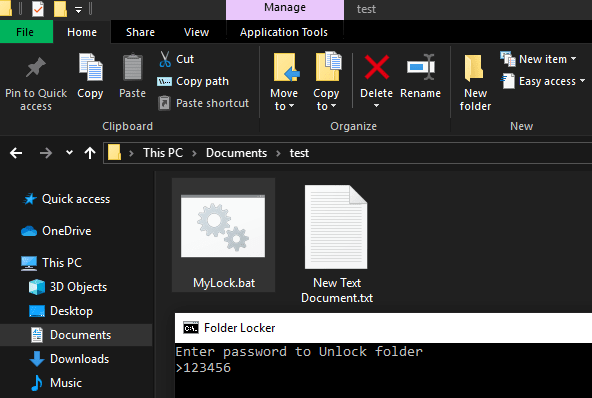
“You’ll find a new file with a Gear Icon on it named ‘MyLock.bat’ and when you double-click on it, a Folder named ‘Locker’ will also appear.”
Step 8. Move all your secret files and folders to the new folder (Locker).
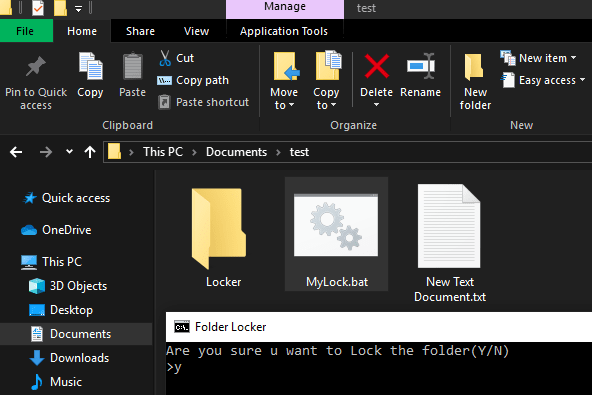
Step 9. Double-click on the file again ‘MyLock.bat’ to execute the batch file. A Command prompt will open to confirm “Are you sure you want to lock the folder(Y/N). Type ‘Y’ for Yes and hit enter. The folder will be locked and will disappear. This will password protect the folder and its files.
Step 10. Whenever you want to open the folder, double-click on the ‘MyLock.bat’ file again and a command prompt will open to confirm your password to show the folder back to you. Enter the password and hit enter and the folder will appear back at its place.
Please Note: If you leave the password protected folder unlocked and close Windows Explorer, anybody can gain access to it until it’s not locked again. Don’t forget to lock it before leaving the system. Someone can delete the master folder or it’s sub-files and folders if left open. This is just a temporary lock, as if someone knows about batch files and you forget to hide the file or rename it to a system file, he/she may get into ‘MyLock.bat’ and change the password. You will lose access to your documents forever.
Turning ON Device Encryption using BitLocker
If you are using Windows Vista or 7 Ultimate, Windows Vista or 7 Enterprise, Windows 8.1 Pro, Windows 8.1 Enterprise, or Windows 10 Pro. this device encryption is for you! BitLocker comes pre-installed with these versions of Windows.
Also Read – How To Encrypt Your Drive With BitLocker in Windows 10
Hidden Folders & Files
Alternatively, you can also hide files and folders so that others can’t peep into your files. Whenever you apply the hidden folder attribute to a file or a folder in Windows, the folder or the files does not appear in the Windows Explorer or the directory list even if someone tries to check it in the command prompt. You just need to ensure that the ‘Don’t show hidden folders, files, or drive’ option is checked.
To hide a file or folder in Windows 7, 8, and 10, follow these steps.
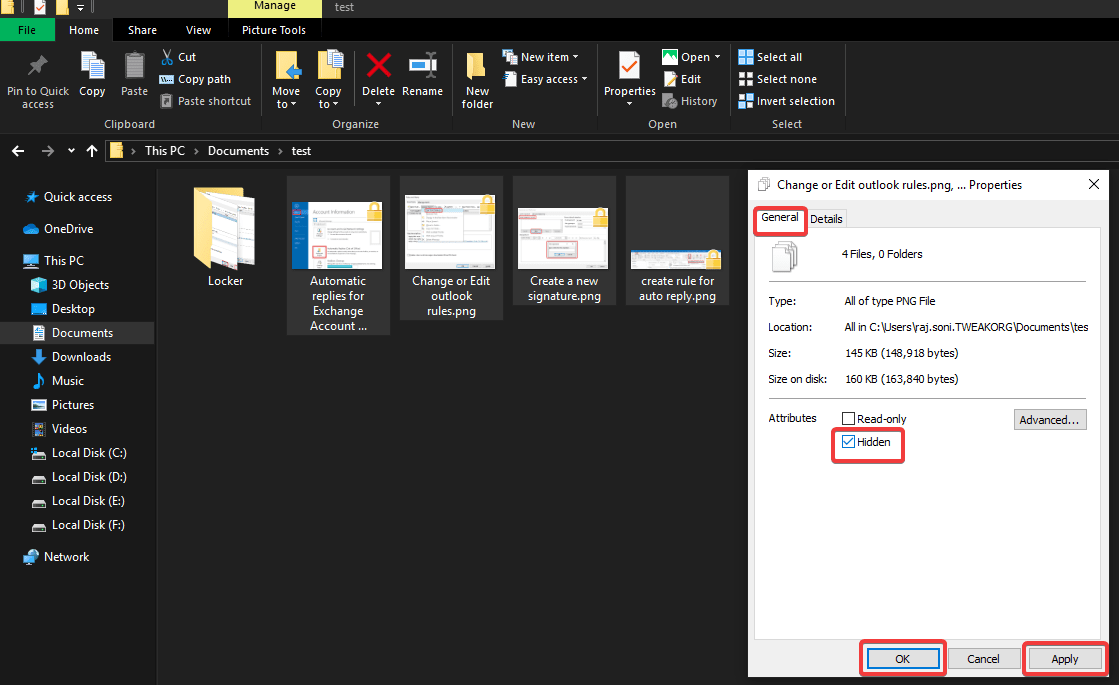
Step 1. Select the files or folders you want to hide and Right-click on the selection.
Step 2. Click on ‘Properties’ at the bottom to look for file properties.
Step 3. On the ‘General’ tab under the Attributes section, put a check on the ‘Hidden’ box.
Step 4. Click on ‘Apply’ and ‘Okay’.
If the file or folder is still visible in Windows Explorer, you’ll need to make more changes.
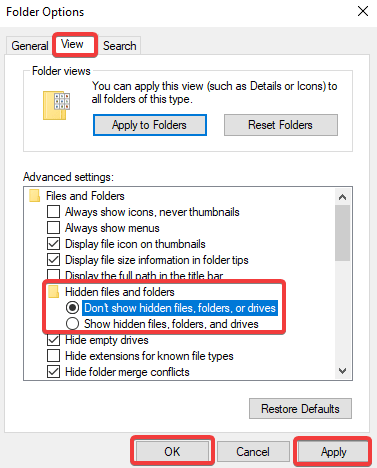
Step 5. In Windows Explorer, click on the ‘File’ tab and go to ‘Change Folder & Search Options’.
Step 6. Go to the ‘View’ tab on the next pop-up window.
Step 7. Under Hidden folders and files, ensure that there is a check on the radio button ‘Don’t show hidden files, folders, or drives’.
“Note: If you want to see your hidden folders and files, repeat steps 5,6, and 7 and put a check in front of ‘Show hidden files, folders, and drives’.”
Also Read: Is it safe to use AES 256 Bit Encryption?
Summing Up
We have compiled tips and tricks to put encryption and password protect a Word document, password protect Excel sheets or password protect folders and files. We have also tried attributes for hidden files and folders and BitLocker. Now you know how to protect your data in Excel Sheets with password protection. Encryption using BitLocker is also a useful tool to ensure that your files and folders are secured and not accessible to others.
We hope that this article has turned out to be helpful to you, please like and share this with your friends. For more such tips, tricks and tech-related updates click on the bell icon to get regular updates from Tweak Library. Do share your thoughts about this article in the comment section.


Leave a Reply