
Encrypting hard drives is one of the easiest and widely used ways to enhance hard drive security. Microsoft added drive encryption known as BitLocker to its latest operating system – Windows 10.
It is a complete drive encryption tool accessed by Windows 10 Enterprise, Pro and Home users. For some, drive encryption using BitLocker on Windows 10 might sound intimidating, as if you lose the password the drive will be locked forever.
If you too fear this, try using TweakPass – an amazing password manager. This tool helps to secure username passwords. Plus, you can use its Secure Notes feature to save important login information in encrypted form. This means stop worrying about forgetting the password. You can now save them in TweakPass – an excellent password manager in an encrypted form.

What Is BitLocker?
BitLocker on Windows 10 is a complete encryption tool that offers strong encryption. It is added to Windows 10 Enterprise, Pro and Home to secure data stored on it. By default, BitLocker uses AES 128-bit encryption strongest in recent times.
In addition to this, if you want you can use BitLocker on Windows 10 with a stronger 256-bit key. This will make decryption almost impossible.
In this tutorial, we will show how to change to BitLocker to AES-256. Before that let’s learn about the encryption methods used by BitLocker.
BitLocker on Windows 10 uses the following three different encryption methods:
- User authentication mode. This standard authentication uses PIN or password to encrypt data on Windows 10.
- Transparent operation mode. This second one is a bit more advanced. It uses the Trusted Platform Module (TPM) chip, that checks system files. If after encrypting the drive system files have been modified BitLocker will not give you the decryption key. This means you will not be able to enter a password to decrypt the drive. This mode creates an additional layer of security on top of your drive encryption.
- USB Key mode. This last encryption mode is very advanced, it uses a physical USB device to encrypt the drive.
How to know if your Windows 10 has a TPM Module?
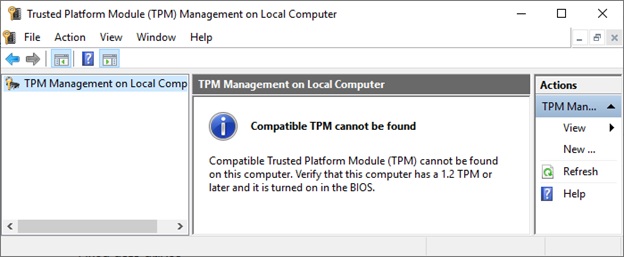
Want to know if your Windows 10 has a TPM module? Open Run window by pressing Windows + R keys. Here, type in tpm.msc and press enter.
You will see information about TPM if installed, if not in the left pane it will read “Compatible TPM cannot be found” message.
Don’t worry there’s nothing to worry, you can still use BitLocker on Windows 10 to encrypt data. To know how to do it without a TPM module read further.
Check If BitLocker Is Enabled on Windows 10
Before we learn how to use BitLocker on Windows 10. You’ll need to check if BitLocker is enabled on your Windows 10 system.
To do so, type gpedit in your Start Menu search bar. Select the Edit group policy.
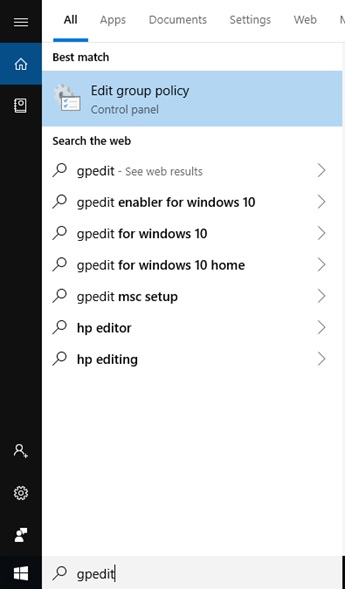
This will open the Group Policy Editor.
Here, go to Computer Configuration > Administrative Templates.
Next click on Windows Components in the right pane > BitLocker Drive Encryption > Operating System Drives.
Look for Require additional authentication at startup option.
Double click on it > in the following windows click on Enabled radio button.
Note: If your Windows 10 system is not TPM module compatible, check the box next to Allow BitLocker without a compatible TPM.
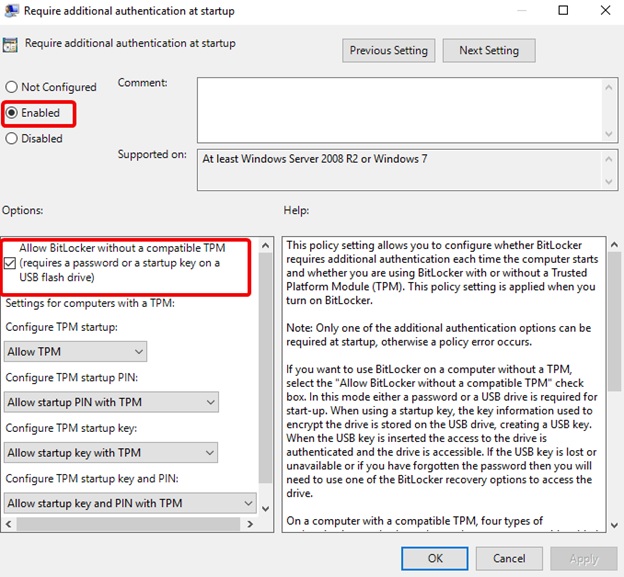
Click Apply > Ok.
Close Group Policy Editor.
Now that you have enabled BitLocker, let’s learn how to use BitLocker on Windows 10.
How to Use BitLocker on Windows 10
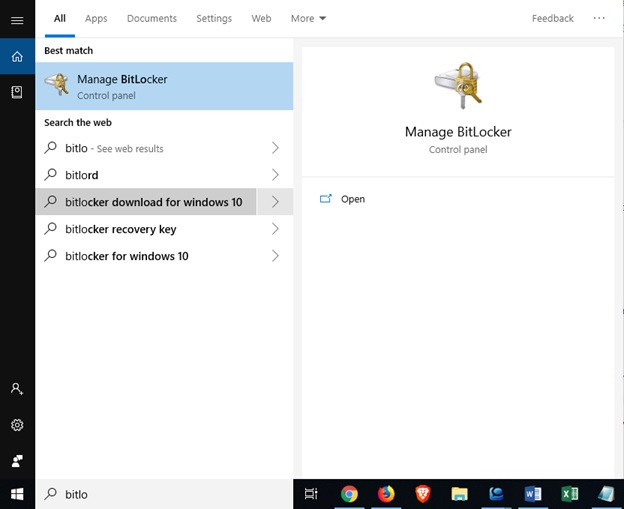
To use BitLocker First, head to search bar here type BitLocker.
Select the drive you want to encrypt using BitLocker on Windows 10.
Next, click Turn on BitLocker > select the option using which you would want to unlock the drive.
- Use a password.
- Use a smart card.
We suggest using the first Use a password to unlock the drive.
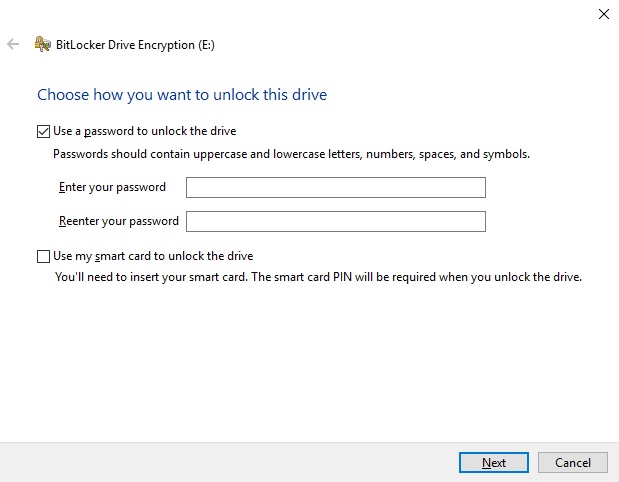
Enter the password and click Next.
Remember the password should be a combination of numbers, letters both in upper and lower case, spaces, and symbols.
Once a suitable password is created confirm it.
You’ll now see options to back up the BitLocker recovery key.
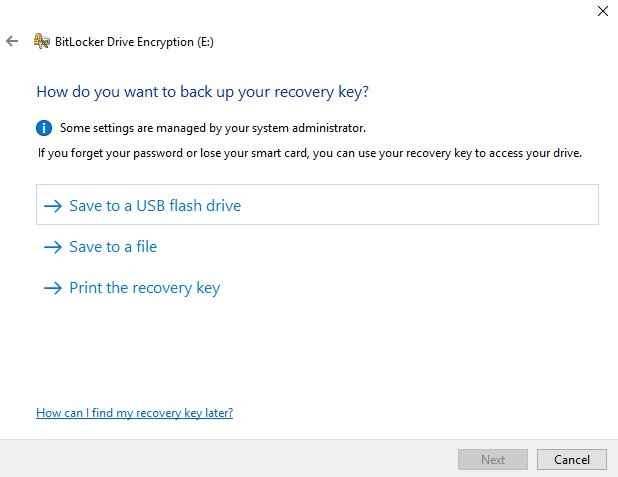
A BitLocker recovery key is a unique and secure way to create all sorts of backup. You’ll get three options to choose from.
For now, you can select Save to File > choose the location > Next > select how much of the drive you wish to encrypt.
How Much Drive to Encrypt Using BitLocker and Which is the best Encryption Mode?
This is when you need to decide how much of your drive should be encrypted.
If you are using BitLocker to encrypt all data stored on the drive go with the “Encrypt entire drive.” This will encrypt all available data, including the one deleted but not removed from the drive. Whereas if the drive you are encrypting is new or the PC is new select “Encrypt used disk space only,” because BitLocker will keep on encrypting new data automatically.
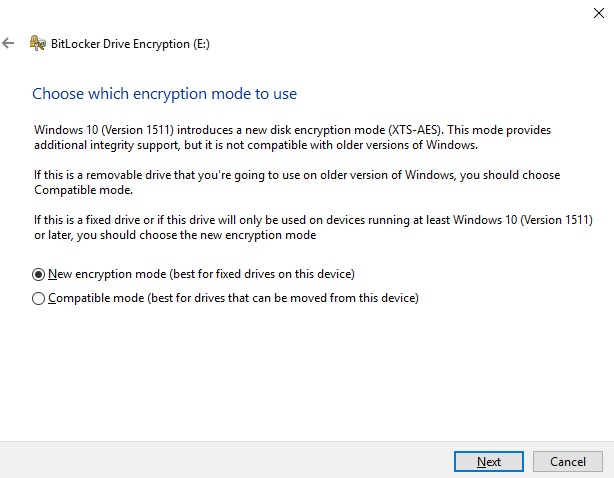
Now the last step, selecting encryption mode. Windows 10 has introduced a new disk encryption mode, known as XTS-AES. This mode provides additional integrity support but is not compatible with older Windows versions. If you are not going to use the drive on another machine, select “New encryption mode.” However, if you think you can use it with other machines select Compatible mode.
Click Next, to proceed.
Here, click on Start encrypting when you are ready and willing to use BitLocker.
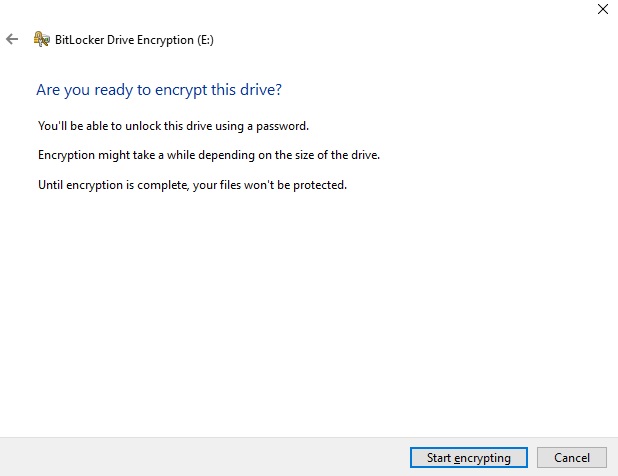
BitLocker will now start encrypting data, this process will take time-based on the data you are encrypting.
Reboot your device. Now when you try to access the encrypted drive, BitLocker will prompt you for the drive password.
So this was it using these simple steps you can encrypt your data using BitLocker on Windows 10
Now, as we said we will tell you how to use AES-256, here we are.
Using AES-256 with BitLocker
If you wish to make BitLocker much stronger use 256-AES encryption instead of 128-bit AES.
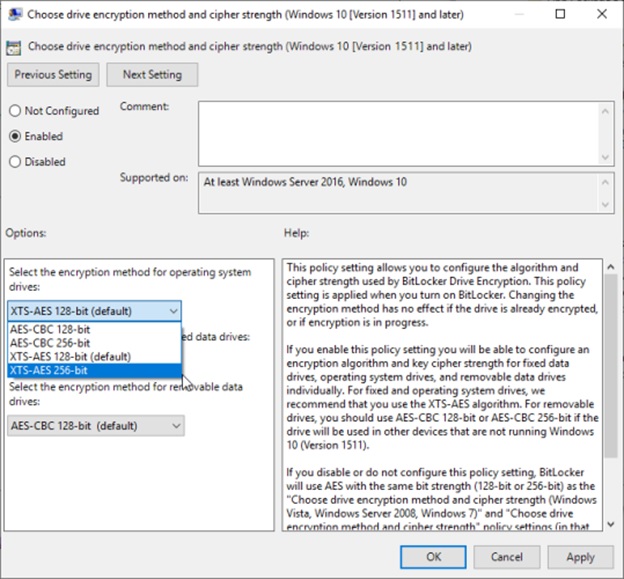
To do so type gpedit in the search bar > Open the Group Policy Editor.
Go to Computer Configuration > Administrative Templates > Windows Components > BitLocker Drive Encryption.
Here, select drive encryption method and cipher strength > Enabled.
From the dropdown box select XTS-AES 256-bit.
Click Apply > Ok.
You are now good to go.
BitLocker on Windows 10 is an amazing encryption tool that adds an additional layer of protection. This tool not only encrypts data but also make difficult for people to access data. BitLocker on Windows 10 is an advanced encryption tool.
Follow us:


Leave a Reply