According to a report published a few days back in a leading newspaper the consumption of Internet has drastically increased after the Corona Pandemic. Now since people are locked down they have all the time in their world to stream their favorite channels, connect to their friends through video calling apps or play online games with their friends.
But if in between suddenly your Mac lost the connection to the Wi-Fi network, you will be all tense as you know that getting a technician in such a situation is really a tough task. But believe us the problem of MacBook not connecting to Wi-Fi can be resolved by a few tweaks that we are going to discuss in the article below.
How To Fix Mac Not Connecting to Wi-Fi Network Issue
There can be several reasons for Mac not connecting to the Wi-Fi network. It can be due to a problem in the Router with which your Mac is connected, your Mac is not in the signal range, DNS issues and simply an issue at your service provider end. So whatever be the reasons in this article we will be trying to cover all possible resolutions.
Troubleshooting Mac Not Connecting to Wi-Fi Network Issue
First we will start with the basic and simple steps to check whether it resolves the problem. And then will slowly move to the technical aspect.
Make Sure Wi-Fi Is Turned On your Mac:
Before moving to any of the troubleshooting steps first rule out the possibility that Wi-Fi is turned off on your device itself. If it is turned off then use the Wi-Fi status icon on the menu bar to turn on Wi-Fi. If the Wi-Fi is already enabled then you can try disabling and enabling it again.
Restart your Mac:
One of the oldest tricks that still many at times fixes many common issues related to your Mac. Also this is not at all complicated therefore let’s give it a try.
Shutdown your Mac, wait for a few seconds and then restart your Mac as usual. Now try connecting your Mac to the Wi-Fi network again.
If the problem persists then head on to next step:
Restart your Modem:
Every electronic device now and then needs a restart. If it is a while your modem is continuously On then it is the time to restart it.
1. Power off your Router/Modem by disconnecting the power source.
2. Now wait for a minute and then plug in the power source again.
3. Wait for the network LED to lit and then try connecting your Mac again. Hope this has resolved the problem of Mac not connecting to the Wi-Fi. If the problem persists continue with the below listed steps.
Make Sure Your Mac Is In Network Range:
Every router has a specified network range. If any device is out of that range then it will not remain connected to the network. Therefore make sure your Mac is in the range of the wireless network. You can try moving close to the router to check whether it resolves the problem. You can also check our article on how to boost Wi-Fi signal.
Forget Your Wi-Fi Network
Many users facing this problem have claimed that forgetting the Wi-Fi network and joining again to that network helps them to get connected to the Wi-Fi network again.
1. Login to your Mac and click on the Apple Logo located in the top left corner of the screen. From the drop down menu select System Preferences option.
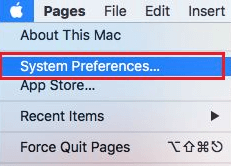
2. On the System Preferences screen that opens select the Network option.
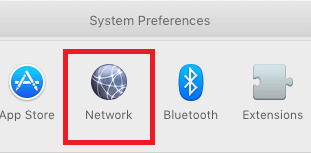
3. Now select the Wi-Fi option in the left pane and click on the Advanced button on the right pane.
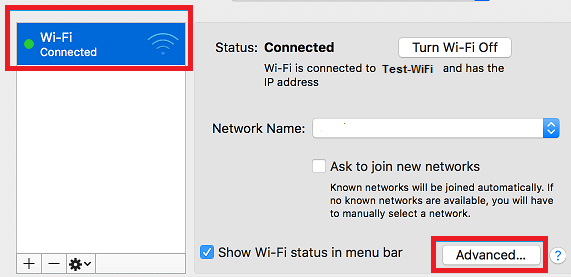
4. Click the Wi-Fi tab on the next screen, and click on the Wi-Fi Network that you wish to forget. Once selected click on the minus (-) sign.and click on OK to save the setting.
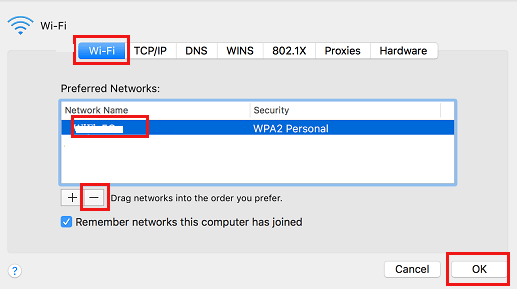
5. Now join the Wi-Fi network again by clicking on the Wi-Fi Icon at the top right corner of the screen. From the available Wi-Fi connection select the one to which you want to connect. Enter the password to connect.
Now check whether you are able to connect your Mac to the internet as before.
Renew DHCP Lease on your Mac
If power cycling the modem or router does not resolve the problem of Mac not connecting to Wi-Fi network then renewing DHCP lease is another common troubleshooting step to resolve network connectivity issues on Mac. This is also helpful when your Mac is connected to the
Wi-Fi but is still unable to connect to the internet.
1. Login to your Mac and click on the Apple Logo located in the top left corner of the screen. From the drop down menu select System Preferences option.

2. On the System Preferences screen that opens select the Network option.

3. Now select the Wi-Fi option in the left pane and click on the Advanced button on the right pane.

4. Click the TCP/IP tab on the next screen, and click on Renew DHCP Lease button.
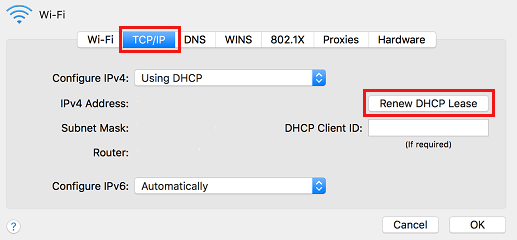
5. Next click on the OK button to save the settings.
Also read: Common MacBook Problems and How To Fix Them
Switch to Another DNS Servers
If your Mac keeps on facing connectivity issues then you may also try to switch to a openDNS DNSor Google DNS to check whether it fixes the issue. DNS servers provided by Google and OpenDNS are not only trustworthy but also are faster as compared to DNS servers of your ISP.
Contact Your Internet Service Provider:
If your Mac is connected to the Wi-Fi and showing no Internet connection. And the same problem is faced by other household devices while connecting to the Wi-Fi network then it means that the problem is at the end of your Internet Service Provider. Try connecting them for further support.
So guys hope this article has resolved the problem of Mac not connecting to Wi-Fi and that too without going out or consulting a technician. Do share it with your friends and family in case they are facing the same problem.
Read Next:
Tips To Manage Wireless Networks In Windows 10 through Command Prompt
All You Need To Know About Guest Wi-Fi Network


Leave a Reply