Are you currently facing issues in viewing the content on your system? Are the letters too small or too big for you for a smooth read? Don’t worry, you can anytime use the zoom in and zoom out feature on Mac to have a better reading experience. Behind a novice user, are you wondering how to make this happen? Well, we are here to help you out.
Zooming in or out makes it easier for the user to see the content on screen. Not only this, but macOS has both built-in as well as some external methods that help a user to zoom in and out on your content. Read this article further to know all the possible methods to zoom in and out on your Mac.

How To Zoom IN and OUT On A Mac
1. Zoom in on Mac using Keyboard Shortcut
Keyboard shortcuts are one of the most common ways to zoom in/zoom out on a Mac. This applies to every nook and corner of the Mac, no matter which app you are in. macOS is already well-versed with many predefined shortcuts to access zoom features. If you are a novice and have barely an idea about using these keyboard shortcuts. Here’s the know-how.
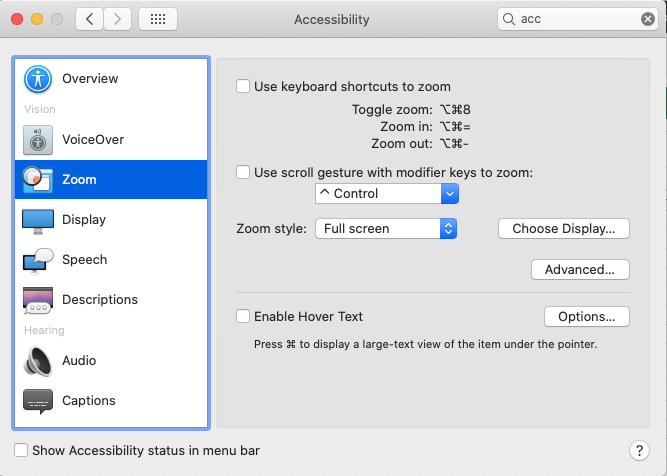
You first have to enable the option before using keys. To enable keyboard shortcuts, follow the steps below:
- Click on the Apple logo from the top-left corner and select System Preferences.
- Find Accessibility and click on it.
- Now, choose Zoom from the options menu.
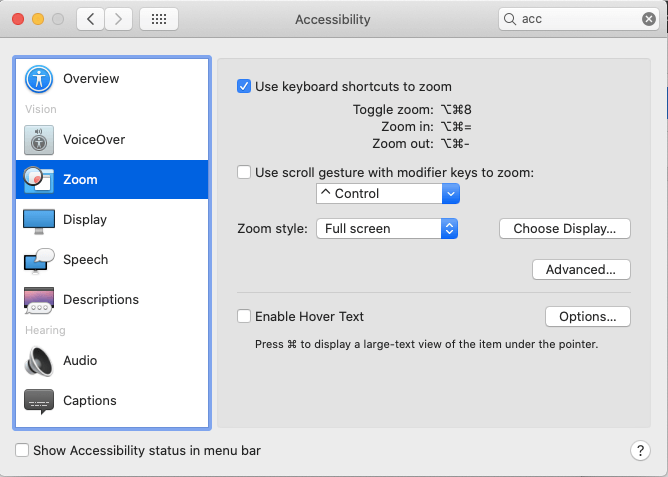
- Tick the checkbox, Use keyboard shortcuts to zoom.

Since now you have enabled keyboard shortcuts, you can now use the below listed shortcuts to Zoom in and out on your Mac.
| Keyboard Shortcuts | Outcomes |
|---|---|
| Option + Cmd + 8 | Zoom will activate. Press it again, to deactivate Zoom. |
| Option + Cmd + Equals | Use this to zoom in on your screen. |
| Option + Cmd + Minus | Use this to zoom out from your screen. |
That’s it!
2. Use Trackpad To Zoom In On Mac
Trackpad gestures is another way to Zoom in and out on your Mac. If you are happy using a trackpad most of the time, you will surely love this. While you follow this method, this adds a modifier key to your regular gestures. Later on you can hold down the key and draw a gesture to Zoom in or out on your screen.
Here’s how to enable this method:
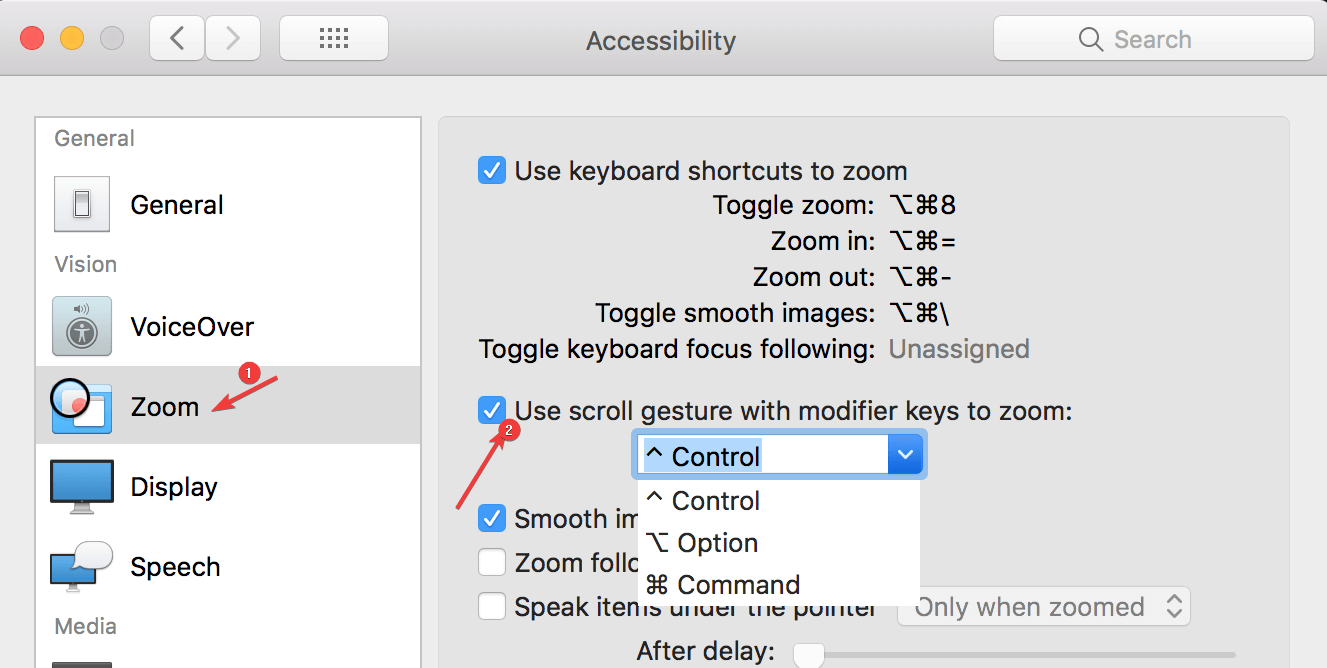
1. Head to System Preferences > Accessibility > Zoom on your Mac.
2. Tick the checkbox with Use scroll gesture with modifier keys to zoom.

3. Select the modifier key that you’d like to use to zoom in.
4. Press and hold the modifier key and scroll using your trackpad or mouse. With this you can zoom in the content on your screen.
5. To zoom out the content on your screen, reverse the direction.
3. Third Party App To Zoom In And Out On Mac
Yes, when it comes to zoom in and zoom out on a Mac, besides the built-in options, there are third party apps as well that can be used to zoom in/out the content on the screen. The default macOS offers a limited number of features as far as the zoom option is concerned. Therefore, installing an app for more options, zooming in or out more precisely, all can be done using third-party applications. What are these apps? The most used zoom in/out application for macOS is Zoom Me- Desktop Magnifier. You can get this free app on the Mac App Store easily. With this app you can customize the size of the lens. Furthermore, it offers you to customize the size of the lens so that you can view the larger area of the screen.
Wrapping Up:
This is all folks! Use these ways out if you are a novice Mac user and do not know much about its basic features. Check out this guide on how to use Mac and share your first-hand experience in the comments section below. Also tell us what is your favorite platform macOS or Windows 10.
We’d love to hear from you.
Keep reading Tweak Library for more similar content.
Recommended Readings:
Here’s How to Run Windows Programs on a Mac
Different Methods to Download Apps on MacBook
Mac Not Starting Up: Possible Fixes To Know!


Leave a Reply