When it comes to Android or iPhone we are quite familiar with the feature, “Find my Device”. However, do you guys know that this feature is not limited to iPhone/Android phone. As this feature is also available in Windows 10 to find your lost Windows 10 PC or Laptop. Seems interesting! So, without further ado, let’s find out how to setup Find My Device in Windows 10 operating system.
Must read: Personalize Your PC With The Best Windows 10 Themes
How to Setup Find My Device in Windows 10
This feature works for all desktop, laptops including tablets with Windows 10 installed. Once enabled, this feature determines the location of the device on the map. However, before setting up this feature there are few requirements that needs to be fulfilled:
Essential Requirement to set up Find my Device:
- Before enabling Find My Device user must need to sign in with Microsoft account along with administrative privileges. Please note that the feature cannot be enabled if you are logging with local user account like at workplace or school.
- Location tracking should be enabled on the device so that your system shares its location information with the servers of Microsoft. As per Microsoft, the feature will continue to work for the administrator, no matter other users have denied the location access to their apps. This helps to track down the last known location of your device, in case it is powered off or not connected to a network.
Enable Find My Device in Windows 10
If all the above prerequisites are fulfilled, then we can easily enable this feature by following the steps listed below:
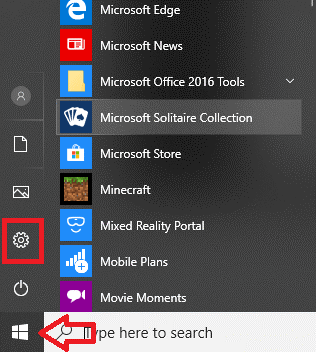
- Click on Windows Start button and select Settings Icon.
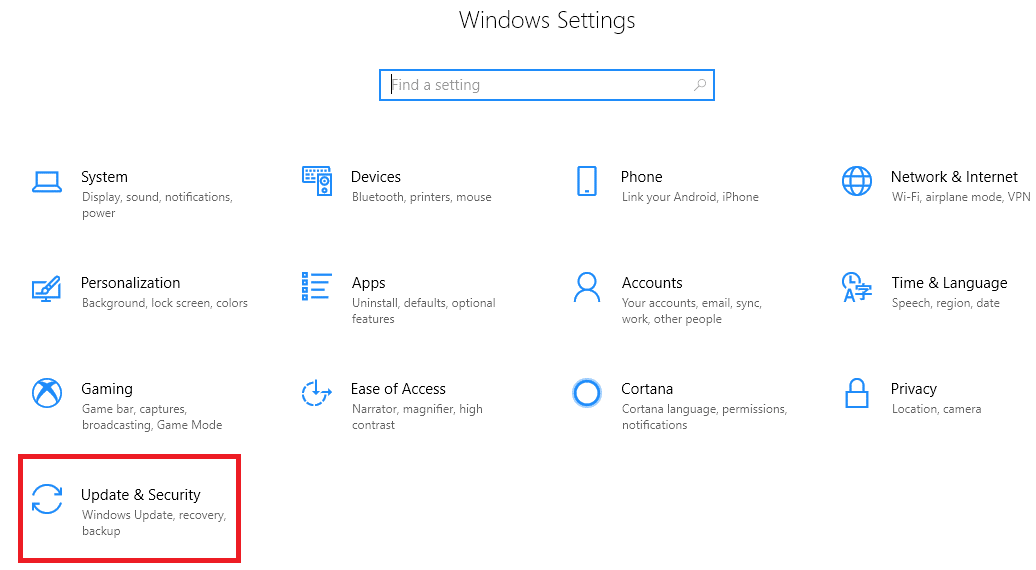
2. On the Settings window click on Update & Security option.
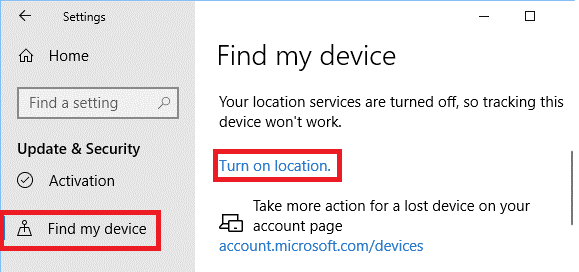
3. On the next window that open, click on Find My Device option located in the left panel. Now in the right panel click on Change button.

4. If the button is greyed out, then you need to click on Turn on location followed by enabling location settings.
5. Once done, the Change button will enable. Now click on it and in the pop-up that prompts turn on Save my device’s location periodically option.
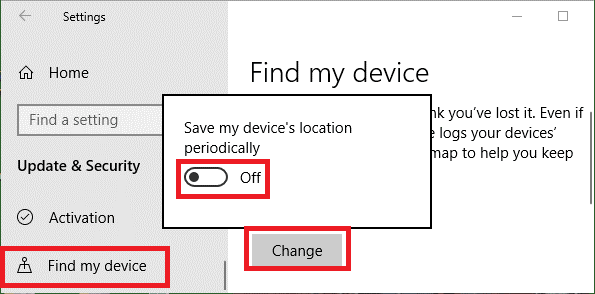
From now onwards your computer will periodically share its current location to Microsoft servers. This in turn, will help you track the last location of your laptop when required, regardless it is connected to active internet connection or not.
How to Track Location of Lost Laptop using Find My Device
In one of the most unfortunate conditions when your laptop is lost or stolen Find my device will help you to locate or track its current location. To track location of your lost laptop you need to follow the below steps:
- On any computer visit the link https://account.microsoft.com/account/windows.
- Now, provide your username and password to sign-into your Microsoft account.
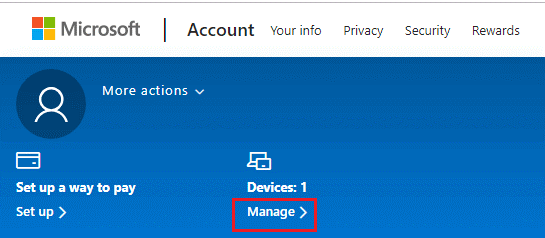
- After signing in, click on Manage option located below Devices.
4. On the next window that opens click on Find my device. This will display the current location of your device on map. Area, city, country and the time of last seen will also be displayed.
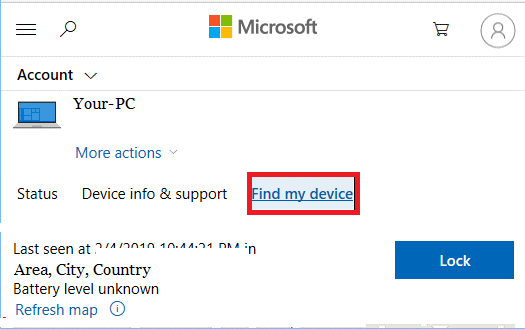
5. If your device is stolen and you wish to remotely lock it to safeguard your data, you can do this by clicking on Lock button. However, this will only be possible if your device is connected to the Internet.
6. If you have lost your device, then you can also create a customized lock screen message providing the instruction regarding the return of the device.
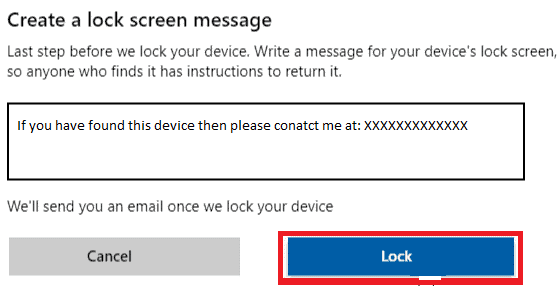
7. Now after writing the message click on Lock button to remotely lock your device.
Now no one will get access to your device unless he provides your Microsoft account password.
Also Read: How to Optimize Windows 10 PC for Best Performance
So, guys, this is how you can safeguard your personal stuff in case your laptop is lost or stolen. However, to get the exact current location and remotely locking of the device can only be possible if it is switched on and connected to the Internet and using GPS.


Leave a Reply