
Smartphone issues are some of the most aggravating problems these days. Those errors could be intrusive and solutions aren’t always easy to come by. At that moment, we end up with two alternatives, i.e. either buy a new cell phone or get the existing one repaired. But before you spend your hard-earned money check if these issues can be easily fixed with a quick troubleshooting or a hardware test.
Quick hardware tests can be performed using diagnostic codes on your Android that help users to find internal issues of a phone, so that one can take further actions to rectify common smartphone errors.

What Exactly Are Diagnostics Codes?
Diagnostics codes are the set of secret codes that can help users to get a closer look at the inner functionalities of a phone.
You might remember, whenever you go to a mobile repair shop, the first thing they do is enter a code with “#” symbol with some numbers & symbols. They are known as diagnostics codes that helps them to detect the exact problem.
So, if you wish to perform a diagnostic test on your own and discover what exactly the issue with your device is. Here we are to show you how to perform it and make your phone run as smoothly as possible.
Also Read : How to Switch from Android to iPhone
How To Run Diagnostics Tests On Android?
Method 1 – Manually Through Built-In Diagnostics Tools
This may sound a bit matrix, but several Android phones come with hidden built-in diagnostics tools, that can simply be discovered by entering a few codes into the phone’s dialer app.
To find those secret tools on your OS:
- Launch your phone’s dialer app.
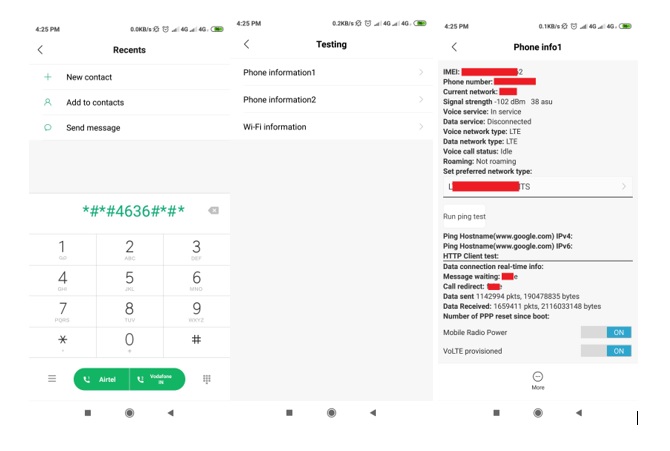
- There are two main codes that are mostly used on Android devices: *#0*# and *#*#4636#*#*. Codes may vary from device to device.
- The first code would offer a bunch of standalone tests that can be performed to check performance of your phone’s screen display, cameras, sensor & volumes/power button.
- The second code would showcase a list of information, related to current service carrier, IMEI number, phone number, app usage history, data network connection stats, Wi-Fi status etc.
As said before, these codes may differ from device to device, so if nothing happens when you execute these codes, then it means your phone doesn’t have the feature. Moreover, there can be a probability that your device doesn’t provide these set of helpful information by hitting random codes. In that case, try the next method to find out those diagnostics tools.
Method 2- Using A Third-Party Android Hardware Checking App
We’re using Phone Check (and Test) app to test internal hardware information. This app functions to give you a complete rundown of hardware specifics, along with a complex list of hardware check options.
With Phone Check, you can detect issues like:
– Wi-Fi & Radio
– Audio tests for microphones, speakers, volume buttons
– GPS tracking
– Memory, CPU storage stress checks
– Battery & charging socket test
– Low memory checks & improvement tips
– Thermal stress
And a lot more. Besides this information and check tests, the app also offers a Guided Test feature that runs a series of complete phone check-up. So, that you have complete information about your smartphone and you can take additional steps to fix it.
Read Also : Best Call Recording Apps For Android 2019
That’s All!
So, next time you face some problem with your smartphone, do not forget to run a diagnostics hardware test to detect what exactly the issue is.
Give Your Smartphone A Diagnostics Test Today For Best User Experience!


Leave a Reply