Has it ever happened that after you shut down your computer last night only to restart it in the morning and find that your headphones are not working on your laptop? No worries, it does not mean that you must buy a set of new ones. There are a few steps using which you can resolve the issue. These steps are as simple as placing the headphone jack or a bit complicated as updating your drivers and tweaking the sound settings on your PC.
Steps to Fix Headphones Not Working On PC
There are many reasons as to why the headphones are not working on your PC. Some issues can be fixed in short simple steps while others might require complex troubleshooting. The simplest ones are:
- Check the Audio Jack in the computer: Your laptop has more than one 3.5 mm audio jacks, one for mic and the other for speakers. One of them is input jack and plugging your head phone into them will not give you any output. Check if you have connected the headphones in the right jack and check for the sound. Also check with another set of headphones to determine if the headphone jack is working or not.
- Check the volume controls in the computer: It does happen that the sound output from your computer might be muted. Check the volume controls and increase it to maximum to check if you hear any audio at all. Also remove the headphone jack from the computer and check if the sound is audible on your laptop’s speaker.

- Check in another device. Try to check your headphones by connecting it with another device, another laptop or your mobile phone. If you don’t hear any sound, then probably it’s time to buy new headphones. But if the headphones are audible with another device, then it’s time to move towards more complex troubleshooting steps.
- Clean your Headphone Jack. Take a small cotton swab and insert it in the headphone jack in your computer. Swirl it around gently to remove the dust particles and pull it with extreme caution.
The complex steps which require tweaking the computer’s settings are listed below:
1. Check if the headphones are enabled on your computer and set as default
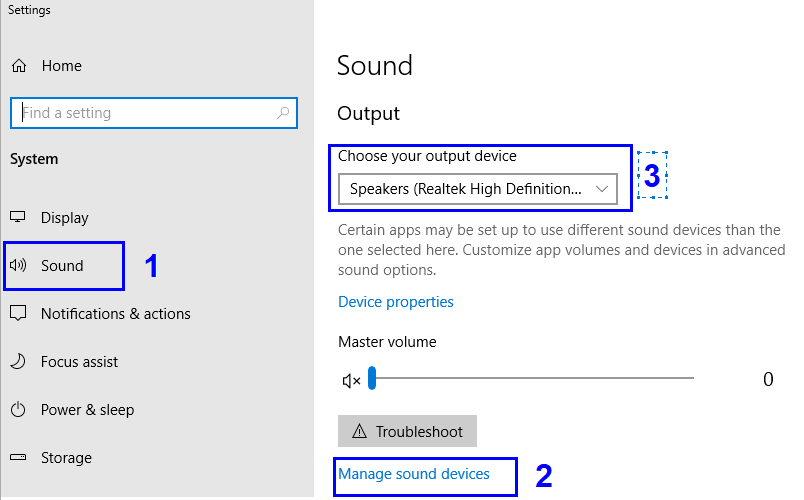
Step 1. Right Click on the Sound Icon in the notification section of the task bar and choose ‘Open Sound Settings’.
Step 2. Click on ‘Manage Sound Devices’ and check if the headphones are mentioned under disabled list. If so, then click them and click on enable.

Step 3. On the main Sound settings screen, click “Choose your Output device” and select your headphones from the list. This will make it default option for sound to flow out of your computer.
2. Check the Drivers
Another way of resolving the headphones issue is to check the drivers, as it possible that the headphone jack is not working. This can be easily resolved by opening the ‘Device Manger’ which is the store house of information on all hardware connected to your system.
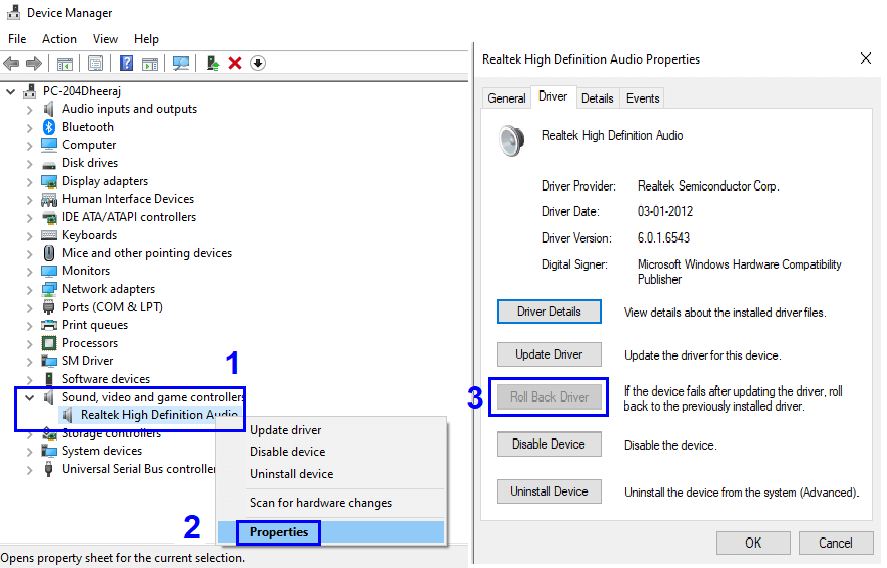
Step 1. Open Device Manager by typing it in the search box on the bottom right of your screen.
Step 2. From the list of Hardware, double-click on ‘Sound, video and game controllers’ and click on the driver name under that.
Step 3. Right-click on the selected driver and choose ‘Update Driver’. Windows would automatically search for the latest version and install it.
Step 4. You can also toggle the driver on and off by clicking on disable driver and enabling it after a few seconds.
Step 5. The final step involved with drivers is to roll back the current version. You can always do the step 3 again to update the driver to the latest version. To roll back the driver, right-click on the driver and from the small menu list, choose Properties. In the new window, choose the ‘Driver tab’ and click on ‘Roll Back Driver’.

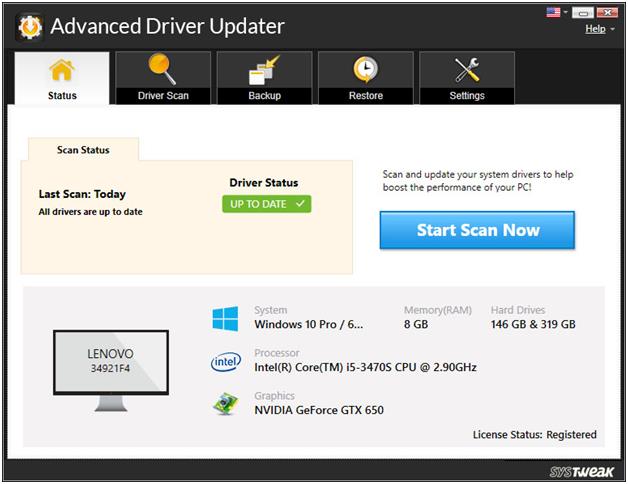
Drivers are one of the major causes for your headphones not working on laptop. Although Windows can quite efficiently update the drivers through updates, but it takes time before Microsoft retests the drivers from the OEM website and then releases it to its users. I use a software to check for the updates on a weekly basis and update them without hassle free. You can always try:
Advanced Driver Updater. To know more, click here.

To download, click here. Download Button.
3. Check the Default Format of the headphones.
There is another option which can be checked for headphones not working on your Windows 10. Access the Sound Properties of your computer. To do so:
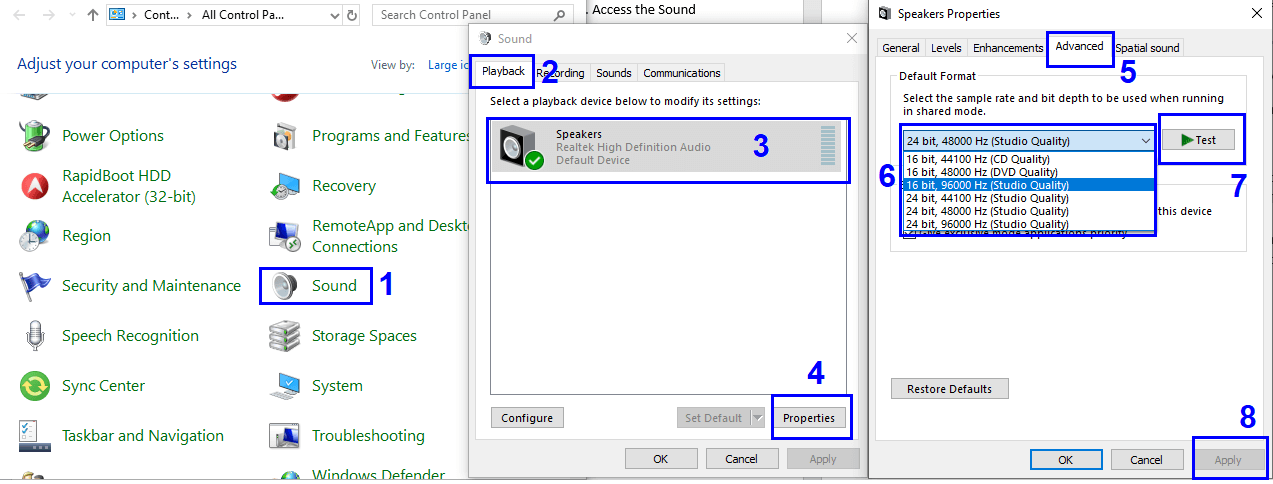
Step 1. Type” Control Panel” in the search box of the on the bottom right of your screen and open the Control Panel Window. Click on ‘Sound’ from various setting options listed.
Step 2. In the Sound Properties window, click on the Playback tab and select your Headphones icon (they may be listed as Speakers only).
Step 3. Click on Properties and move to the Advance tab.
Step 4. Change the Default Format from the drop-down list and click on test after every change. Select the one which enables you to hear the sound and click on Apply.

4. Check for IDT Device.
If your computer has an IDT audio device program installed, then you have to uninstall it, IDT audio device does tend to create issues with sound driver of your system. To uninstall, follow the following steps:
Step 1. Type” Control Panel” in the search box of the on the bottom right of your screen and open the Control Panel Window. Click on Program and features.
Step 2. Locate IDT Audio Driver from the list of applications installed on your system and click it.
Step 3. Click on Uninstall on the top and it will be removed.
Step 4. Restart your computer and check your headphones.
These are the steps that should be carried out to troubleshoot your headphone not working on your PC. You can always begin with simple steps and then follow the others. The best way to test any headphone is to plug it in other device like your mobile and test it. If you are not able to solve your headphone issue by following all these steps, then do mention in the comments sections with the result of all the steps you have taken, and my team would try to find.
See the video below and fix the issue of headphones not working:


Leave a Reply