
Are you a Windows user and switching over to another Windows 10 PC? If yes, this article is for all those users who are looking for the ways to transfer their user profile between PCs. Earlier, Microsoft used to have a built-in tool called, Easy Transfer that has made it easier and convenient to move user accounts from one computer to another. Since now, Easy Transfer has been removed, there are other options like Transwiz and PCmover that help you do the needful.
Windows Easy Transfer
In the earlier versions of Windows, Microsoft introduced Windows Easy Transfer, a tool that gives you a free option to bring up local user profiles and your settings from one computer to another. The process was so quick and easy that switching computers was not a big deal. Unfortunately Microsoft discontinued Windows Easy Transfer with Windows 10. It started with Windows Vista and supported Windows 7, 8, and 8.1. Thereafter, Microsoft tied up with LapLink to provide its users with a free access to PCmover. Unfortunately, this too didn’t work out.
To migrate from one (older) Windows PC to another, you will have to use tools like PCmover and for this you have to spend at least $30 now.
Best Ways To Move User Profile to Another Windows 10 PC
While we look for ways to migrate user profiles from one PC to another, here are some of the tried and tested ways to opt while transferring user profiles to another Windows 10 PC. The methods to be discussed includes:
- By converting your local microsoft account.
- Using a free tool like TransWiz.
- Using PCmover- the most powerful and reliable option.
Method 1: Use a Microsoft Account and Transfer Files
Are you a Windows user with Windows Windows 8.1 or Windows 10 version? You can directly sign in into Microsoft account. This method is helpful if you are using a local account on Windows instead of a Microsoft account. You can try to convert it to a Microsoft account. OneDrive and device encryption like features would work with a Microsoft account only. Therefore, ensure that you have one. Just by converting into a Microsoft account, you can not transfer your user profile to another computer. At some point you need to manually transfer a few important files and reinstall programs using an external hard drive.
The process of transferring a user profile becomes easy if you own a Microsoft account. To start with the process of migrating user profiles on another Windows computer, you must have a Microsoft account. This will help you migrate the same Windows settings and get the Cloud sync going. Here’s how to do this:
- Open Settings (or Win+I) from the Start menu.
- Go to the Accounts tab.
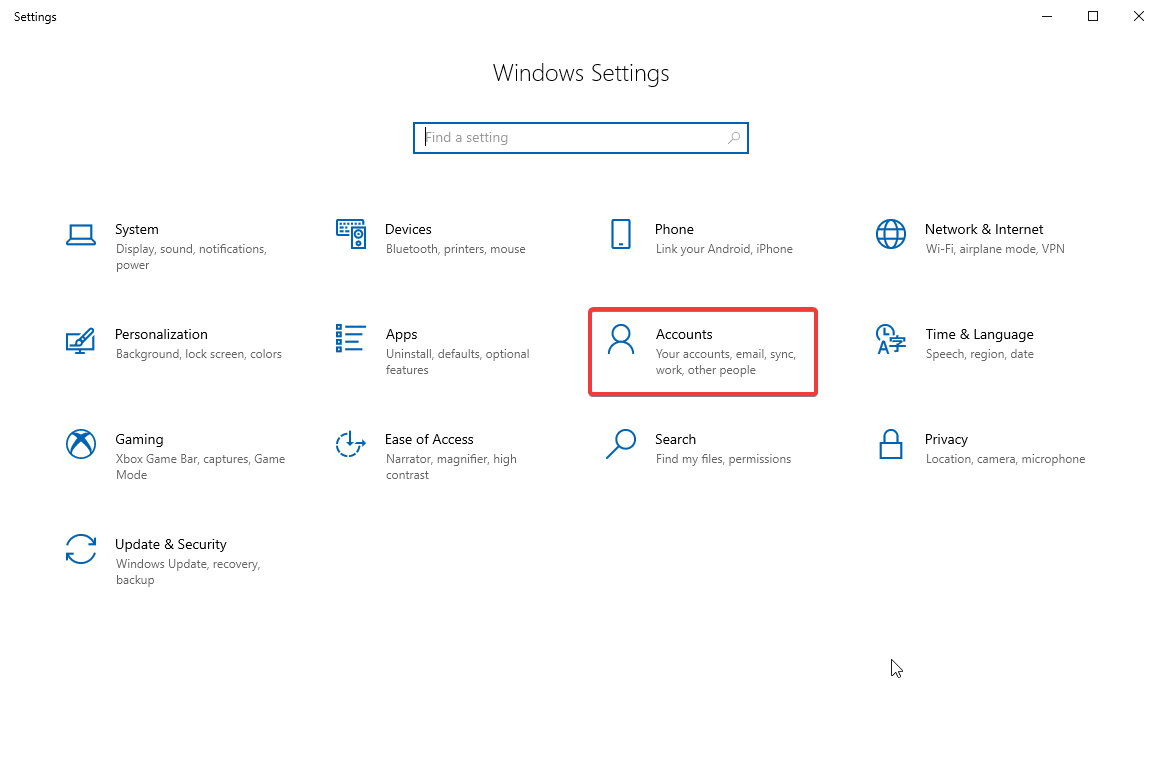
- Click on Sign-in with a Microsoft account.
- Follow the setup wizard and onscreen instructions.
Afterwards, you’ll have to manually transfer user data using the Windows 10 File History tool. After connecting a hard drive go to Settings > Update & Security > Backup. Select add a drive, then your external hard drive.
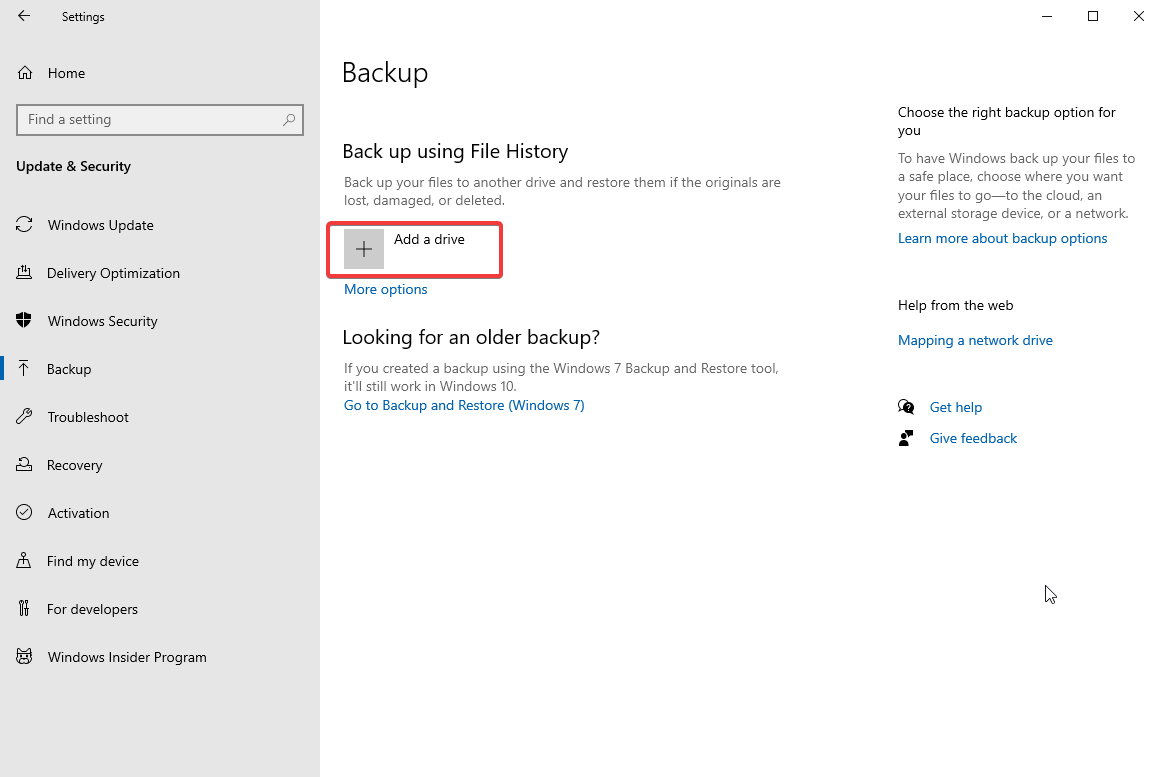
When you add an external drive, your Windows will process backup automatically. The default Windows settings backup Desktop, Downloads, Documents, Pictures, Music, Videos folders. You can also backup additional folders by clicking on More Options. Choose the folder you want to add.
Now, simply take your external drive to your new computer and plug it in. Thereafter, go back to Settings > Update & Security > Backup, and setup file history again using the external drive.
Click on More Options, and choose ‘restore files from a current backup’.
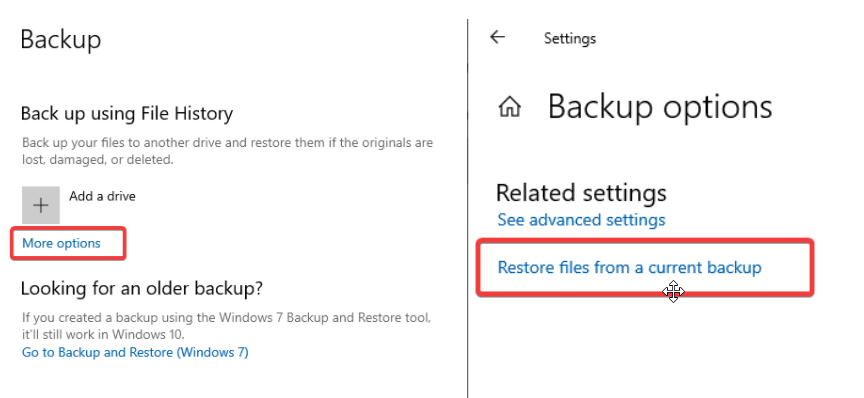
Choose the most recent backup file and restore them to your new computer. You’ll see a file history restore dialog box showing the folders that have been saved.
Method 2: Download TransWiz (Free)
Transwiz is an amazing tool that is free to use and helps you quickly transfer one or two local accounts without converting to a Microsoft account. While you use this tool for transferring a user profile, you have to somehow move things manually to your new Windows 10 PC to process the things you’ll need an external hard drive too.
To start migrating a user profile from one PC to another, download and install Transwiz on both the old and new machine. The program is entirely free to use.
If you have one profile, create another using admin rights or in case you have more profiles, ensure that you have at least two profiles with admin rights. While you need to transfer a user profile to new Windows 10 PC, ensure that you aren’t signed in with the similar account. TransWiz cannot transfer a user profile when you are currently signed into it. Here’s how to do this:
- Start Transwiz and select ‘I want to transfer data to another computer’.
- Click on Next and choose the profile you want to switch and again click Next.
- Now, choose your external drive as the destination to save files. Click on Next.
- Enter a password if you want one. If you don’t want to password protect, leave both the fields blank and click OK.
This way, Transwiz will create a .zip file on your external drive. Now, plug in your external drive to your new machine. Now, open Transwiz there, and choose the restore data option. Take your pointer to the .zip file, TransWiz will unzip the file. Restart your machine to finish adding the profile. Transwiz just brings over user profiles, but not any data.
Note: If you want your data including all your files and folders, use the file history process described in method 1. Reinstall programs to complete the process.
Method 3: Buy PCmover To Transfer User Profile To New Windows 10
If you are looking for ways that can not only transfer your user profile to a new computer, but also the data therein, you can use PCmover. This amazing tool will not only migrate user profile to new Windows 10 but also transfer files and data as well. If you look for more expensive tool, it might help you transfer applications as well. to start using PC mover, firstly download and pay for it. If you need to transfer all users and applications, we will recommend you to choose Express version that costs for $30. This program by Lap Link transfers data over the network and speed up the process of transferring data from one PC to another. Here’s how to use PC mover to transfer user profiles and data on a new Windows 10 computer:
- Install PC mover on both the PCs.
- Open and click through the Next buttons.
- Further, provide the serial number. Also connect the transfer cable to both computers if you have any. In case you have transfer cable, you get two options i.e. network connection and cable connection.
- Select any of these as per availability. On both the PCs, choose the other PC to connect.
- Click OK to continue.
- The PC mover will auto-detect the direction to move data, in case it goes wrong, click on the Switch Transfer Direction.
- On the new PC, click Analyze PC.
That’s it! Depending on the amount of data, you’ll have to wait for a while and whoa! your data has been scanned to be transferred to the new PC. click on View details and choose what to transfer and what not. Once sorted, click on Start Transfer.
When PC mover finishes the process, restart your computer. Once it restarts, you’re done.
Wrapping Up
That’s all folks! With this guide, we have made Transferring user profile easy and convenient for both novice and pro users. you can choose from any of these ways and get your work done quickly in no time. All the methods explained above are tried and tested. check them out and share your views with us in the comments section below.
For more similar guides, keep reading Tweak Library.


Jackie
The first method seems very easy as so does the others. Thanks for explaining the transferring user profile so efficiently.