Variety of devices like mouse, keyboard, flash drives, portable hard drives, cameras and printers are connected to our PC. Most of which are USB. Sometimes you face problems while accessing USB on Windows 10 due to which different interrelated problem occur. Therefore, today we’re going to show you how to fix USB not working on Windows 10 that results into other common problems.
List of problems that may occur if USB is not working on Windows 10.
Also Read: How To Disable USB Ports In Windows 7 & 10
Common Windows 10 USB Problems
- USB, mouse keyboard not working on Windows 10
- USB port not working on Windows 10
- USB not working Windows code 43
- USB not working when plugged in
- USB not working, Toshiba, Samsung, Dell, Lenovo
- USB not accessible
- USB not initialized
- USB not opening files
- USB is not yet available
- USB not recognized, detected, showing up
- USB not opening, not responding
- USB not transferring
- USB not reading
First think that you should do when you face USB not working problem on Windows 10 is to try connecting your USB to another port. This is done to determine if the problem is with USB port or the device. If the problem persists, try connecting a USB device to another PC. If the issue isn’t resolved, then too then there might be some issue with the USB device.
To Fix USB not working problem try following solutions:
Solution 1: Reinstall Device Driver on Windows 10
Reinstall Device Drivers: You can reinstall device driver either manually or automatically.
To reinstall USB device driver manually, follow the steps below:
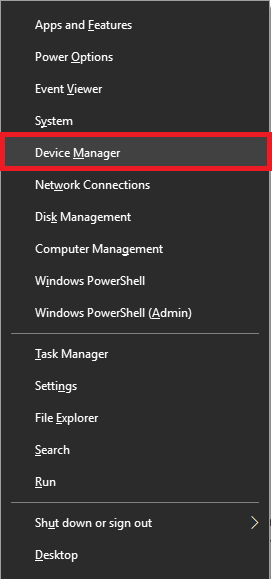
1. Press Windows key + X and select Device Manager from the menu.
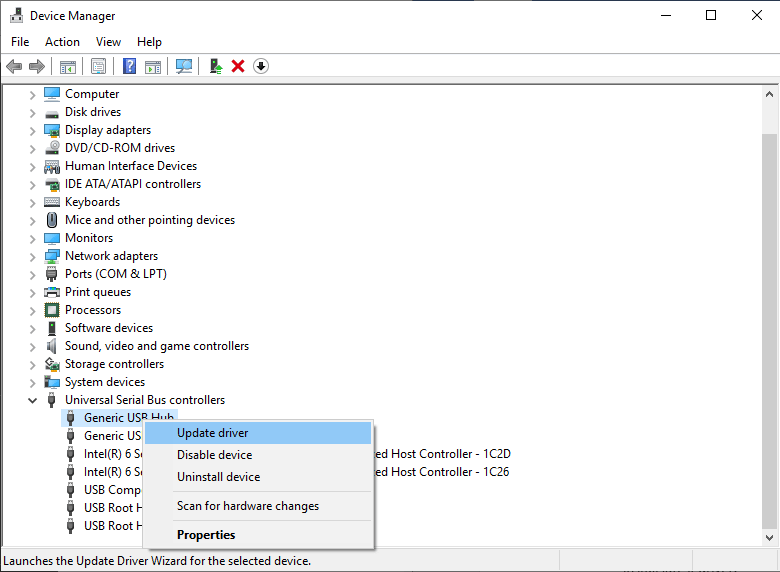
2. Here under Device Manager window look for (USB) Universal Serial Bus Controllers, right click on it.
3. Now, from the context menu, select Update driver, and follow on screen instructions to install latest driver.
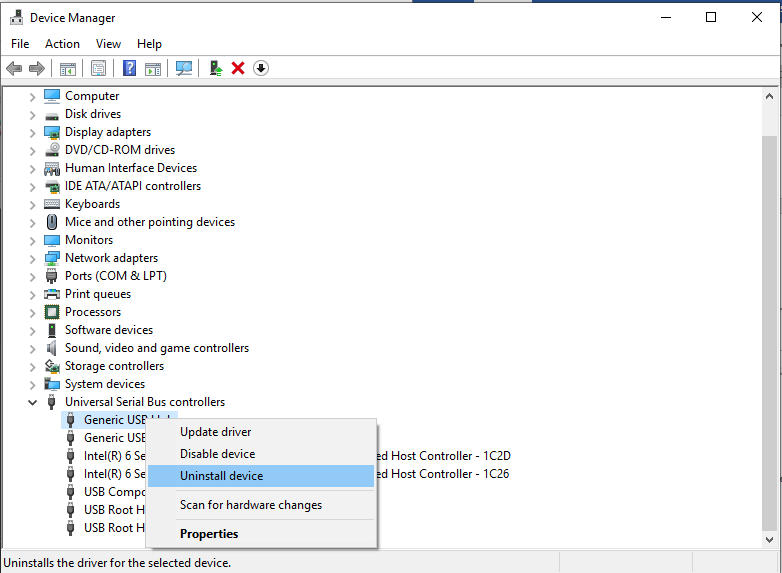
If this method doesn’t work, instead of selecting Update driver, choose Uninstall device. Once you do, so re attach the device to install the driver and see if it works.
Tip: Restart your Windows machine to bring driver changes into effect.
If you find the above-mentioned steps time consuming, difficult or they don’t work. Try updating USB device driver automatically on Windows 10. For this you can try using Systweak’s Advanced Driver Updater. This tool is compatible with Windows 10, thoroughly tested, virus, adware, malware free. To install latest USB device driver using Advanced Driver Updater follow the steps below:
Steps to install latest device driver using Advanced Driver Updater on Windows 10
1. Download and install Advanced Driver Updater.
Once installed, Advanced Driver Updater will start scanning your Windows 10 to identify outdated drivers. Advanced Driver Updater will check for missing driver and installed driver version against the device connected and its database stored on cloud. This is done to install compatible and latest device driver on your Windows 10 machine. All you need to do is let the scan finish.
Read Further: Best Free Driver Updater Software For Windows 10,8,7
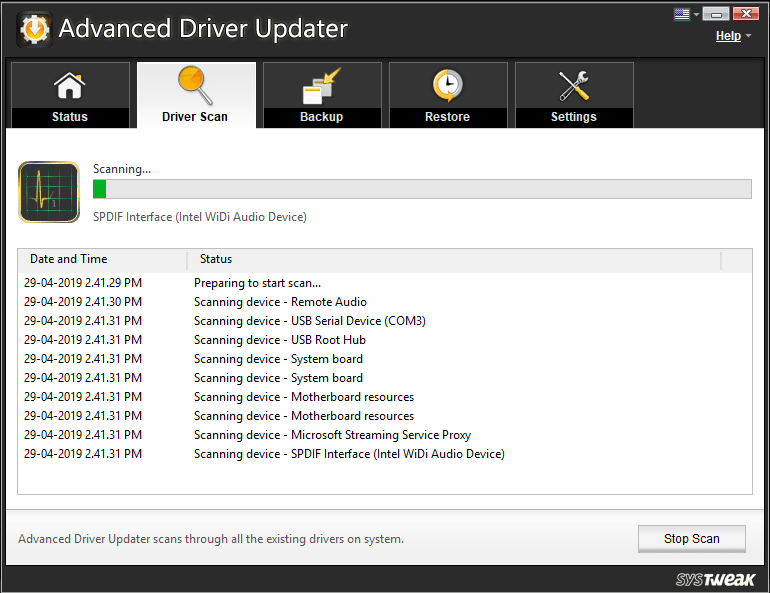
2. On scan completion, you’ll see a list of all the outdated drivers on your Windows 10 PC. Analyze the list and see which driver you wish to update. To update driver individually, click on OUTDATED next to the driver name. However, if you wish to update all the outdated drivers click on Update ALL.
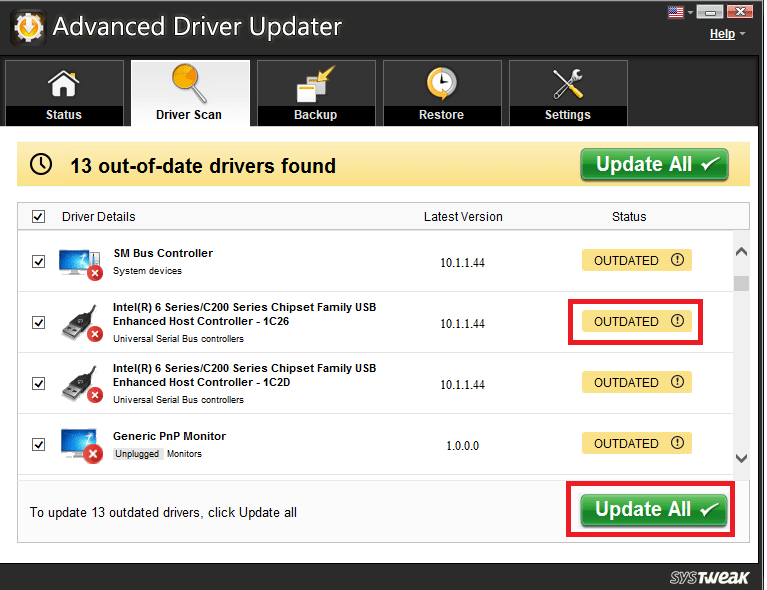
Note: There might be certain drivers that may not get installed at once. Therefore, you’ll need to hit OUTDATED or Update ALL multiple times. Remember to restart the system after updating the driver.
Download Advanced Driver Updater Here
Disclaimer: Trial version of this tool is limited functionality.
Solution 2: Alter Power Management settings for USB Controller
If USB isn’t working on Windows 10 then you can try changing Power Management settings on Windows 10 for USB Controller. To do so follow the steps below.
Steps to change Power Management settings on Windows 10 for USB Controller:
1. Press Windows Key + X together and from the context menu select Device Manager.
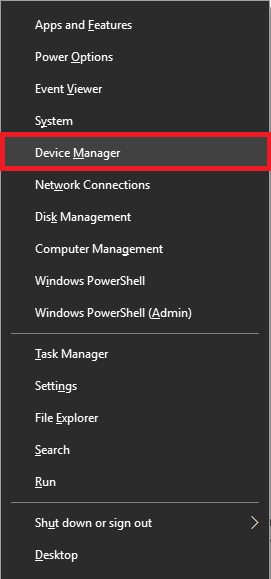
2. Here under Device Manager window look for (USB) Universal Serial Bus Controllers. Double click on it.
3. Next click on Power Management tab under Generic USB Hub Properties. Here, if “Allow the computer to turn off this device to save power,” is checked uncheck it and click on OK, to Apply changes.
4. Repeat these steps for all the USB device driver under Universal Serial Bus Controllers.
5. Restart your Windows 10 PC and see if the problem is fixed.
Solution 3: Make changes to Windows Registry
By making a few changes in Windows registry you can fix Windows 10 USB not working problem. To modify registry, follow the steps below:
1. Open Run window by pressing Windows key + R.
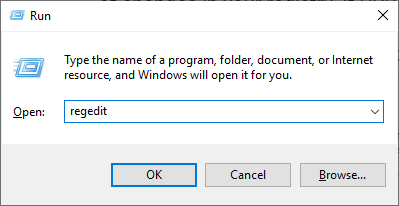
2. Next enter regedit in the Run window and press Enter.
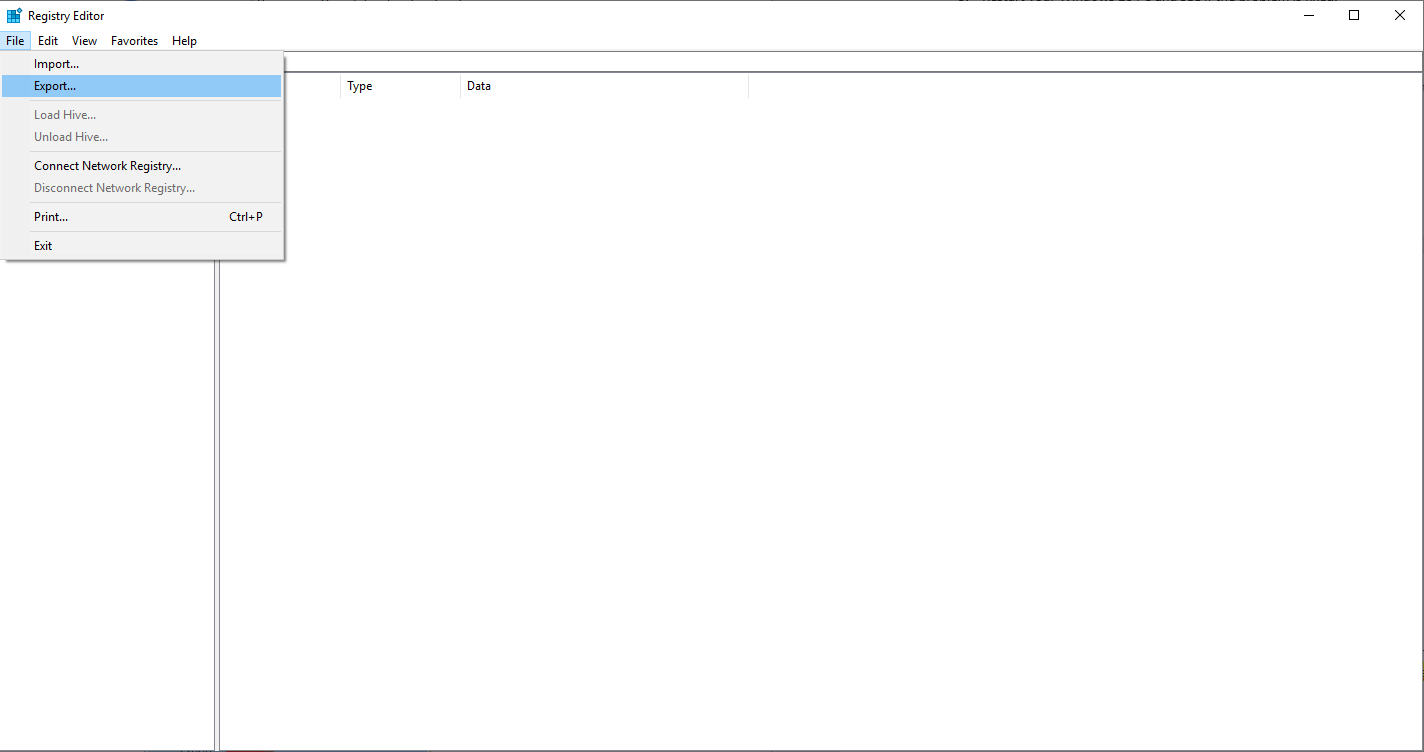
Tip: As making changes to the Windows registry is not recommended we recommend taking backup of Windows by clicking on File > Export. Here under Export window set Export range to All, chose a location where you want to export the backup, click Save.
If you find it difficult you can try using Advanced PC Cleanup and take full backup of your Windows registry. To use this tool for registry backup download it by clicking the button below:
Download Advanced PC Cleanup Here
Once downloaded, launch Advanced PC Cleanup > click the three stacked line present in the top left corner > Settings > Backup & Restore > Take a Full Backup.
This backup will help restore registry if anything goes wrong.
Additional Tip: Using Advanced PC Cleanup you can clean junk files, virus, temporary files, uninstall unwanted apps and do a lot more. This will help tuneup system and optimize it for better performance. To know more about this read the comprehensive review of Advanced PC Cleanup
3. After taking complete backup of Windows registry navigate to HKEY_LOCAL_MACHINESYSTEMCurrentControlSetControlClass{4d36e965-xxxx-xxxx-xxx-xxxxxxxxxxxxx}. The registry key will differ from machine to machine, but it will start with 4d36e965. This will help you in locating the key.
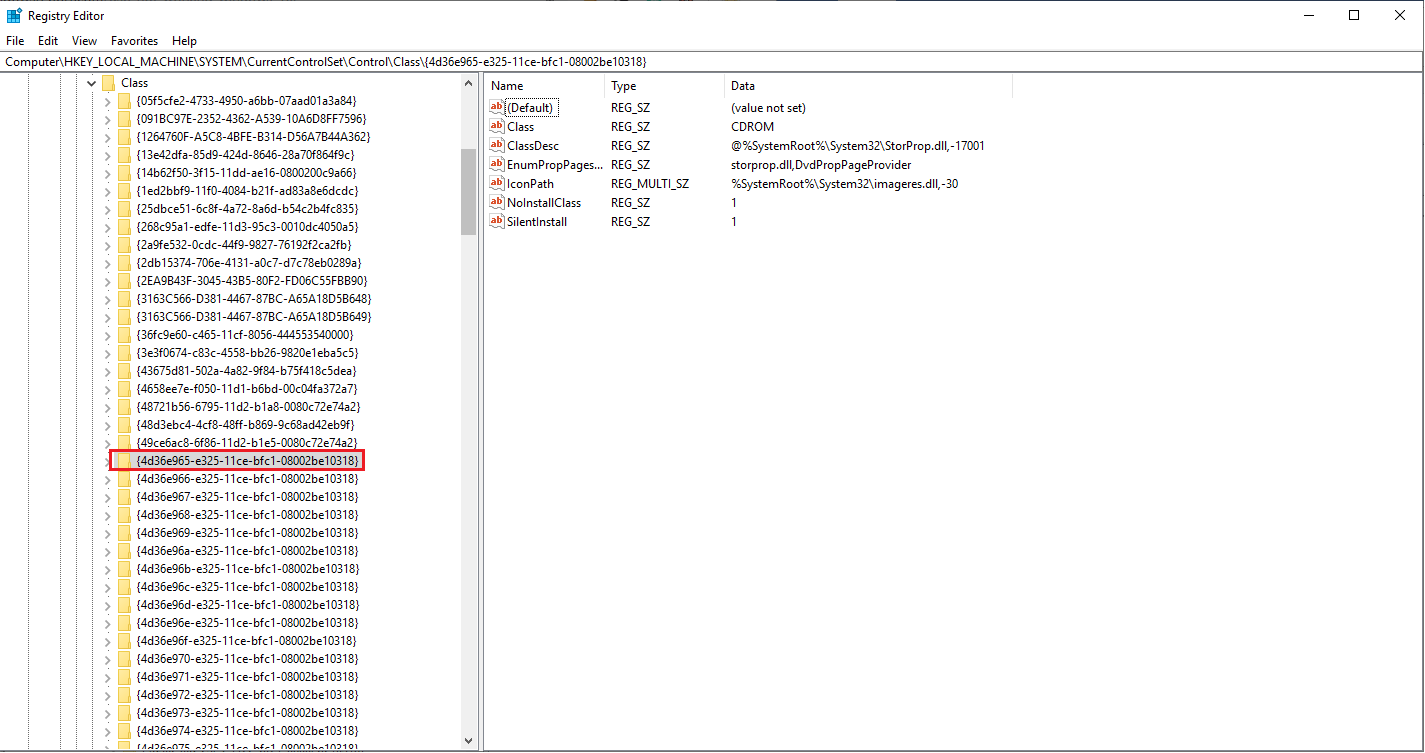
4. Next, in right pane look for entries named UpperFilter and LowerFilters delete them. If you cannot see them switch to next solution as this one won’t work for you.
5. However, if you find these entries after deleting them restart your PC.
After your Windows 10 PC is restarted check if USB device not working problem is solved or not.
Solution 4: Update USB Root Hub drivers
If the problem persists, try updating USB Root Hub Driver to solve Windows 10 USB problem. To do so follow the steps below.
Steps to update USB Root Hub driver on Windows 10
1. Press Windows key + X and select Device Manager from the menu.
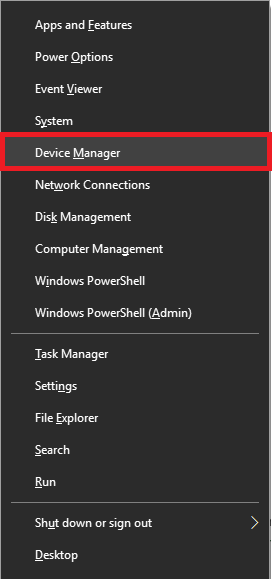
2. Here under Device Manager window look for (USB) Universal Serial Bus Controllers. Double click on it to expand (USB) Universal Serial Bus Controllers.
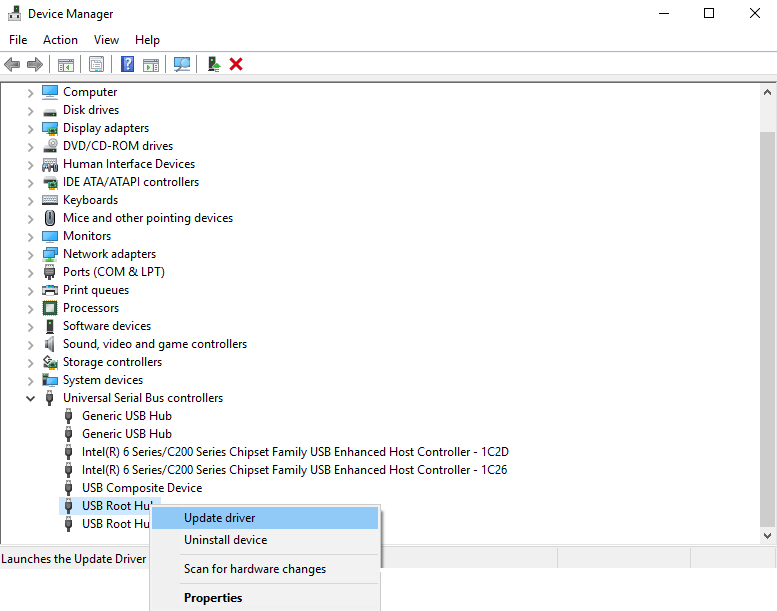
3. Now, look for USB Root Hub. Right click on it and from the context menu select Update driver.
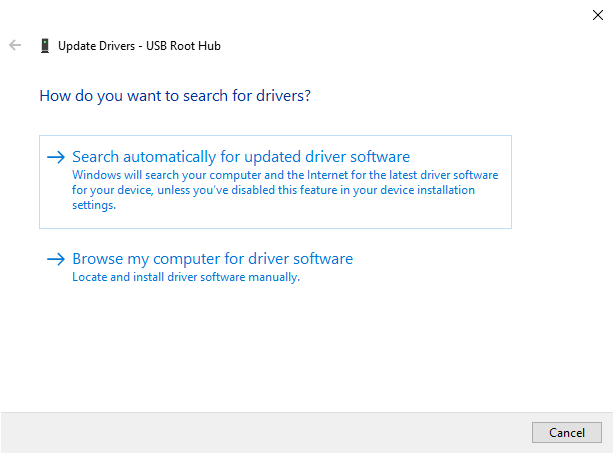
4. You’ll now see a window with two options to search for driver. Select “Search automatically for update driver software” and follow the on-screen instructions.
5. Follow the same steps and update all USB Root Hub device driver.
Once done, check your USB should be working without any issues on Windows 10.
Solution 5: Install Windows updates
By installing necessary Windows updates, you can solve USB not working on Windows 10 errors. To install Windows update, follow the steps below:
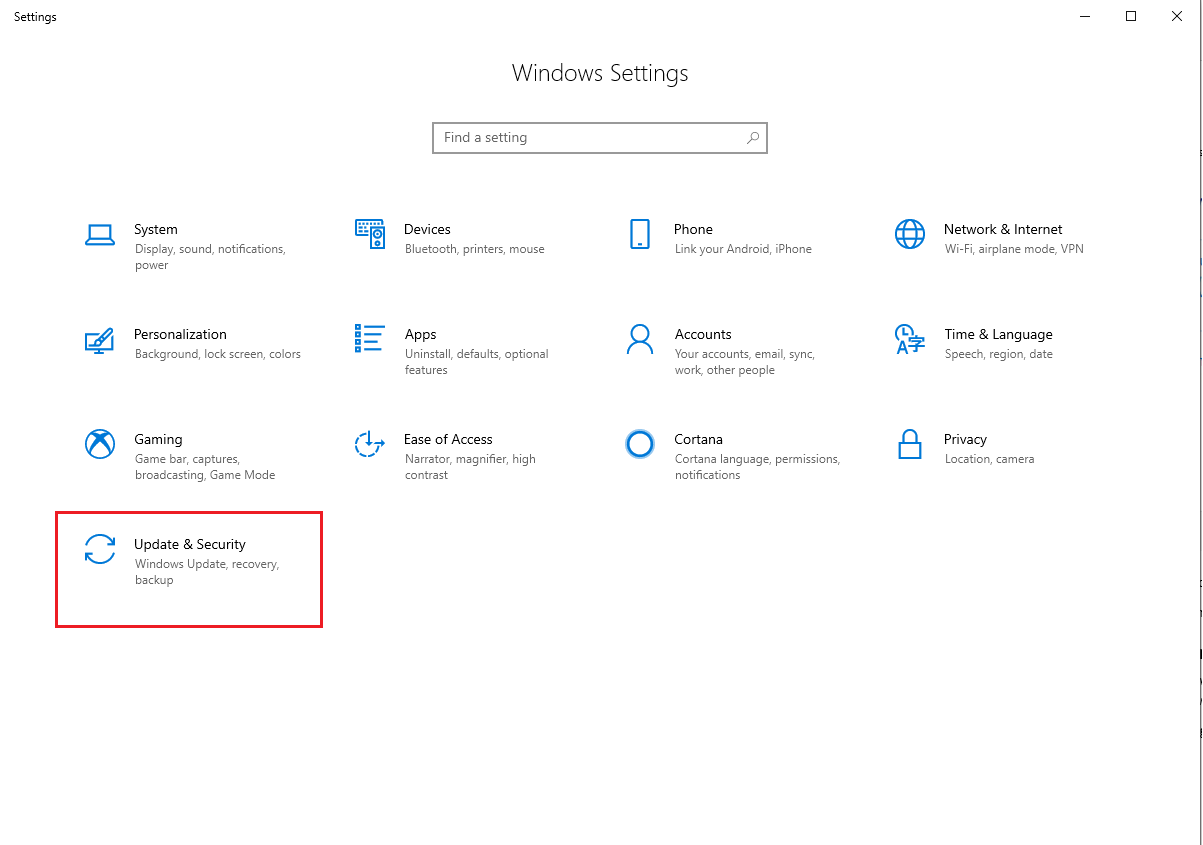
1. Open Windows settings by pressing Windows key + I.
2. Here, look for Update & Security.
3. Now click on Windows Update option present in the left pane.
4. Next click on Check for Updates, to see if any updates are available.
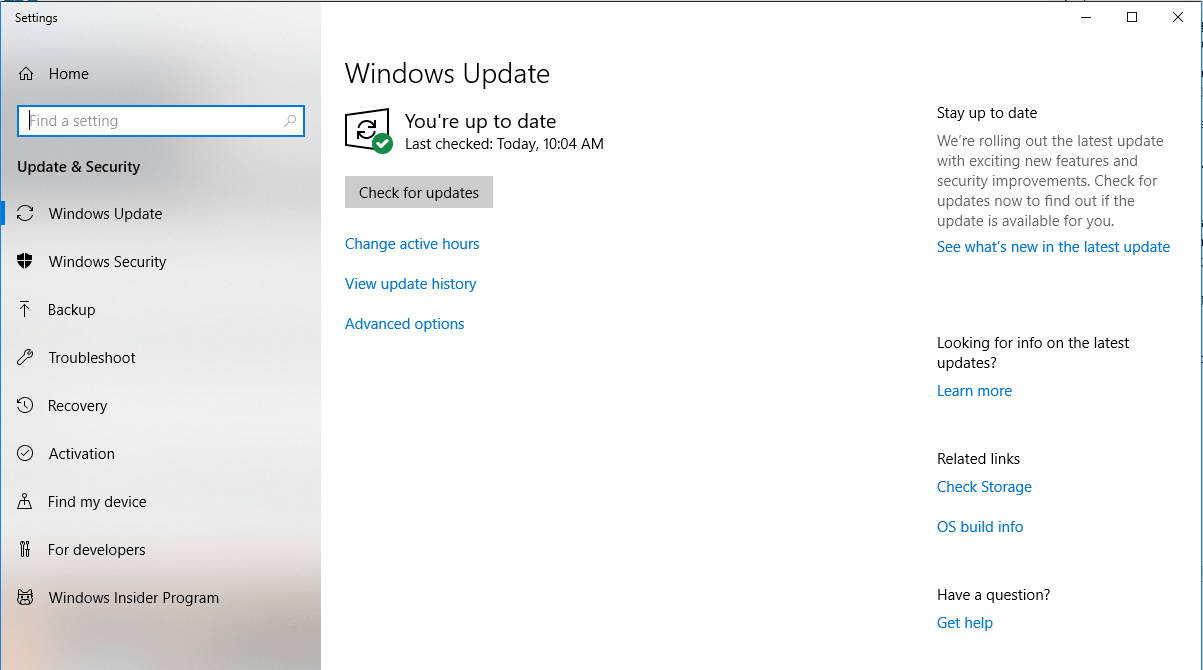
5. Download updates, restart PC to install updates and see if windows 10 USB not recognized issue is fixed or not.
Solution 6: Remove laptop battery
To resolve USB port not working on Windows 10 if you are using a laptop try removing laptop battery. This might fix the problem. What you need to do is remove the battery and press the power button for 30 seconds or more. This will make discharge capacitors completely. In addition to this leave your laptop turned off for complete night. Now try and see if Windows 10 USB problem is resolved.
Solution 7: Disable fast startup
In some cases, if Windows 10 boots quickly then your system does not get enough time to detect USB. In such a case you need to disable Fast startup on Windows 10. To disable Fast startup on Windows 10 follow the steps below:
Must Read: How to Create Windows 10 Bootable USB
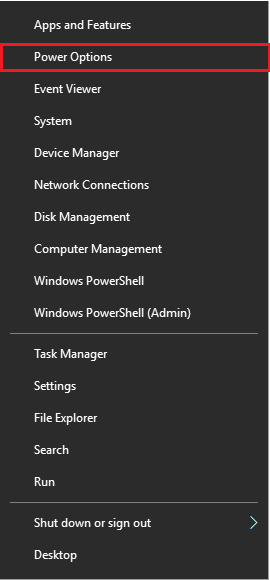
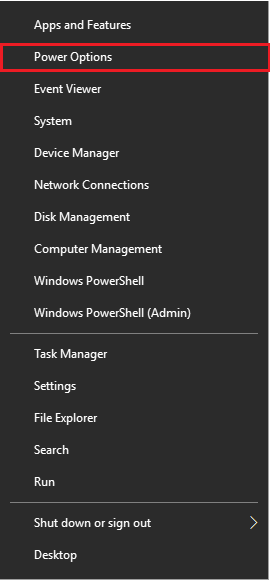
1. Press Windows key + X and select Power Options from the menu.
2. Click on Additional power settings option present in the right.
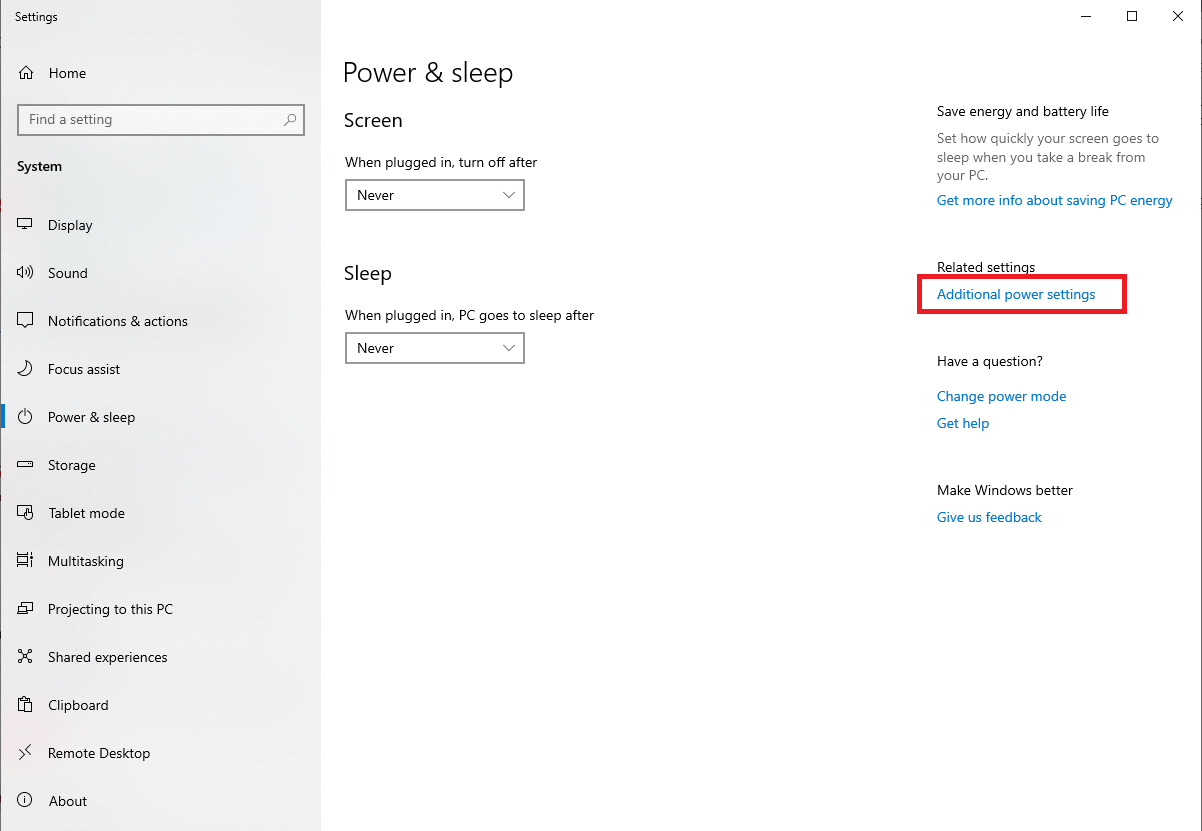
3. Now, click on Choose what the power button does.
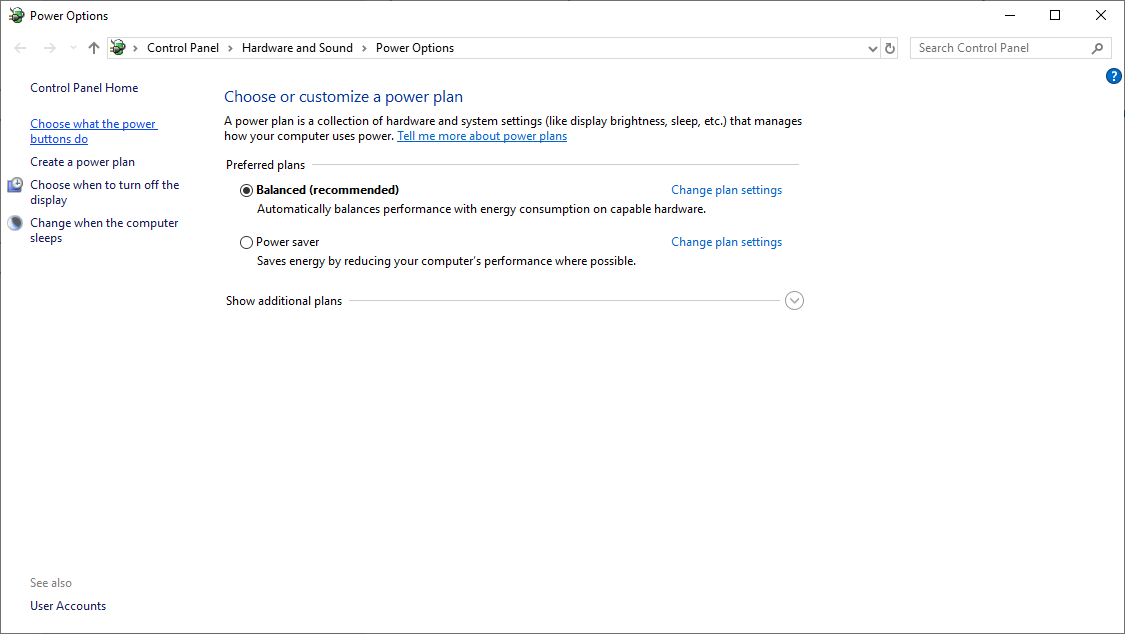
4. Next click on Change settings that are currently unavailable
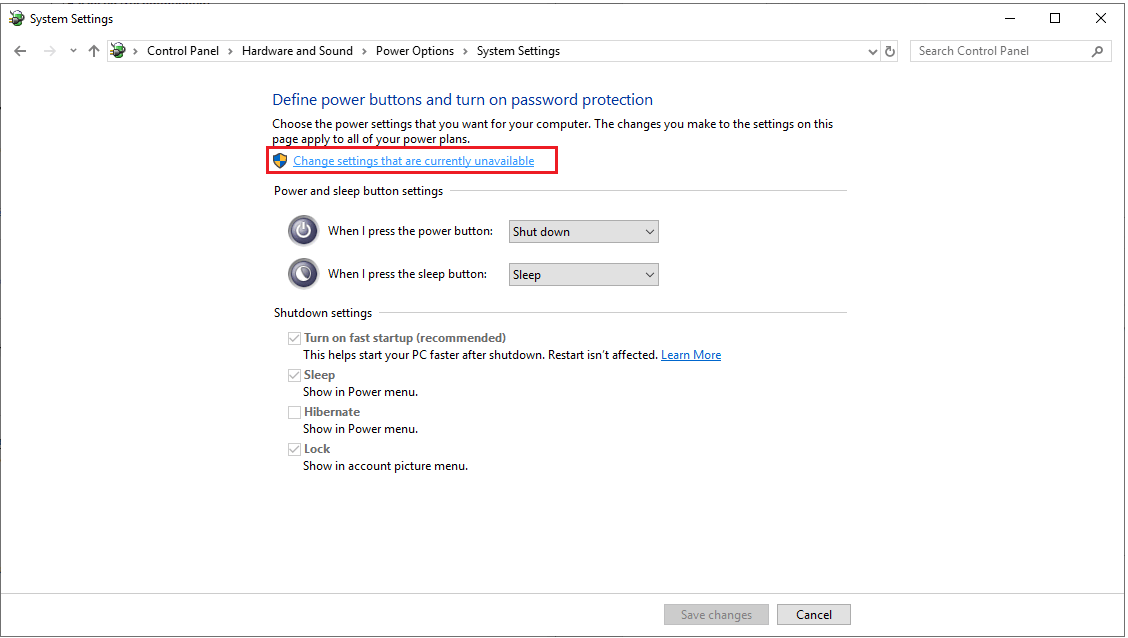
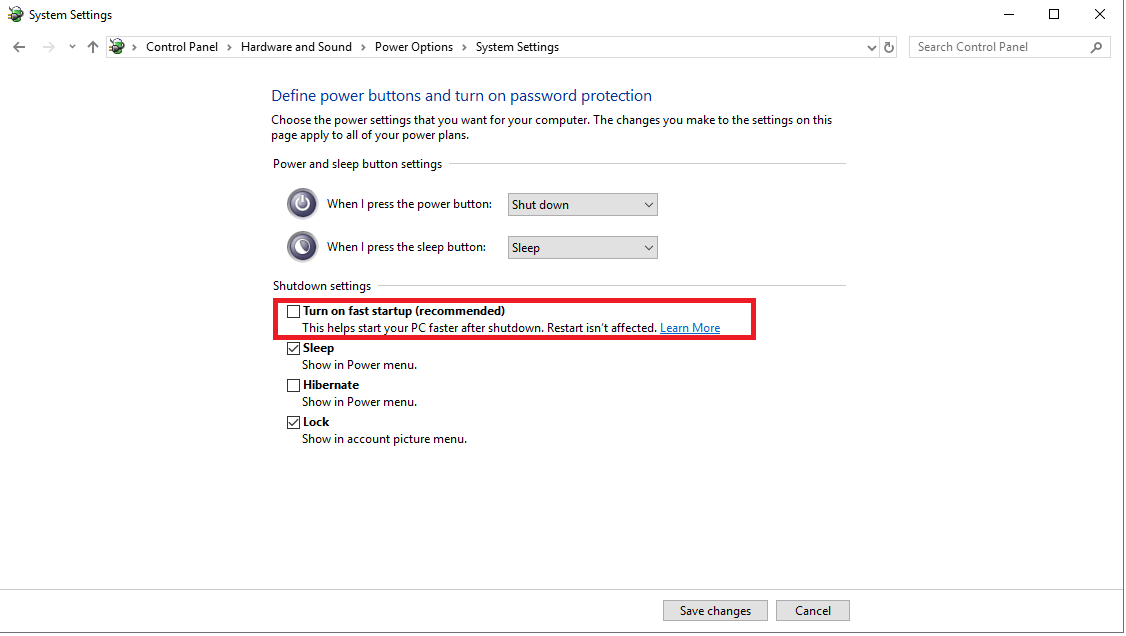
5. Here, uncheck “Turn on fast startup” under Shutdown settings and click on Save changes.
In addition to this disable USB selective suspend feature. To do so follow the steps below:
1. Press Windows key + X and select Power Options from the menu.
2. Click on Additional power settings option present in the right.
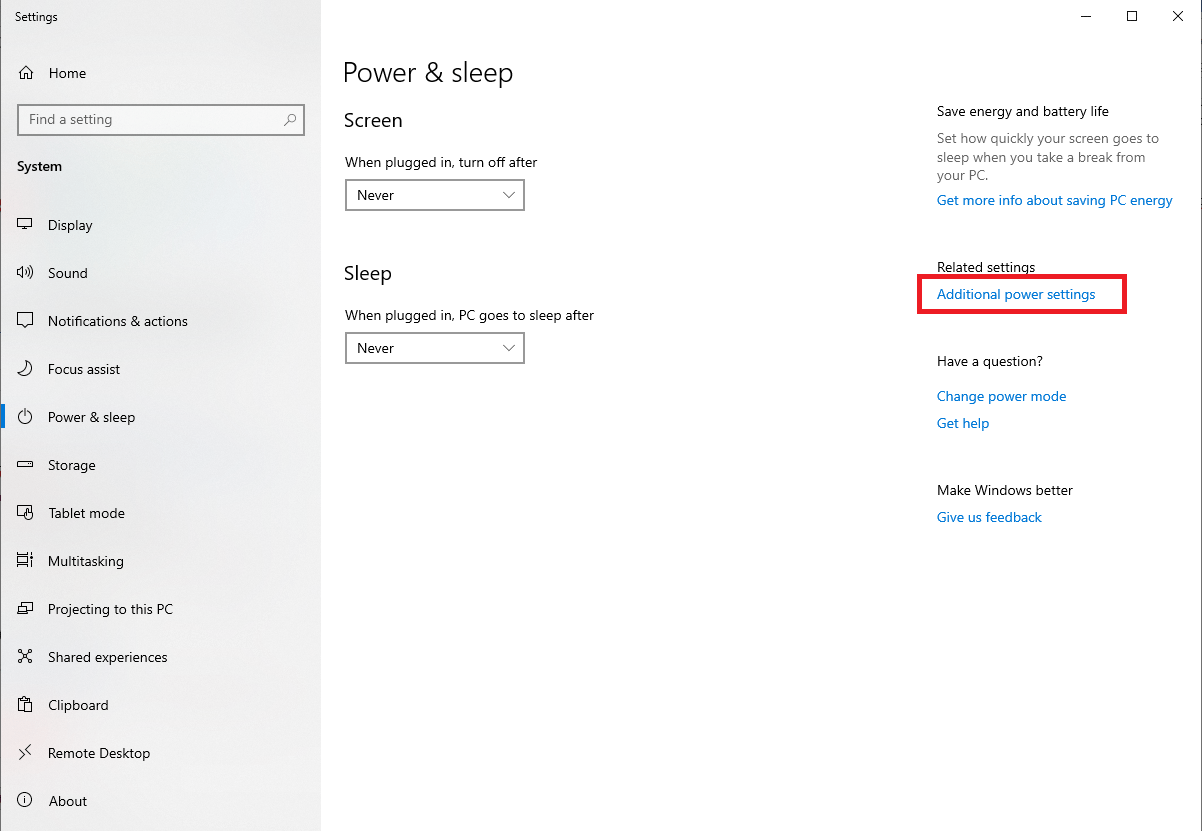
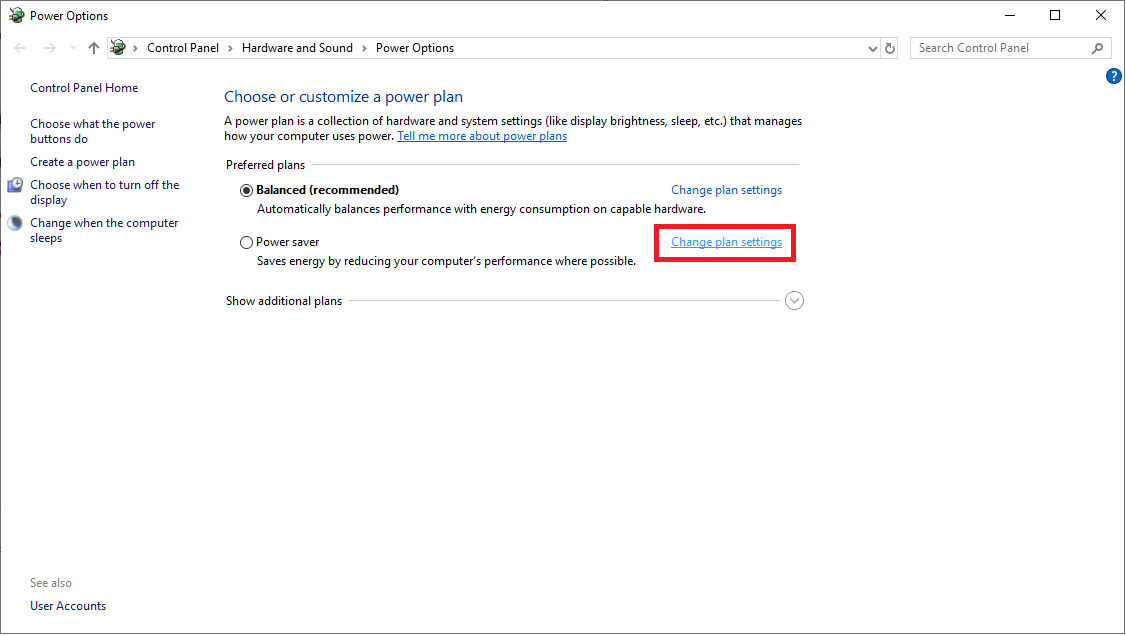
3. Now click on Change plan settings next to High Performance.
4. Next to modify power settings click on Change advance power settings.
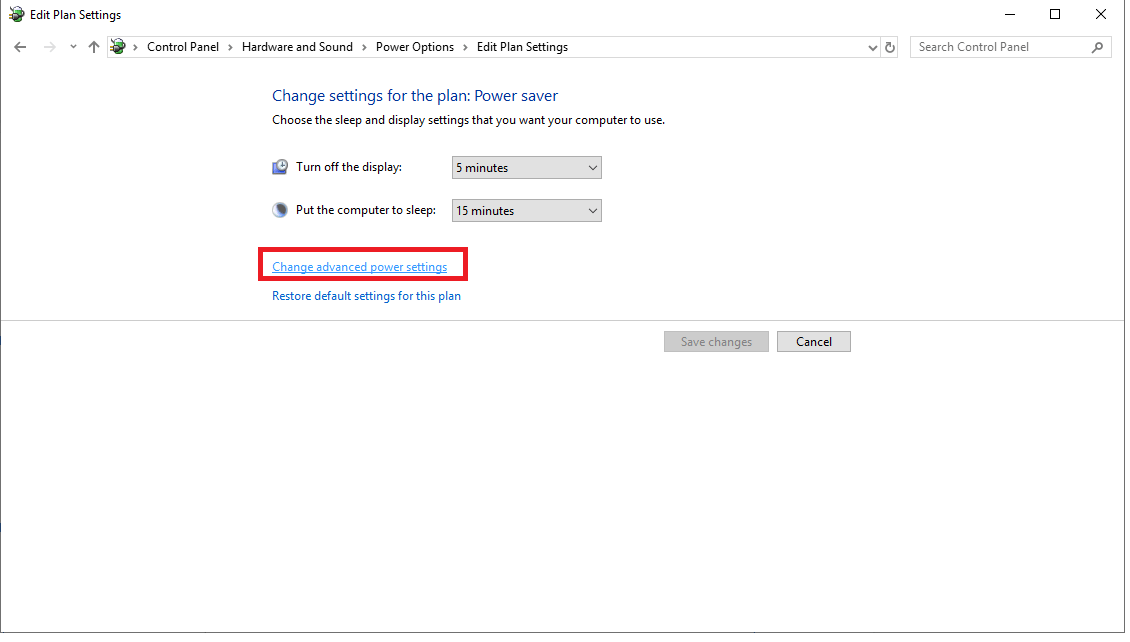
5. Now you need to go to USB settings and set USB selective suspend settings to Disabled > Apply > Ok.




Leave a Reply