
One of my friends wanted to upgrade his hard drive as the one he was using has less storage capacity. Also, he was getting a good offer on purchasing a new if he exchanges his old hard drive. My friend deletes all his data, stored in the drive and was all set to exchange that before I visited him. He was shocked to hear that even deleting all the files does not mean that they can’t be recovered or get back.
He gets tensed as the drive he was exchanging contains some important documents regarding his research. Then I told him that how he can securely wipe all the data stored on the drive using Mac.
Below I am sharing the detailed description of this process, by which you can make the data 100% unrecoverable.
How to completely wipe the data:
If you guys are using Mac, then you can securely delete the data by using Disk Utility.
To get started open Disk Utility from Applications. You can also search it using Spotlight.
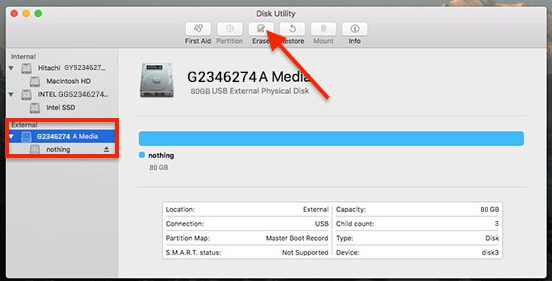
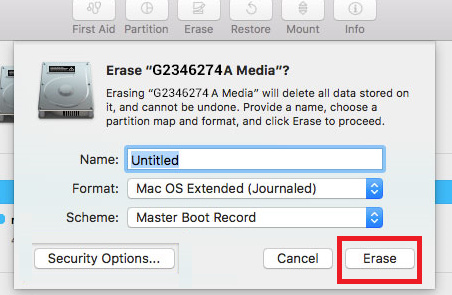
- Now next step to connect the drive which you wish to securely delete, and click on it. Once you select the drive click on Erase.

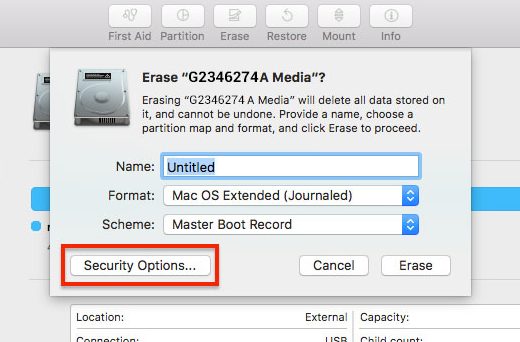
- You will now get a dialogue box with options Name, Format and Scheme. In Format option choose Mac OS Extended (Journaled), since it protects the integrity of the hierarchical file system. Now click on Security Options.
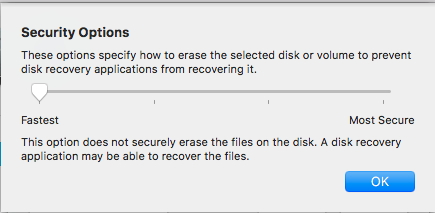
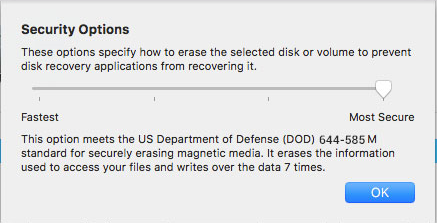
- You will now receive a new box of Security Options with a security scale ranging from Fastest to Most Secure. If you choose the Fastest option then it will only delete the partition, leaving the files intact. However, since we wish to securely delete the drive we will move the slider.
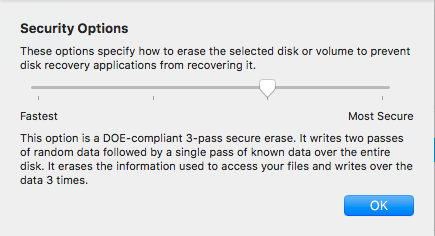
- If we choose this option then the option of recovering the data is minimal or almost 0, as in this option you data is overwritten 3 times by some random data.
- However, if you are still concerned about your data then move the slider to Most Secure. As you can see in the screenshot that this method of deleting the files is used by US Department of Defence, therefore this method will take a lot of time and data can not be recovered by any means. Once you decide how securely you wish to wipe the data, click on Ok.
- Now click on Erase button to start the process of wiping.
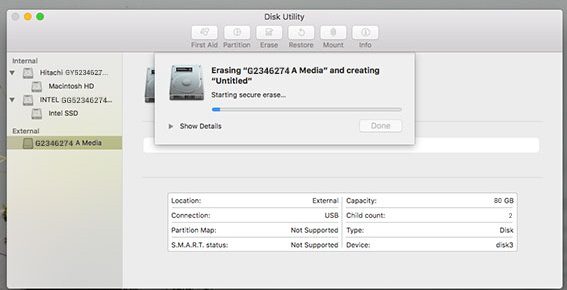
- You can see the progress bar which shows the wiping process. Please note that time to wipe the disc depends on its size and the level of security you have selected. It is recommended for a normal user to use 3 pass secure erase, as 7 pass secure erase can take a day or even more to complete.
So guys, if you too are giving your old hard disc to your friend or family member and concerned about your data then make sure to secure delete it, by following the above mentioned steps.


Leave a Reply