
Do you frequently wonder what is it that’s making your PC slow and how can you optimize your Windows 10 PC to perform fast? Why is it that despite using Windows PC optimally your PC just refuses to cooperate or work fast? The reasons for these problems could be many and it is always good to keep a note of all the probable causes that might be slowing down your computer. High disk usage is one of the most common reasons why your Windows PC might be running slow.
While again, the reasons and effective solutions to counter high disk usage could be many, there are certain processes which are not known to many users. One such process is wsappx.
What is Wsappx?
Wsappx is a Windows background process that runs in the background of Windows 8 or Windows 10 PC. It is also an essential part of the Microsoft Universal App platform. It was introduced in Windows 8 and is responsible for updating, installing and uninstalling the apps of Microsoft store.
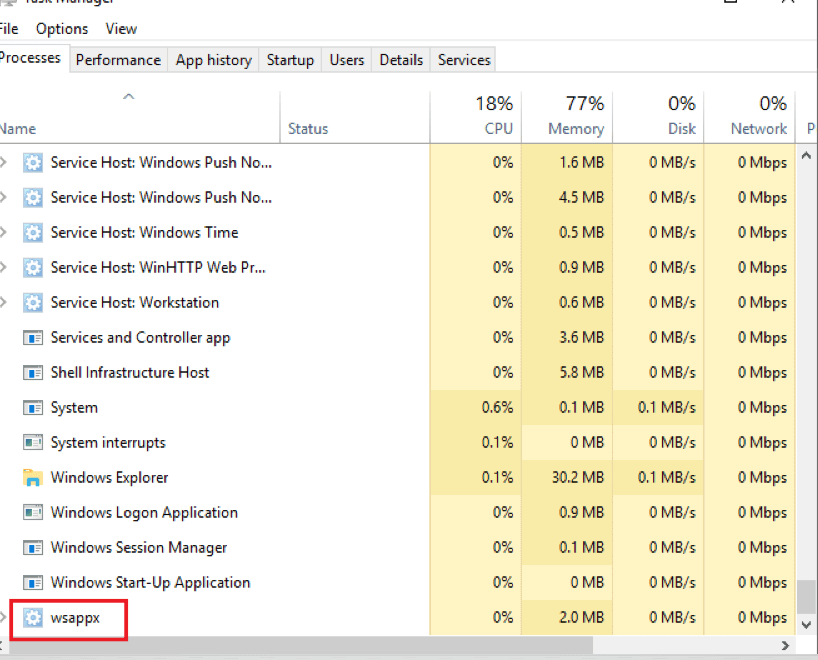
You can see this process by following the path below –
Press Ctrl+Shift+Esc > Processes > Click on Windows processes > Look for wsappx
This Windows background process also sees to it that the apps are legit and licensed.
Wsappx consists of two services –
1. AppXSVC (Appx Deployment Service)
This service is responsible for installing, updating and uninstalling Microsoft store apps. It enables Windows 10 PC to automatically update such as email apps or paint.
2. ClipSVC (Client License Service)
In plain and simple terms it is required for providing infrastructural support to the Microsoft store. If it is disabled, the apps that you have installed from the store will not function properly. This is the Windows background process that sees that the apps that you have installed or paid for are licensed.
How to Fix High Disk Usage Issue Caused By Wsappx?
Wsappx does take a considerable toll on CPU and is therefore accountable for high disk usage. Now, you might come to a conclusion that any processes that take a toll on disk usage should be removed without further ado. Wait before you disable wsappx Windows in 10. That’s because the moment you’ll try to get disable wsappx Windows 10 in the task manager, you’ll see a message warning you about the repercussions.
Your system could become unusable or shutdown abruptly. You may even lose some critical data especially if you haven’t saved it.
So, here’s you can deal with it.
Easiest and the best ways to prevent Wsappx from causing high disk usage –
1. Update Drivers On Your Windows 10 PC
High disk usage can be tackled by updating all the faulty drivers.
If you take the manual route, you would first have to identify the drivers and then exhaust a considerable amount of your precious time in searching for vendors by visiting from one website to another.
Here’s an easier way, you can install a dedicated utility tool like Advanced Driver Updater which focuses mainly on scanning your PC for outdated drivers and once it finds them, it searches for the latest drivers and installs them on your PC. All it takes is just a few clicks and a few minutes out of your busy life. While need of drivers cannot be emphasized enough, there are drivers that can cause instability. Advanced Driver Updater excludes such drivers from updating. It also takes a backup of all the essential drivers so that in the need of urgency, they can be restored. To add on, you also schedule a scan for your drivers too.

2. Stop Microsoft From Manually Updating Apps
Follow the steps and prevent Microsoft store from manually preventing apps
1. Launch Microsoft store
2. Click on the icon next to your profile pic and click on settings

3. Switch the Update apps automatically to off

3. Disabling Microsoft Store Using Group Policy Editor (gpedit)
Disabling Microsoft store might sound awkward to some, but it may help prevent Wsappx from high disk usage. To disable Microsoft store, follow the steps mentioned below –
1. Open run command by pressing Win + R
2. Type gpedit.msc in the search box that appears
3. In group editor policy window, go to Computer Configuration and click on Administrative Templates.
4. Now, double click on Windows Components and then, double click on Store
5. You will now land on a few settings, look for Turn off the store application (it is normally the second last option). Right click on Turn off the store application and click on edit
6. Check the enabled radio button, click apply and hit OK
7. You will now be required to restart your PC
4. Scan Windows PC for Viruses
One way to prevent Wsappx from causing high disk usage is by checking the Windows PC for viruses. With Windows 10 you can use the inbuilt Windows Defender security/ Windows Security to perform a full-fledged scan. Once the scan reverts with malicious programs, you can uninstall or fix them.
Or, you can choose from amongst some of the best antivirus software available.
What do you think of this process? Is it a troublemaker or an important part of your operating system? Though we have tried our best to take a 360-degree perspective and have listed out some of the easy ways to deal with this issue, we would love to have your views too. You can reach us out in the comment section below or by clicking on the social media icons on the top right of this blog.
And, if you love technology as we do, do subscribe to our Tweaklibrary Blog and visit our YouTube Channel.


Leave a Reply