
Twitter is a great tool for socializing, marketing but sometimes certain tweets can be unbearable, attention-seeking. Making you want to deactivate Twitter account.
A few years ago, virtually Twitter was unheard. However, with time it has started to become popular among the rich and famous instigating immense user flow. However, the things that work well for Twitter sometimes irritate users. Due to which they look for ways to deactivate Twitter.
Once Twitter gets to know the user and what type of things they are interested in, it will suggest other Twitter users follow and more. All this is frustrating. Whatever the reason be some users want to deactivate Twitter account. So, for them, here’s a complete guide on how to deactivate Twitter account − permanently.
Note: Twitter offers a grace period of 30 days to reactivate profile. This means if you change your mind, you can restore your Twitter account within 30 days. However, once that’s over, the account is gone forever.
Without further delay, let’s learn how to deactivate Twitter account.
How to deactivate Twitter on desktop
To deactivate Twitter account on desktop, follow the steps below:
1. Go to Twitter website and sign in to your account.
2. Next, click on your profile picture and click on Settings and privacy from the drop-down.
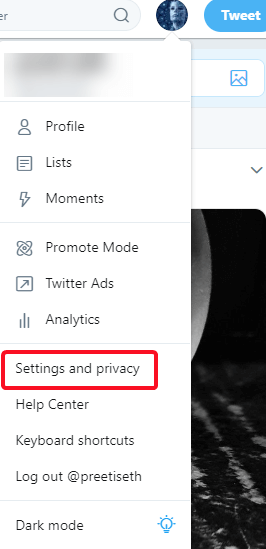
3. After this, click on Account in the left pane.
4. Next, in the right pane scroll down to locate Deactivate your account option.
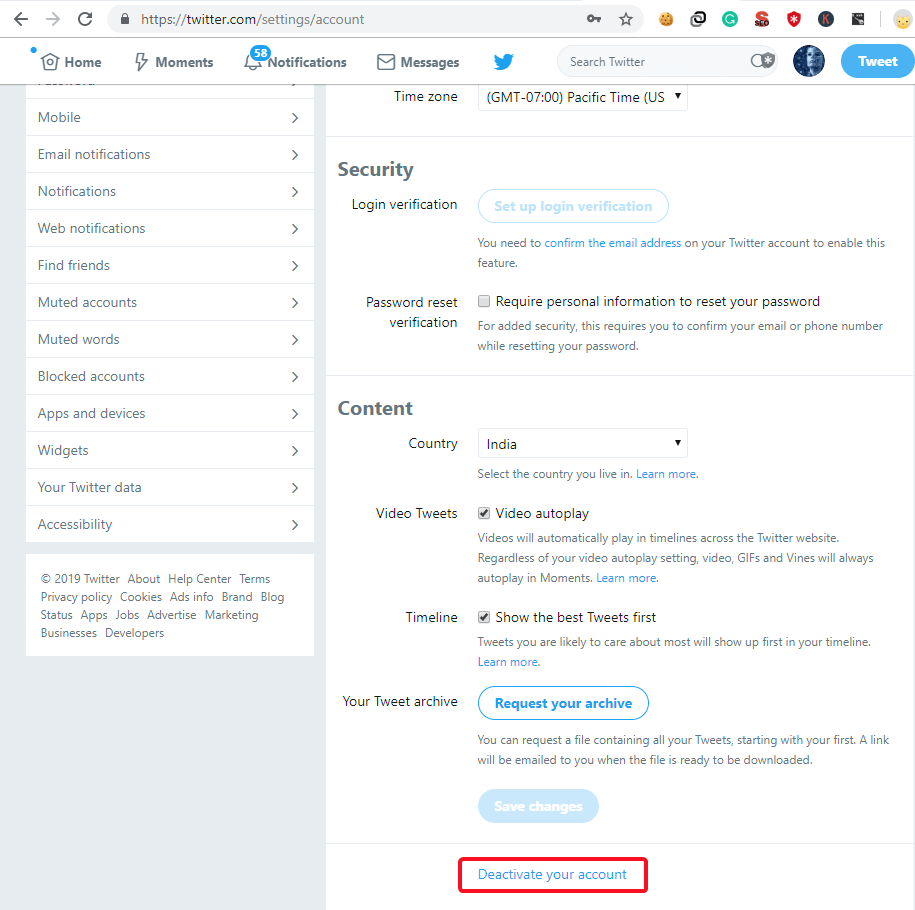
5. You’ll now be asked to confirm if you want to deactivate the account.

6. Click on Deactivate > enter your Twitter account and click on Deactivate account.
Using these simple steps, you’ll be able to deactivate your Twitter account.
How to delete Twitter on Android
If you use Twitter on Android and would like to deactivate Twitter account on Android follow the steps below:
1. Open Twitter > tap on your profile icon.

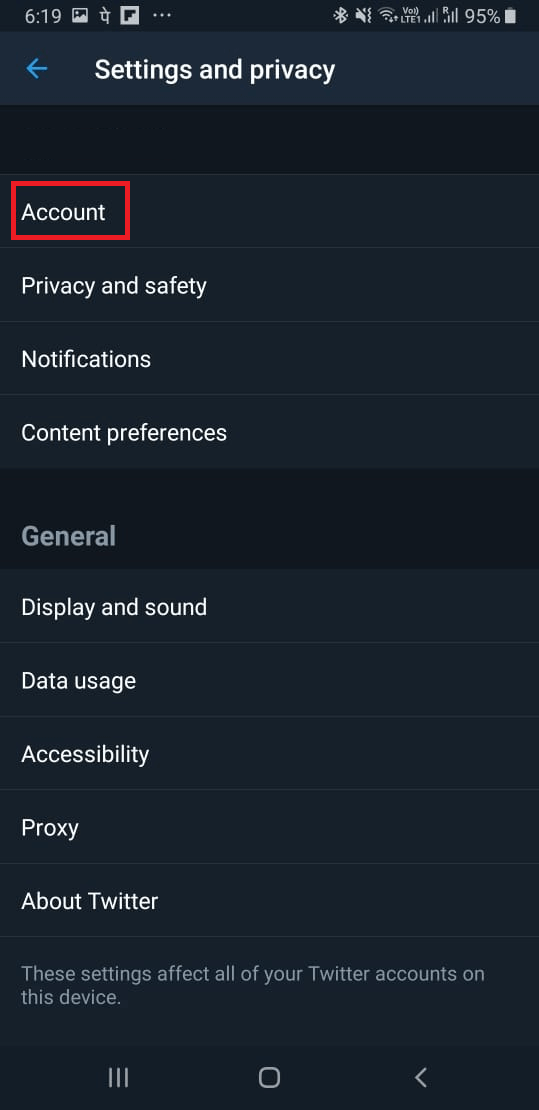
2. Tap on Settings and privacy.
3. Next Tap Account > scroll down to locate Deactivate your account.
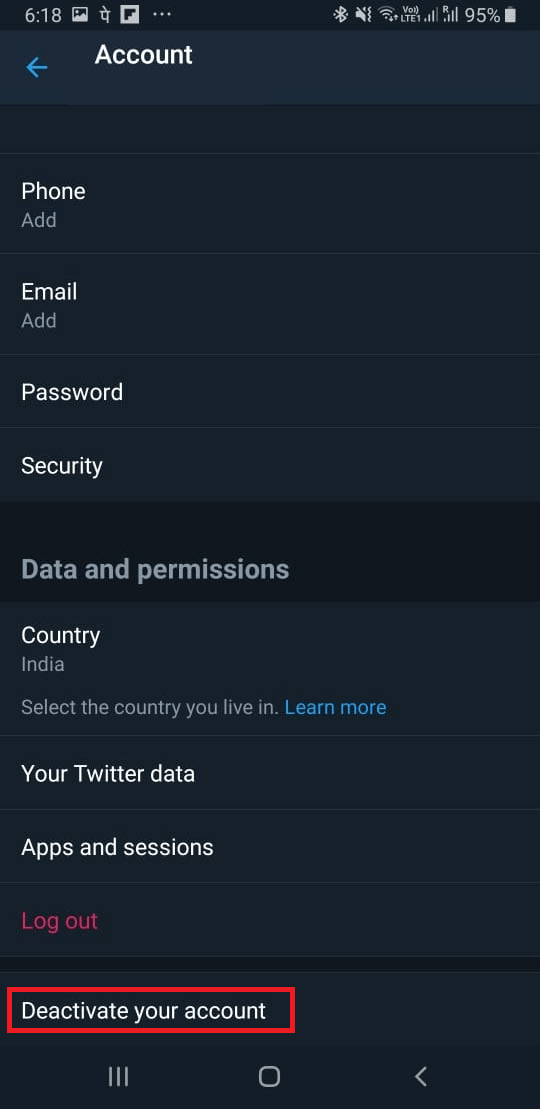
4. Tap on it > tap Yes, deactivate.
This way you’ll be able to deactivate Twitter account on your Android.
How to deactivate Twitter on iOS
1. Open Twitter account.
2. Tap your profile icon > Settings and privacy > Account.
3. Tap Deactivate your account > enter the password when prompted.
4. Tap Deactivate > Yes, deactivate.
This way iOS users will be able to deactivate Twitter account.
Using these steps, you’ll be able to deactivate Twitter account and stop annoying Tweets from appearing. However, remember, when a Twitter account is deactivated, Twitter keeps all the user data for a 30-day period. Once that’s finished, Twitter starts deleting the data permanently when that’s done Twitter account is deleted forever.
However, if you change your mind before that login to your Twitter account before 30-days. This will reactivate your Twitter account and to deactivate it you’ll need to follow the steps again.
Moreover, if you just want to change your username, email address, password. You don’t need to delete your account all this can be easily done from the account settings. Although Twitter account is deactivated immediately some content is still viewable on some site for a few days.
Remember, Twitter cannot control cache content that third websites like Google or Bing may have. Due to this, you might see your Twitter profile content on the Internet. In addition to this if you want to create a new Twitter account with the same email address or username before 30 days are up you’ll need to unlink the email address links with an existing Twitter account.
Liked the article share it and follow us. Did not like it let us know by leaving a comment.


Leave a Reply