Everyone has thought of Google photo albums as a convenient way to view photographs on a computer or mobile device. But there’s nothing quite like flipping through a tangible photo book with friends and family. Google Photo books are making it simple to create photo books as per your choices.
How to Create Your Own Photo Book Using Google Photos?
Google Photos came up with this brilliant concept of photo books to save your memories into hardcopies. Depending on how many images you choose in making a photo book and if you want a soft or hard cover for the album, the final price might range from $10 to $75. It’s easy to have a Google photo book made and shipped to you; pick some pictures from your gallery, add them to an online album, and pay.
You can make your own photo book on your phone and test it on your computer for a more convenient viewing and editing experience.
Here we have shown simple steps to create photo book:
Making photo book in Windows/ Android/ iOS:
- On your device, open Google.com.
- You must first sign in to your Google Account.
- Create a photo album.
- Choose 20 pictures at minimum. If your coverage exceeds 140 images, some of them may be integrated onto a single page.
- Press the “Done” button. Automatically store your photo album after you create one.
Create photo book from an album:
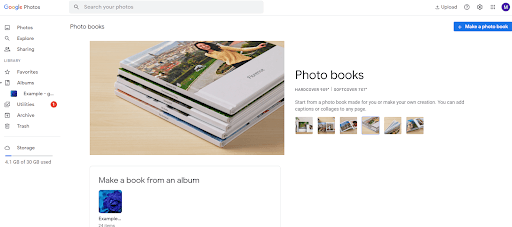
- Tap on Print store- Photobook.
Pay for your photobook and then you are done. Make sure you entered the correct shipping address and contact information.
Also Read: Best Duplicate Photo Cleaner Apps for Android
6 Recommendations to Make Your Own Photo Book with Google Photos.
1. To use or not to use chronology –
Google Photos automatically sorts your photos from earliest to latest when you make a Google photo book from an album. Changing the sequence in which your photos are displayed can make your book stand out.

Photographs can be displayed in any order you like. Identifying photo pairings or clusters that work well together is a brilliant place to begin. If you want to wow people with your album, give it a central topic that develops throughout.
Images that progress from dark to light or sections representing each of the 4 seasons are two examples. Just as in those rare instances, trying to make your photo album consistent in theme may not be worth your time. But if you’re up for it, it’s a great time.
2. Make Collage –
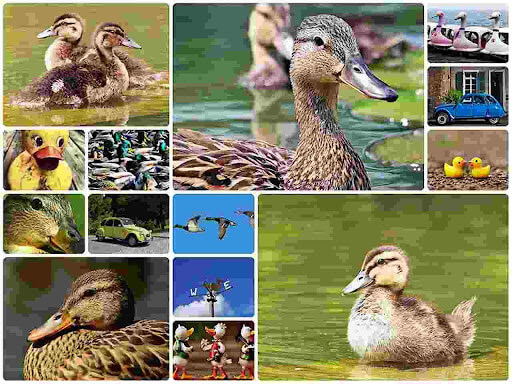
After 20 pages, Google Photos starts charging per page for publishing a photo book. Be aware of putting together a series of photographs that you think would work well. You can make A collection of photos by opening the Google Photos app, switching to the Edit book view, tapping any page, and then tapping Edit. There’s an option to “Add photos,” where you can select images to display on a single page.
The Layout tab displays your expanded photo collection alongside several different layout options. To move an image around the page, tap and hold on to it. Images are switched when placed on top of one another. Android has several options for creating photo collages. Collages can be uploaded to Google Photos and included in your Google photo book as regular photographs. Make sure that the exported collages are of sufficient quality to print using the manner you choose.
3. Pay attention to size –
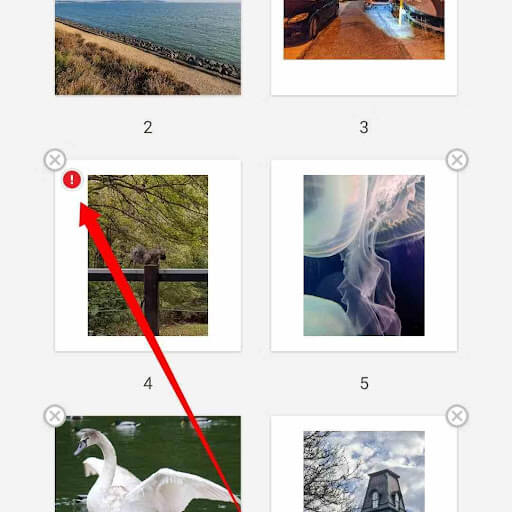
Google Photo alerts you if you add photos with an insufficient resolution to print an adequate standard in an album. Any page highlighted with a red exclamation mark icon in the Edit book view has photographs that will likely not print correctly. If you prefer low-resolution images, you may disregard these cautions, but don’t expect outstanding results.
4. Use blank pages to highlight unique photographs –

One method to draw attention to specific images within a Google photo book is to place them on facing otherwise blank pages. In that manner, they can be the exclusive focus of the page. Google Photos doesn’t have this feature built-in, but you may upload blank images to any album to simulate blank pages. This can be done several times within a single book without uploading multiple blank images.
It would be best if you pondered image placement for a while. This is something to consider if you want a photo to fill a page but also have a caption. You can include your actual picture on one side and a blank image on the other side. Under the space on the facing page, type the photo’s caption. After using Google Photos for 20 pages, you’ll have to pay for each subsequent page.
However, this is one option for enhancing the visual appeal of a printed album, including photographs that you are particularly proud of.
5. Use a softcover book –
If you want more than 20 pages in your photo book, you will have to pay extra for them. Additional pages for softcover books are 49 cents each. Books in hardcover cost $30, and each additional page costs $0.99. Hardcover books, regardless of length, cost twice as much as their softcover equivalents. Also, the price will double for every additional photo you include. An album with 100 pages on a soft cover will set you back $65; the same album on a hardcover would set you back a whopping $110.
6. Design your cover as a bonus –

Cover choices for published photo books from Google Photos need to be revised. Using the given tools, you are limited to using a single image for your cover and have few opportunities to customize its appearance. No one will stop anyone from making their photo book covers with design software if that’s what you’re interested in.
Square photo albums from Google eliminate some of the uncertainty regarding layout. Easy cover picture implementation is possible using a high-resolution square JPEG or PNG.
Wrapping up –
So, in conclusion, we will tell you to follow your hobby of photography. As it can give you memories to create for your future self. We hope these recommendations help in making your own photo book using Google Photos easily. Share the article with others to let them know about this amazing service by Google Photos.


Leave a Reply