Filling forms can at times be a very tedious process when you have to fill a long list of fields. And, things can become even more tiring when you have to work on several forms. For example, imagine filling bank account details, examination forms, registration forms, so on and so forth. This is where you can take help of Android autofill service.
What Is Android Autofill?
Android autofill was introduced with Android Oreo and has been a part of the Android lineup since then. It automatically fills out data and passwords (If you have them saved) in the required fields thereby taking off stress from the user who would now needn’t worry about spending precious time on filling fields.
It is important to note that you can use only one autofill service in Android
Also Read: How To Enable View Passwords On Your Browser
How To Enable and Disable Android Autofill?

It is very simple to enable and disable Android autofill settings and even edit information. You can either allow Google to autofill forms and passwords or use a third party Android autofill service.
Steps –
- Open Settings app on your Android device
- Scroll down and tap on System (Since I have a Samsung device, I will click on General Management)
- Tap on Language and input
- Tap on Advanced (In my Samsung device I will have to tap on Input assistance)
- Tap on Autofill service
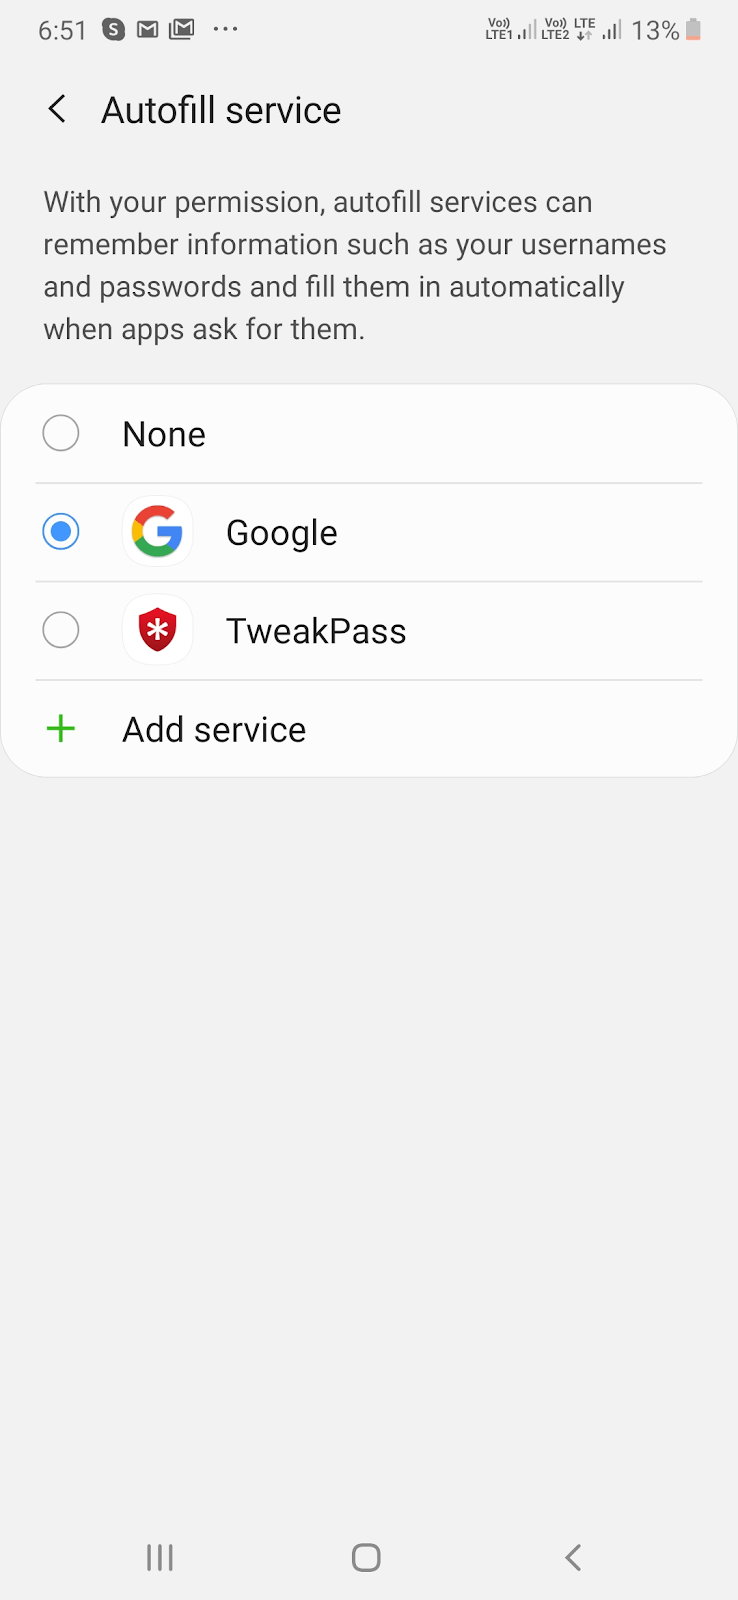
Now, once you have followed the above basic steps you will have three options –
- Choosing No Android Autofill Service
You can choose not to have autofill service by choosing None.
- Choosing Google As Android Autofill Service
You can choose Google as an Android autofill service and then choose what it can fill on your behalf. To choose Google under Autofill service checks the radio button next to Google. Let’s delve a little deeper and see how you can let Google have access to information that it can autofill.
- Tap on the cog icon (Settings) that will appear once you choose Google as your autofill option
- You can now edit your Account details (Change your Gmail ID for instance), change Personal information, Addresses, Payment methods (credit card/ debit card details, bank account no, etc.) and Passwords.
Let’s say you wish to change your Personal Information, first make sure that you have an active internet connection. Now, follow the steps below
- Tap on Personal Information
- Tap on any option that you wish to change. For demonstration purposes, I’ll choose name
- Tap on the pencil icon against the field that you wish to change
- You can even choose a password manager as your Android autofill service.
Which Are Some Of The Best Password Managers That Use Android Autofill?
How To Use A Password Manager As An Autofill Service?

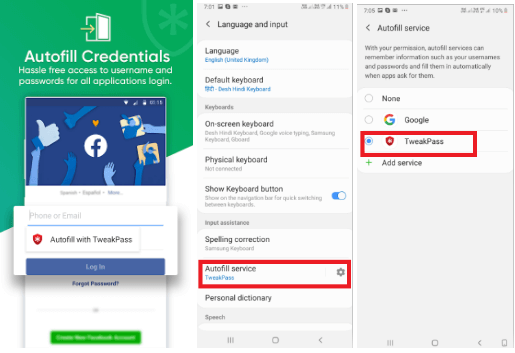
Setting up autofill for Android with your desired password manager is very simple. For the purpose of this blog I have chosen TweakPass which is one of the best password managers on Play Store. It gives you a hassle free access to data such as usernames and other details that you can fill in several applications. You can even choose TweakPass to autofill password in Android. In that way you won’t have to worry about remembering passwords for all your accounts.
1. First, download the password manager from the Google Play Store. You might choose other resources but we highly recommend that you choose the Play Store. I have chosen TweakPass – Password Manager. Other password managers that Google supports include –
Other Password Managers That Can be Used As An Android Autofill Service |
|
| LastPass |  |
| 1Password
|
 |
| Dashlane |  |
| Keeper |  |
| Enpass |  |
And, even with these you can choose to Autofill passwords in Android.
- Now, as you can see TweakPass has appeared in the list of Autofill service
- Tap on the radio button next to TweakPass
- If you wish to change the details you can go back and under input assistance and click on the cog icon
Use The Feature At Your Discretion
Your online data is very critical. If details like credit card pins, account passwords, SSN numbers get into wrong hands, it can be disastrous! So it is very important to use an autofill service for Android carefully. This includes Google too. In fact, we’d like to ask you when you would choose Android auto fill service over manually filling forms. Do let us know in the comment section below. If you find this feature helpful and if we’ve been able to help you, do share this blog with everyone who you think would need this.
Next Read:
Best Password Managers of 2020


Leave a Reply