If your HDMI port, the standard audio, and video output port, is not working, you’ve come to the right place. This post explains how to fix HDMI not working on Windows 10.
There can be different reasons why HDMI HDMI might stop working on Windows 11 & 10. The most common cause is outdated graphics cards. We suggest updating the graphics card driver. The easiest way to update problematic, missing, or corrupted graphics drivers is to use a driver updating tool like Advanced Driver Updater.
With the help of this tool, in just a few clicks, you can update the graphics card and troubleshoot the issue with HDMI.
To get Advanced Driver Updater, click the button below:
HDMI Port Not Working in Windows 10 [SOLVED]
Before following the steps explained below, we suggest creating a restore point. This is just a precautionary step.
Method 1: Check Your HDMI Cable Connections
If all the HDMI ports on your Windows 10 have stopped working, fix the problem by unplugging the power cable and plugging it back. Once that is done, follow the steps explained below:
Step 1. Disconnect all HDMI cables from their inputs.
Step 2. For 10 minutes, keep them this way, then plug them back and connect the device using the HDMI cable.
Now try using the device; you should not face any problem. In case you encounter any issues, move to the next step.
Method 2: Run the Troubleshooter
Generally, when you use Windows troubleshooter, it automatically searches for the problem related to HDMI ports and fixes it. To use it, follow these steps:
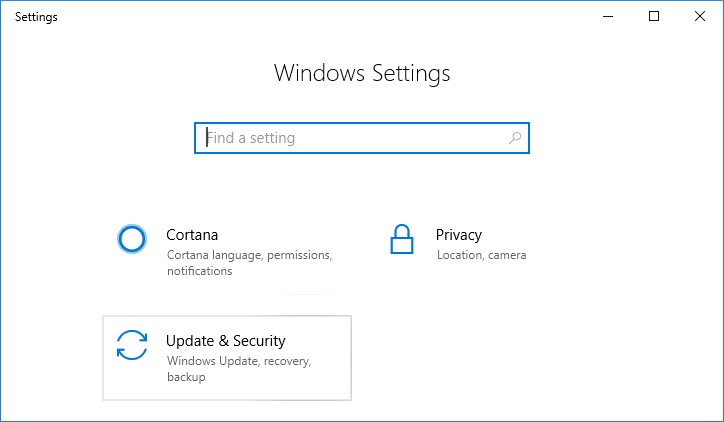
1. Press Windows Key + I to open Settings
2. Click on the Update & Security icon.

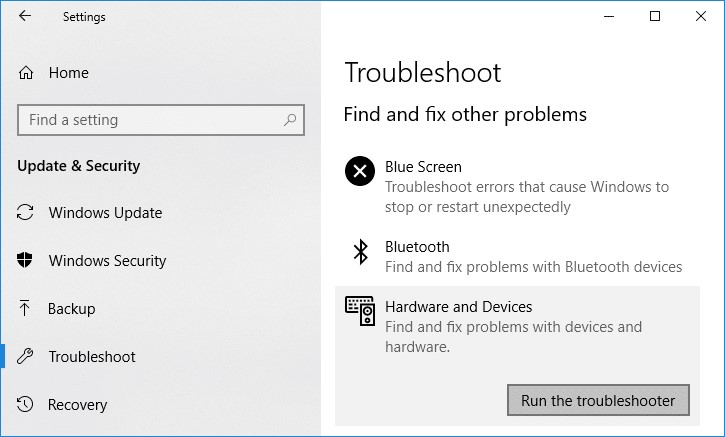
3. Select Troubleshoot from the left pane.
4. Now, under the “Find and fix other problems” section, click on “Hardware and Devices. “

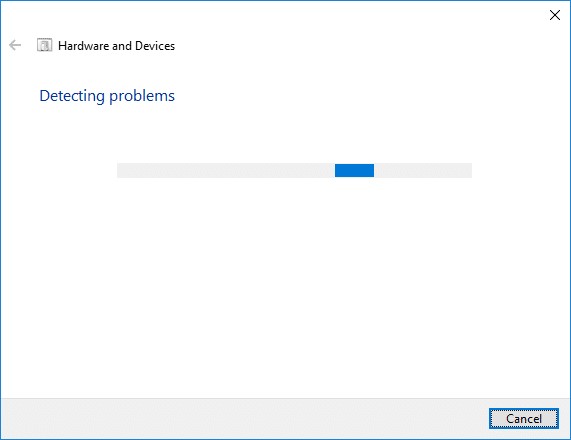
5. Click on Run the troubleshooter and follow on-screen instructions; this will help fix HDMI Port Not Working.
However, if you cannot find the Hardware and Devices option, you will need to command prompt to invoke it. To do so, follow these steps:
1. In the search bar type command prompt > right-click > Run as administrator.
2. Enter the command msdt.exe -id DeviceDiagnostic and press enter key.

3. Wait for it to show the troubleshooter > detect and fix issues if any.

Method 3: Update Graphics Driver for Windows 10
As discussed above, the issue with the HDMI port is generally encountered when the graphics driver is outdated. Therefore, to fix the problem, we recommend updating the driver. This can be done automatically using a driver updating tool, or you can use Device Manager to update the driver. Below we explain both how to update the driver and fix the issue.
Manually Update Graphics Drivers using Device Manager
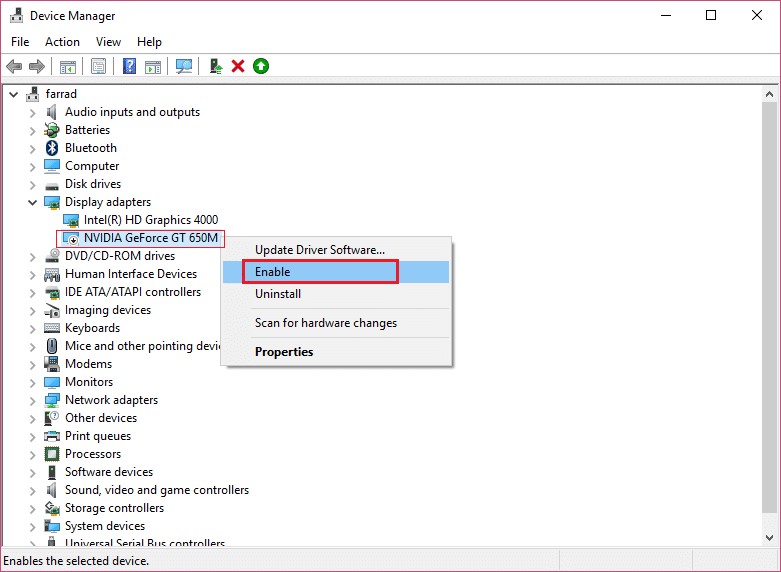
1. Press Windows + X > select Device Manager from the context menu.

2. This will open the Device Manager window.
3. Locate Display adapters category > double click toe expand it > right-click on your Graphics Card > select Enable.

4. After enabling the driver, again right-click on it select “Update Driver. “

5. Select “Search automatically for drivers.

6. Windows will now try to look for the driver update. If available, it will be automatically updated.
7. Restart the PC and then try to use the HDMI port. This should help Fix HDMI Port Not Working in Windows 10 issue.
Automatically Update Graphics Drivers Using Advanced Driver Updater
If the steps mentioned above are confusing or time-consuming, you can automatically update the graphic card driver using Advanced Driver Updater. The tool detects outdated drivers and shows the latest and compatible driver updates; this helps fix the HDMI port not working on Windows. To use the tool, follow these steps:
1. Download and install Advanced Driver Updater.
2. Launch the tool to update the graphics driver and fix the HDMI not working issue.
3. To start scanning the system for outdated drivers, click Start Scan Now and wait for the scanning to finish.

4. Once the scanning is completed, check for the display adapter category and update the graphics driver. If you are using the trial version, you will need to click Update driver next to the graphics driver. However, if you are a registered user, you can update all outdated drivers by clicking Update All.

5. Restart PC to apply the change. Now try connecting the device to the HDMI port; it should be working fine.
If the problem persists, try configuring display settings.
Method 4: Configure the System’s Display Settings
If multiple monitors are connected with the system, you can face the HDMI port not working issue. To confirm that isn’t the case and the wrong display setting isn’t enabled, configure the display settings using the steps explained below:
1. Press Windows Key + P and open display settings.
2. You will get a list of options.

- Computer only.
- Duplicate.
- Extend
- Second screen/Projector only.
If you are using a PC screen or only have a single monitor, use the 1st option.
When using more than one screen and wanting to display the same content on both, use the Duplicate option.
To use both monitors for displaying the screen, use Extended mode.
When you only want to view the content on the second screen, use Projector Only.
After making the necessary changes to try to connect the device, the issue with the HDMI port should now be sorted.
Conclusion:-
To fix HDMI not working on Windows, we have discussed various fixes in this blog. Using any of them, you can fix the issue. The most common reason behind the problem is outdated drivers, try using Advanced Driver Updater to update drivers.
That’s for now. We hope these methods help resolve any issues, you may have had with the HDMI port not functioning on your device. Please share the troubleshooting techniques in the comments section below if you come across different ways to repair the HDMI issue.


Leave a Reply