
Microsoft Windows has been constantly improving and adding countless features from Windows 95 to the latest Windows 10. In order to remember all files, apps and other features, Microsoft inculcating a powerful search option. Using which you can search almost anything, and Windows 10 will provide you the best results based on its database.
But, if Windows 10 Search option stops working then? It would sort of paralyse most of the Windows 10 users. If you face any similar issue to Windows 10 Search not working or pulling out the relevant searches of files you know that exist, then follow the following steps to troubleshoot the Windows Search not working issue and get it working again using these simple steps.
Steps to consider if the Windows 10 Search is not working

Restart your computer
One of the best troubleshooting steps for any machine is to Restart. It is true that computers are designed to remain switched on 24/7, especially in case of Mainframe and Servers, but our personal computers need not go through that ordeal. Turning it off when not using will not only save electricity but will also increase your computer’s life.
Technically speaking, a restart of the computer frees up the RAM or internal memory and brings its occupancy to zero. While a computer is turned on for many days, any process like the Windows explorer or Search process remains open in the internal memory and can develop a glitch. After a restart, the system files load a fresh copy into the RAM and hence this resolves the issue.
Use Windows Trouble-Shooter
Microsoft has designed a Trouble-Shooter in Windows operating system to assist the users to determine the problem and automatically fix it. Though the Windows Trouble-Shooter is not very famous for its resolution providing features, it does help identify the common reasons as to why the issue occurred and a few generic symptoms. After restarting the computer, if the issue persists then running trouble-Shooter is definitely the next step.
To run the Trouble-Shooter in Windows 10 for issues related to Windows 10 Search, follow the following steps:
- Press the Windows key and the letter ‘I’ on your keyboard to access the settings menu.
- Choose ‘Update & Security’ from the various options.
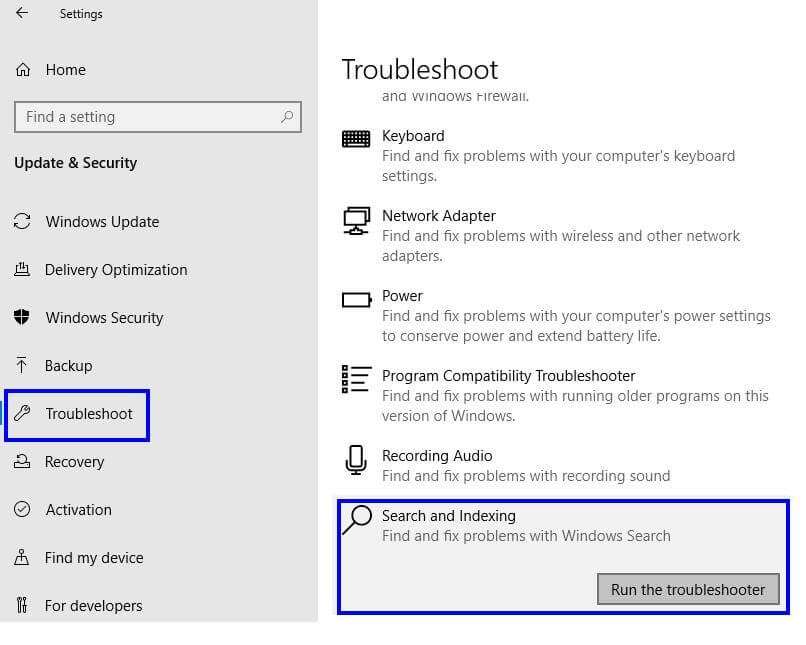
- In the new window, select ‘Troubleshoot’ from the menu on the left.
- Then, scroll down on the right section of the window and find ‘Search and Indexing’
- Click on ‘Search and Indexing’ and then click on the button labelled as “Run the Troubleshooter”.
- Follow the instructions and answer the questions asked in order to identify the problem first and obtain the resolution next.
There is another way to initiate the Windows Trouble-Shooter. Though the steps are entirely different, but the result is same.
- Press the Windows key and the letter ‘R’ on your keyboard to open the Run window.
- Type ‘Control Panel’ in the box and press Enter.
- Search for ‘Troubleshooting’ and click on it.
- Under Troubleshoot computer problems, click on ‘System and Security’.
- In the new window, search for ‘Search and Indexing’ and right-click on it.
- Click on ‘Run as Administrator’ and click on Next in the trouble-shooter window.
- Follow the instructions and answer the questions asked in order to identify the problem first and obtain the resolution next.
The Windows update trouble-shooter will now attempt to fix the issues you are facing on your computer. It may not be able to fix all the issues but will point in the right direction to learn more about your problem.
Use the System File Checker
Microsoft has also provided a system utility tool to scan and fix the system files. This tool can check the integrity of all the operating system files and if required can also restore them to their default state. An advanced utility can also repair some files which are corrupted and cannot be replaced. This tool is run in two parts: SFC & DISM. The user must run these commands on an elevated command prompt in Administrator mode. Normally it is easy to access that by using the search option, but in our scenario, it is the search option that is not working. So, what do we do next?
- Press the windows button with the letter ‘R’ on the keyboard to open the RUN window.
- Type ‘cmd’ in the Open box and do not press on the ‘OK’ button.
- Press and hold CTRL + SHIFT, and then press Enter on your keyboard. The Command Prompt will now open in Administrator Mode.
There is a significant difference when running simple command prompt and elevated command prompt in Admin mode. A simple command prompt will never ask your permission before opening the window. Also, the location at which both the command prompt windows open is different with the Admin mode has more power to make changes on the system level.

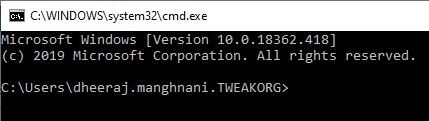
Once the Command Prompt is opened in Admin Mode, copy and paste the following command at the point where the cursor is blinking in the black and white window:
DISM /Online /Cleanup-Image /RestoreHealth
This command will scan the image for any corrupted files and repair them automatically. All the corruption records are saved in a log file. This process takes an approx. of 30 minutes to one hour. After the process is completed, type the next command:
sfc /scannow
This command will check for system file corruption. It should turn up with no errors as the DISM command has already been run to fix errors, if any.
Use the Task Manager to restart Windows 10 processes
Another easy trick to resolve your Windows 10 Search issues is to close the Cortana process and try to search. Don’t worry, once you end the Cortana’s process in the taskbar, it restarts automatically almost immediately, before you can close the taskbar window and return to your work. But still, it is definitely worth a try as the RAM clears up and the system loads the Cortana as a new process. To restart Cortana, follow these steps:
- Right-Click on the task bar.
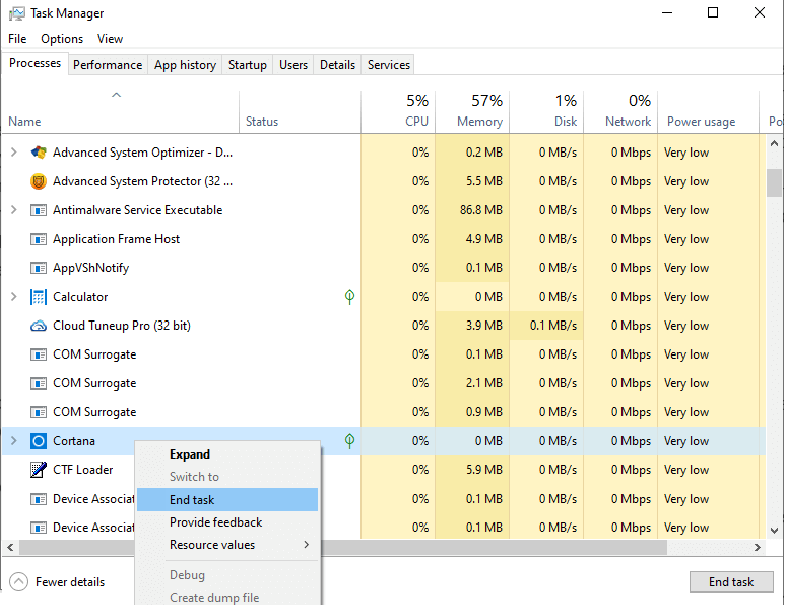
- Click on Task manager from the list.
- The default tab open will be the first tab “Processes”. Search for a process by the name of ‘Cortana’. Scroll through the entire list until you find it.
- Once you find it, make a left click first to select it and then a right click and select End task.
- Search for another process by the name of “Search”. End the process for this one as well.
- The next process is by the name of ‘Windows Explorer’. Right click on this process and select ‘Restart’. This will restart Windows Explorer service.
- Check your Search bar. It will start working.
Restarting few of the relevant processes might resolve the issue of Windows 10 Search box not working.
Disable Antivirus
Antivirus is a complex program which are designed to be over cautious and sometimes do not recognize between system processes and external threats. Open your Antivirus interface and disable the program for a few minutes and check you Search Box. If it starts working, then it clearly means that the current Antivirus that you are using is not compatible with your system. You must uninstall it and acquire another one that is compatible with windows 10. Do remember to enable your Antivirus after you check the Search Box.
Rebuild Indexing
Rebuilding the Index is a power functionality that allows the users to quickly find any file located anywhere in the computer system. It the Windows Search options do not pull a file that you are certain, then Indexing is the best solution to resolve that issue. To initiate the Index rebuilding process, carry out the following steps:
- Press the windows button and the letter ‘R’ on the keyboard to open the RUN window.
- Type ‘Control Panel’ and click on OK.
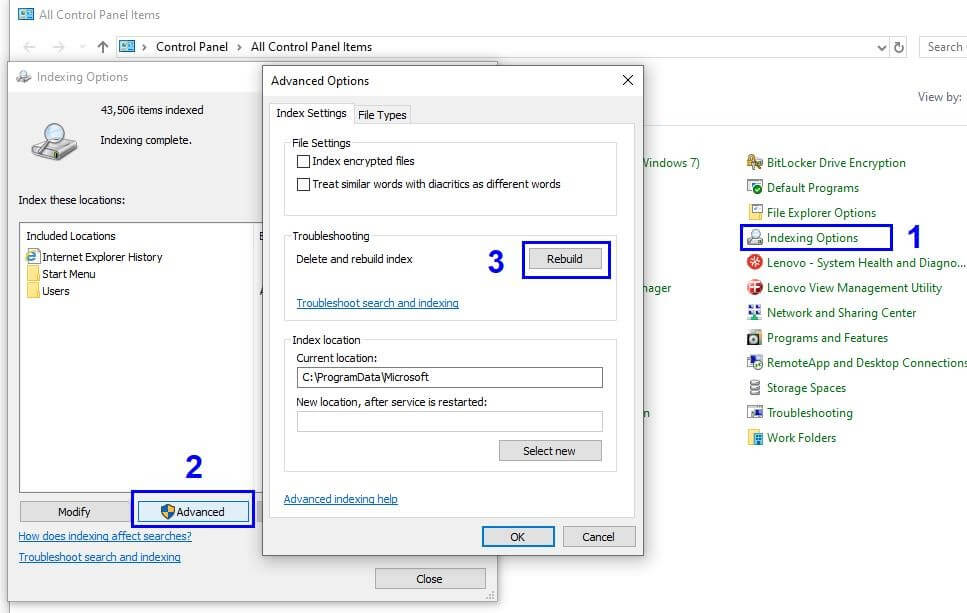
- Select Indexing options from the various options under control panel.
- In the new window of Indexing Options, click on Advanced button.
- Locate ‘Rebuild’ button and click on it.
- You may be asked to enter your system password.
Indexing is a slow process as it reads every file in your system and might take more than a couple of hours depending on the total number of files on your hard drive.
Windows Search Service
Windows Search is a service by Windows 10 which helps its users to search files, folders, apps, settings and even web results. It is automatically preloaded by Windows when it launches. However, there are times it might not load properly, or the existing file loaded in the RAM might be altered and hence not providing the desired results. It is important to locate the Windows search service and check it status and change it accordingly with a few steps:
- Press the windows button and the letter ‘R’ on the keyboard to open the RUN window.
- Type ’Services.msc’ in the RUN window.
- In the new window, locate ‘Windows Search’.
- Check the status. It should be in running state.
- If it is not in a running state, then right click on the service and click on Start.
- Do a right click again and click on Properties.
- In another new window, locate the Start-up Type and from the dropdown menu and select ‘Automatic’.
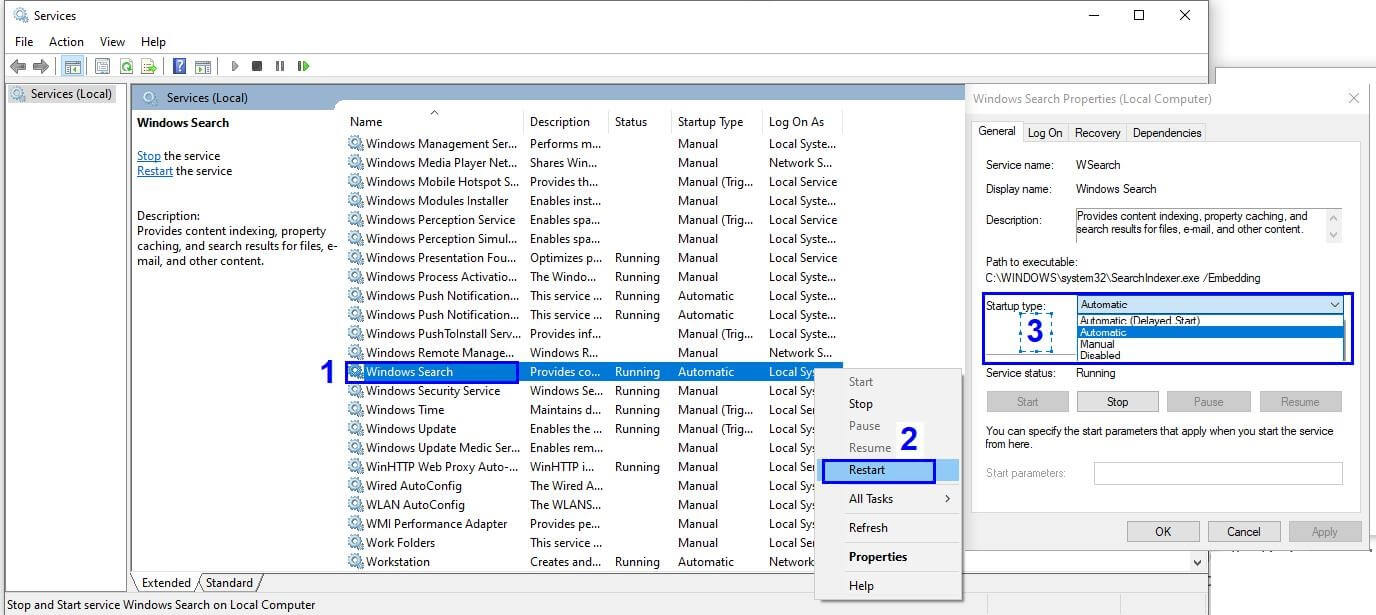
The final step will ensure that the Windows Search is always on and launches automatically every time the computer is restarted.
Paging File Size
Windows 10 has a lot of unknown secrets and one of them is its ability to page files from your RAM to your hard drive. In simpler words, if you open many files and programs on your computer at one time and the RAM runs out of space, then it transfers some of its load to a temporary file located on your hard drive. This process is known as paging and the page file acts as a secondary RAM and is also referred to as virtual memory.
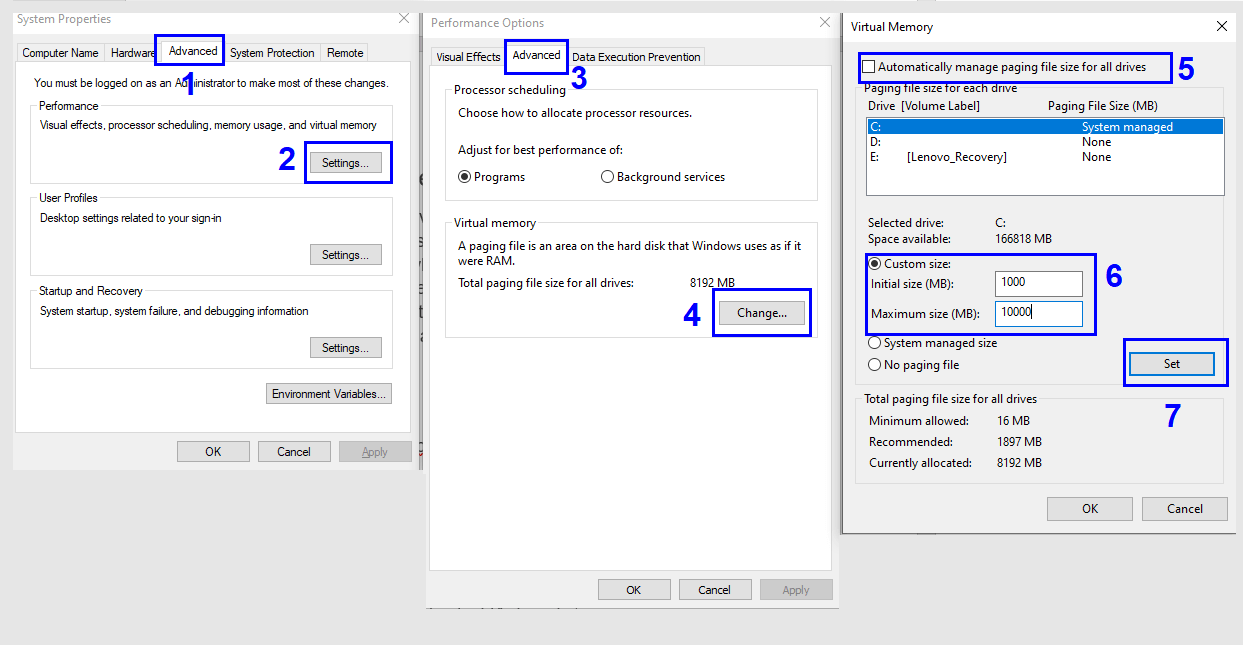
Windows 10 sets a default limit of the page file by taking into consideration your RAM and Hard drive. You can increase the capacity of the virtual memory by increasing the limit of Page File by a few simple steps:
- Press the Windows key with the letter ‘R’ on your keyboard to open the RUN window.
- Type “Sysdm.cpl” and click OK.
- A new window by the name of System Properties will open.
- Click on the Advanced tab.
- Click on the Settings button under the Performance heading.
- A new window labelled as ‘Performance Options’ will open.
- Click on Advanced Tab again.
- Click on Change button under the Virtual Memory section.
- Uncheck the checkbox next to Automatically manage paging file size for all drives. The options previously disabled will become enabled now.
- Click on Custom Size and enter the minimum and maximum size, you wish to allocate for paging files.
Note: You can increase the size in comparison to the default size. If you don’t find any difference, then check the checkbox again to restore to default settings.
Advance Driver Updater

There is one another factor which can interfere the within the internal functionality of Windows 10 and that is the Drivers. They are small software codes which communicate between the hardware and the software. Drivers generally do not pose any threat if they are updated regularly and kept at the latest version. To upgrade the drivers with their latest update, I don’t wait for Windows updates to roll out the updates after months of release and instead use Advanced Driver Updater.
Advance Driver Updater is easy to use software that scans your computer for outdated drivers that cause malfunction, sluggishness, freezing and other issues related to performance. It then searches the latest driver for your hardware based on the information collected from the hardware hash and downloads the latest and updated version from Original Equipment Manufacturer’s website.
For a detailed explanation on Advanced Driver Updater, click here.
To download Advanced Driver Updater, press the download button.

Factory Reset
If you have tried all the options and are still facing issues, then the last and final step which is guaranteed to resolve all your issues is to restore your operating system to its default factory state. Remember to take backup as this step will delete all your files and folders.
If your Windows 10 Search Bar is not working, then it does create issues and makes thing difficult. But it is not the end of the world. Follow the above-mentioned steps precisely and you will succeed to resolve the issue. If you still are facing the issue, drop a comment with the exact nature of the issue and I will consult it with my technical team and provide you the best resolution for your issue.


Leave a Reply