We are so jam-packed with these social networking apps that we can’t even spend 30 free minutes with our granny sitting next to her and exchanging thoughts on family matters. All of a sudden, one day we realize that we want to get rid of this cyber relation and get deeper into our own lives, it’s finally time to get rid of followers’ addiction.
Those who worry about identity theft or have a threat to their data privacy, should not be using Instagram or its parent corporation Facebook to stay protected from odd privacy scandals. In late 2018, there was a security issue reported in the Instagram feature ‘Download Your Data’, where users compromised on their passwords in plain text. There can be hundreds of reasons why you should get rid of your Instagram account. Well, if you finally decided, here is how to delete Instagram account permanently or temporarily disable an Instagram account.
How To Delete Instagram Account Permanently or Temporarily:
What is the Difference Between Deactivating vs Deleting?
You can temporarily disable an Instagram account or permanently delete the Instagram account as per your preferences.
Deactivating is a temporary process where all your account information, your profile, followers, photos, likes, and comments are hidden from other users. You can anytime login back with your user credentials and access all your account information.
Deleting your Instagram account is a permanent process and it can’t be undone. You can’t restore a deleted Instagram account. If you delete your Instagram account, your data, photos, videos, followers, comments, or likes everything gets permanently deleted. You can never sign back in or gain access to this data.
Temporarily Disable Instagram

If you just want to temporarily disable your account and see if you can live without it, you can do that by following these steps. Your profile, photos, all your comments, and likes will be temporarily hidden until you decide to reactivate your account by signing back in.
Step 1. Log into your Instagram account on a mobile browser or a computer browser. You will need to log in using a browser to temporarily disable Instagram account as you can’t do that using the Instagram app.
Step 2. Tap or click on your profile picture at the top-right corner of the screen and then select the ‘Edit Profile’ option.
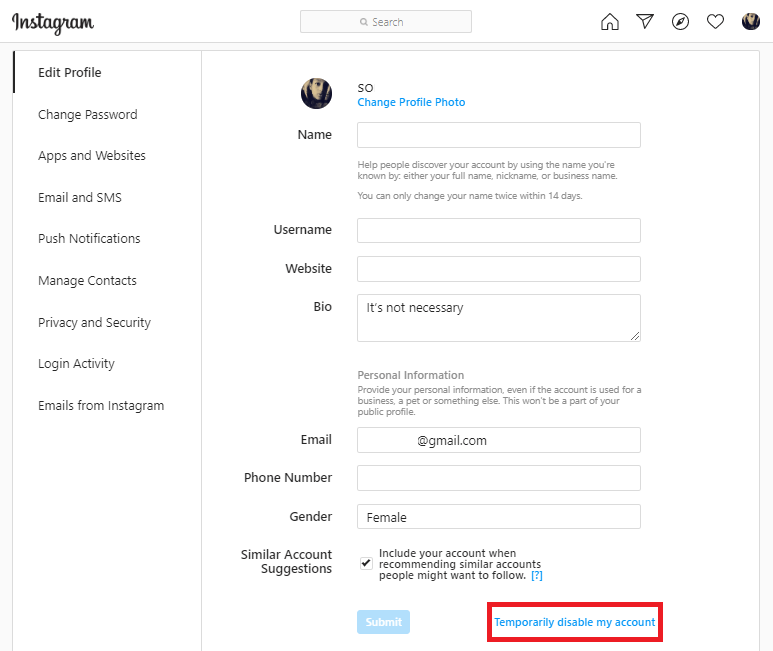
Step 3. Scroll down till the bottom of the list and then tap or click on ‘Temporarily Disable My Account’ listed at the bottom-right corner.
Step 4. It will give you a survey question to select an option from the drop-down list to know the reason ‘Why are you disabling your account?’ Select one option and then re-enter your password. The option to disable the Instagram account will only be enabled after you select a reason from the list and enter your password for confirmation.
Step 5. Tap or click on ‘Temporarily Disable Account’.
This is how to deactivate the Instagram account temporarily. If you want to permanently delete an Instagram account, you can follow the below steps.
Have a Look: Best Instagram Locker Apps
“Please Note: If you don’t remember your account password, first you will need to recover your account password and then go through the deleting/disabling process.”
How to Delete Instagram Account Permanently

“Before you go ahead and delete your Instagram account permanently, you need to know that once you delete your account, you won’t be able to sign back in with the same username. You won’t be able to reactivate your deleted account.”
If you have forgotten the Instagram password, you won’t be able to login to the account and at the same time, you won’t be able to delete Instagram Account permanently. Instagram or anybody else can’t ever delete your account until you reveal your password.
You may follow these steps to permanently delete your account.
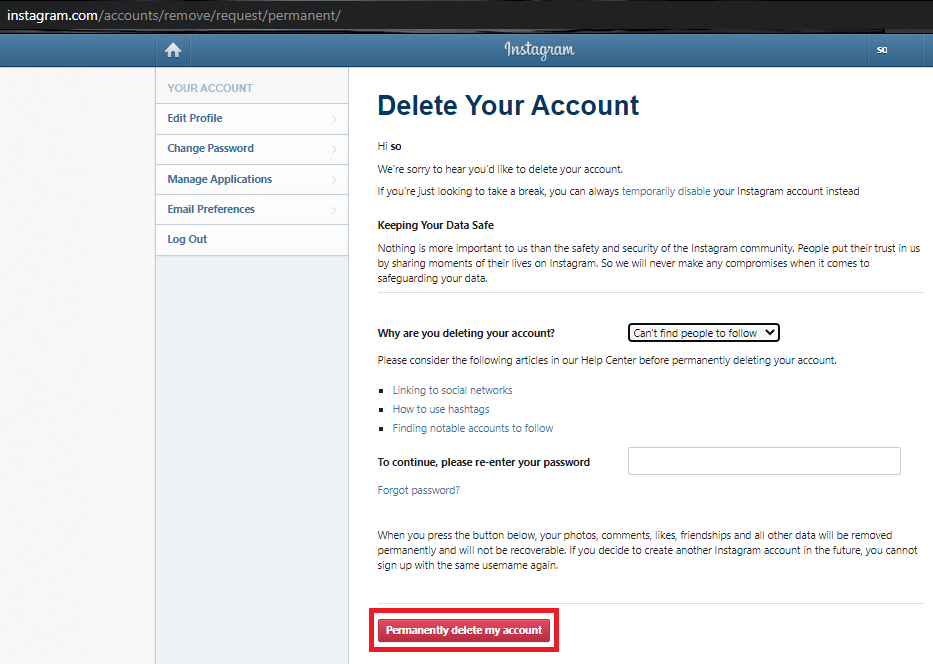
Step 1. Log into your Instagram account on a mobile browser or a computer browser. You will need to log in using a browser to permanently delete the Instagram account as you can’t do that using the Instagram app. Go to the Delete Your Account page.
Step 2. It will give you a survey question to select an option from the drop-down list to know the reason ‘Why are you deleting your account?’ Select one option and then re-enter your password. The option to delete an Instagram account will only be enabled after you select a reason from the list and enter your password for confirmation.
Step 3. Click or tap on ‘Permanently delete my account’ and it will be removed forever.
“Please Note: When you permanently delete your Instagram account, your profile, photos, videos, comments, likes, and followers, everything will be permanently removed.”
Additionally, if your Instagram data is holding you back to permanently delete the Instagram account, you can take a backup of your data with a few clicks.
Downloading Your Instagram Data

Remember that if you have deleted your Instagram account, you won’t be able to get your data back. It’s always better to take a backup of your photos, videos, or contacts. To download Instagram data or make a copy of your Instagram data, follow these steps:
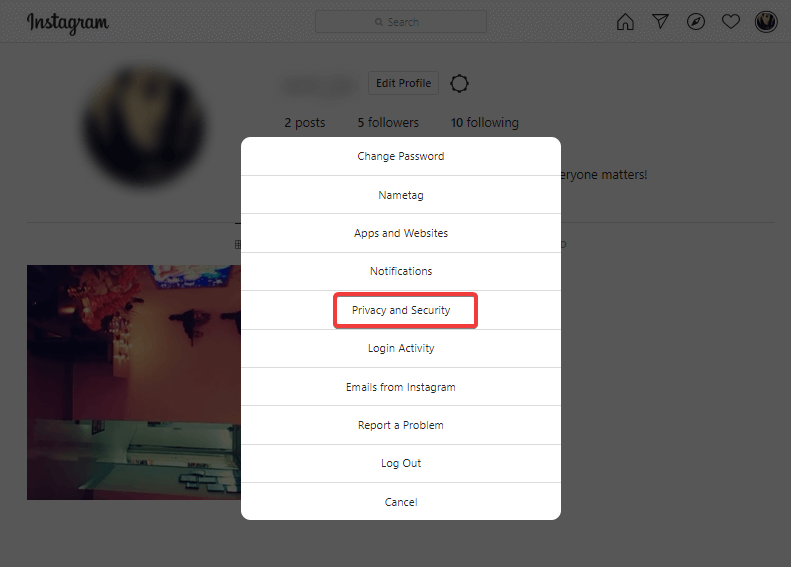
Step 1. Log in to your Instagram account and tap on the ‘Settings’ (Gear Icon).
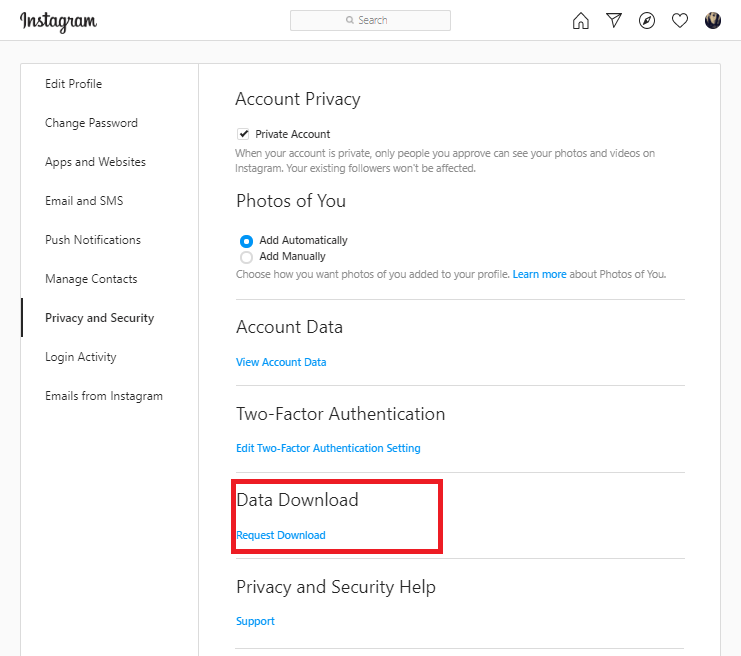
Step 2. Click on the ‘Privacy & Security’ tab and select the option ‘Request Download’.

Step 3. Enter the email address on which you wish to receive a download link to your Instagram data. Enter the password when prompted.
Step 4. Though it says that you will receive an email with a link to your data within 48 hours. The title of the email should be ‘Your Instagram Data’, Click on the ‘Download Data’ to get your data on your system.
Summing Up
This article is for those who just want to temporarily disable an Instagram account or learn how to delete Instagram account permanently so that they can spend time with their family members or prevent themselves from privacy theft.
You May Like To Read Next:
How to Switch Accounts on Instagram?
How To Fix Couldn’t Refresh Instagram Feed Error


Major Nyman
Hey saw this article mention on Hosting Foundy just want to say I loved it too :) mysite.com
Raj Soni
Hello Nyman, I appreciate your interest in this write-up. Please stay tuned for more such articles and keep sharing your experience.