If you want to run an app under a different user account, separate from your own preferences, Windows 11 offers the capability to do so. This is a useful feature, especially for parents who can check the Browsers by running them with their children’s accounts on the same computer. This will help them to check the browser history and recommendations and help them understand what websites their children are vishing.
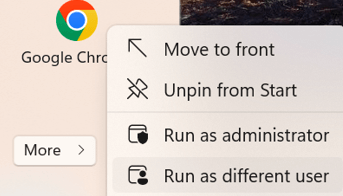
However, this feature can be dangerous for others in a situation when a computer is used by multiple users. In that case, if one user comes to know the username and password of another person, then he/she can find out details that are meant to be kept private.
Other than the above situations, there are a number of ways to include or exclude the Run as a different user option in Windows 11’s Start menu. Let us discuss how to accomplish this.
Also Read: How to Fix “Error 0x80070522: A Required Privilege Is Not Held By The User”
How to Use the “Run as Different User” Option in Windows 11 to Protect Your Privacy?
List of Contents
Method 1: Use Settings To Add/Remove “Run As Different User”.
Step 1: Press Win + I to launch the Windows Settings.
Step 2: Click on Privacy & Security in the left panel.
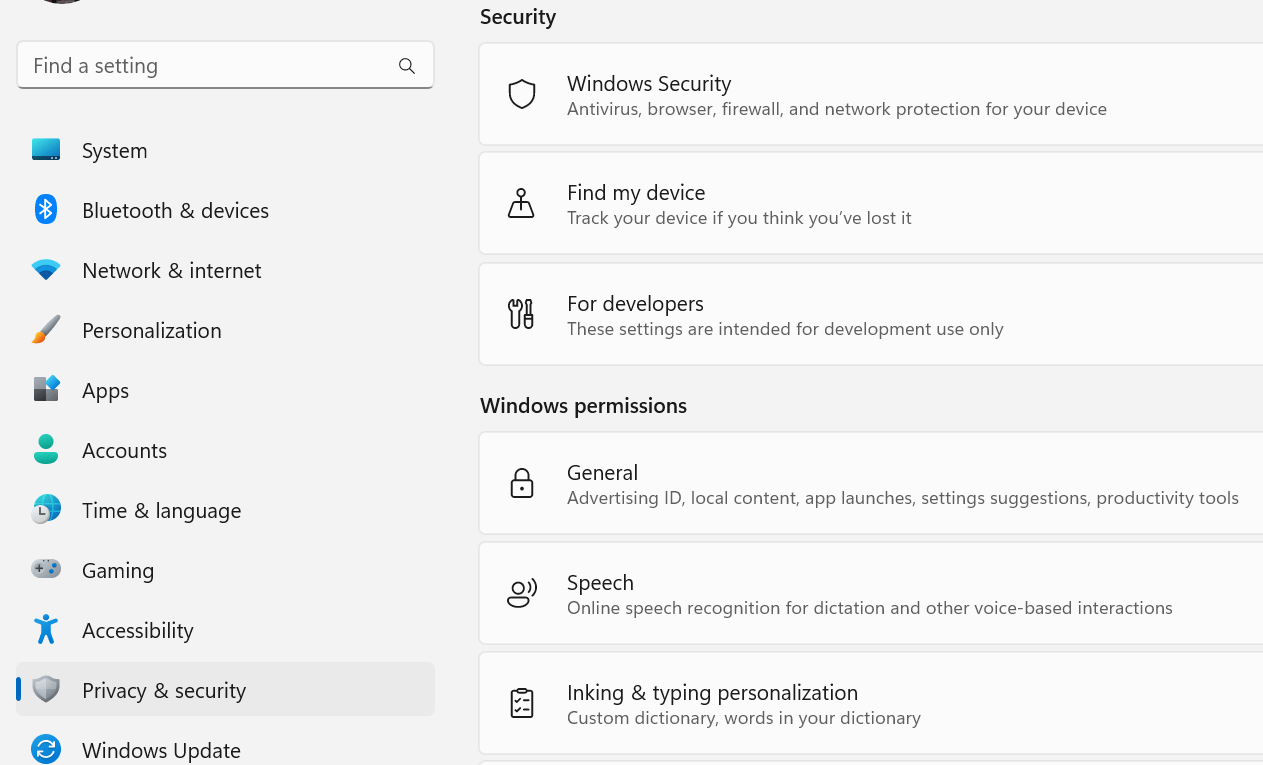
Step 3: Then click on For Developers option in the right panel.
Step 4: Next, click on the File Explorer option and it will expand.
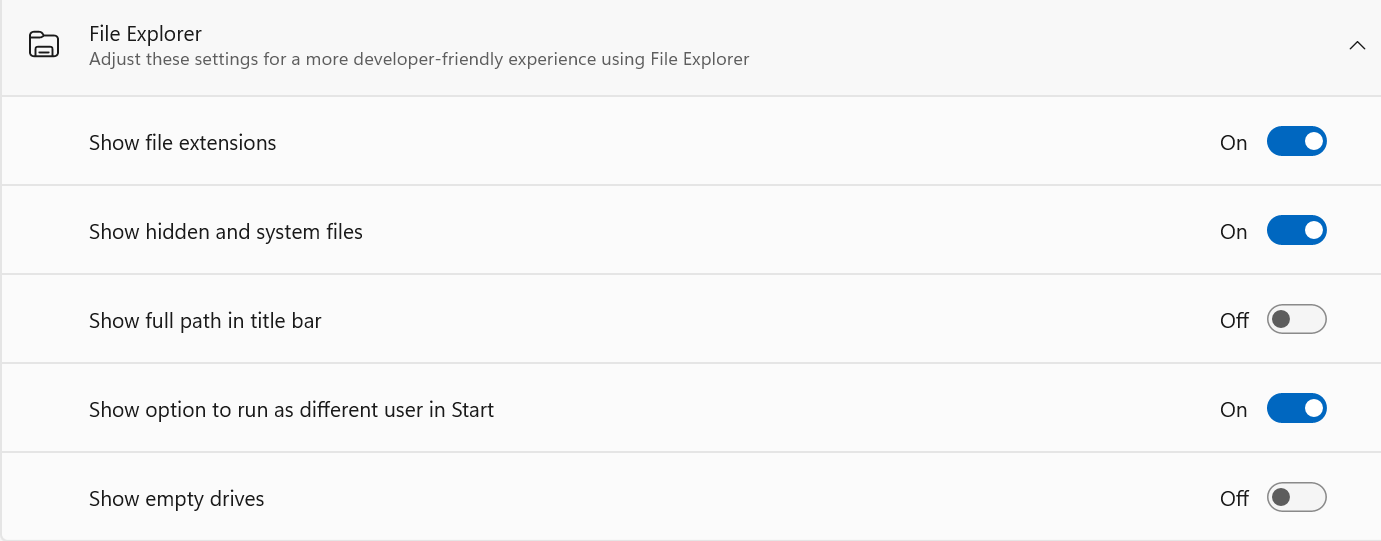
Step 5: Locate the ”Show option to run as different user in Start” and turn on the toggle next to it towards the right. This will enable the option in the Start menu.
Note: To disable this option, you need to turn the toggle off moving it towards the left.
Also Read: How To Change Your Username In Windows 11?
Method 2: Use Local Group Policy Editor To Add/Remove “Run As Different User”.
Step 1: Press Win + R to launch the RUN box.
Step 2: Type “gpedit.msc” and hit the Enter button.
Step 3: In the left panel of the Local Group Policy editor, click on User Configuration followed by Start Menu and Taskbar.
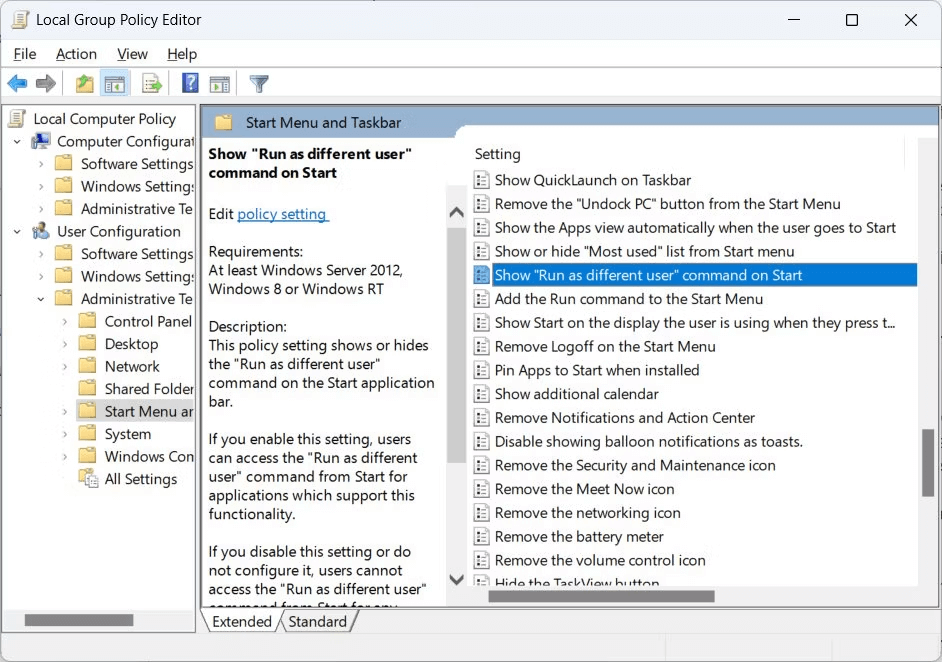
Step 4: Next, in the right pane, double-click on the Show “Run as different user” command on Start policy.
Step 5: A new window will open where you have to click on the radio button next to Enabled.
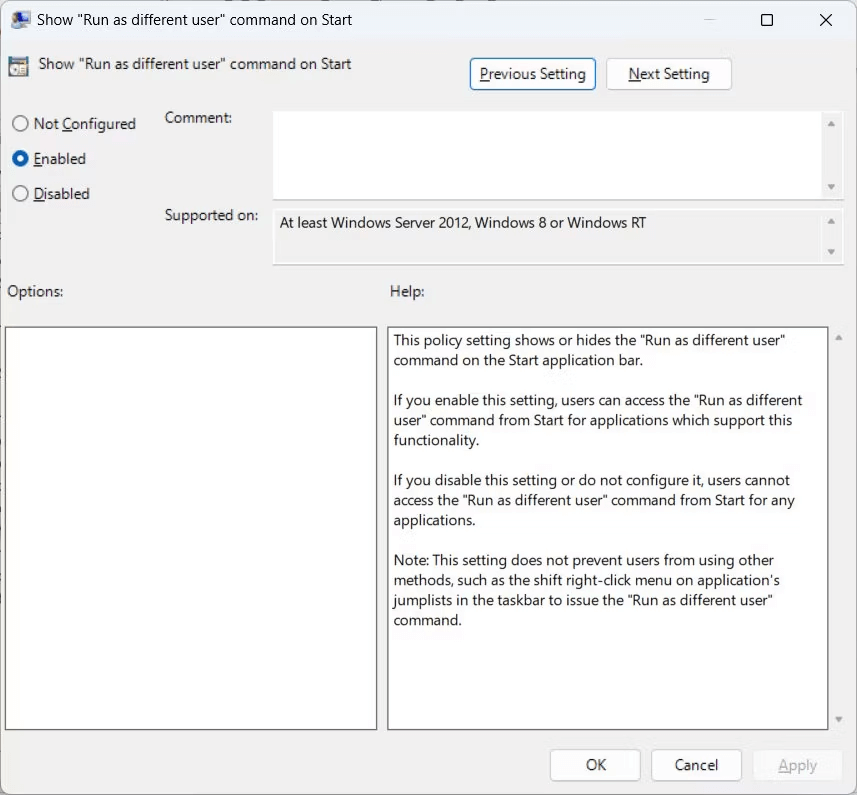
Step 6: Click on Apply and then on OK.
Note: If you wish to disable this option then choose the Disabled button.
Also, if you’re facing the issue of the ‘Switch User’ option missing in Windows 10/11, you can refer to the following guide to fix it.
Method 3: Use Windows Registry Editor To Add/Remove “Run As Different User”.
Step 1: Press Win + R to open the RUN box.
Step 2: Type Regedit and press Enter.
Step 3: Click on Yes if the UAC box appears.
Step 4: Navigate to the following Registry key using the left panel.
HKEY_CURRENT_USER > SOFTWARE > Policies > Microsoft > Windows > Explorer.
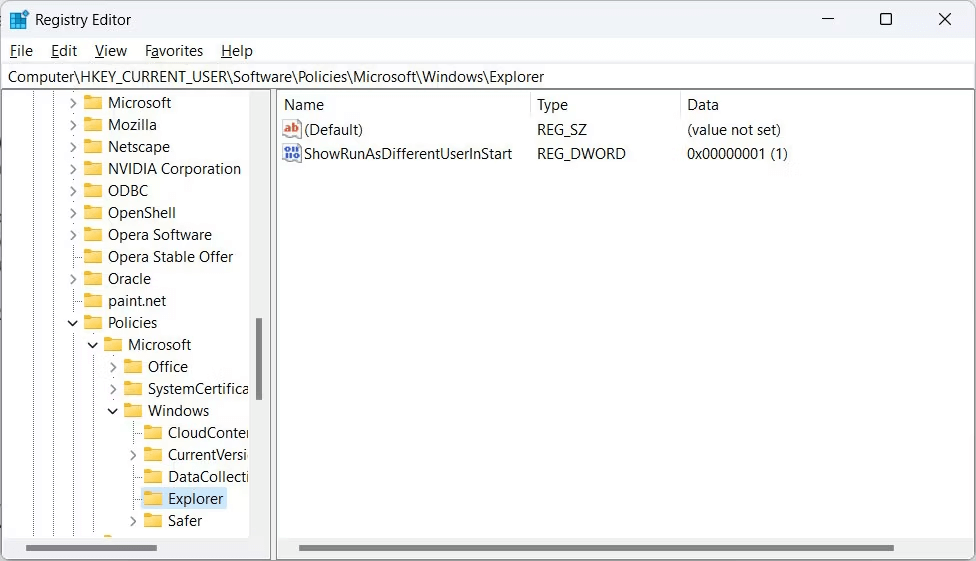
Note: you can copy the path mentioned above and paste it into the address bar of the Windows Registry.
Step 5: Next, in the right panel, look for a registry key by the name of ShowRunAsDifferentUserInStart.
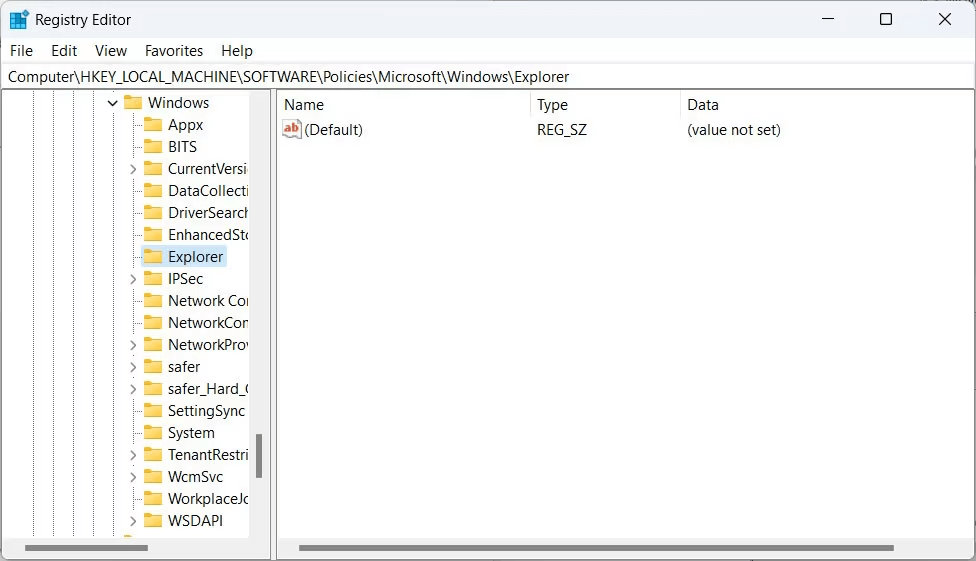
Note: If this key is not available then you can create it by making a right-click on the Explorer key in the left panel and select New-> DWORD (32-bit) Value. Rename the newly created as ShowRunAsDifferentUserInStart.
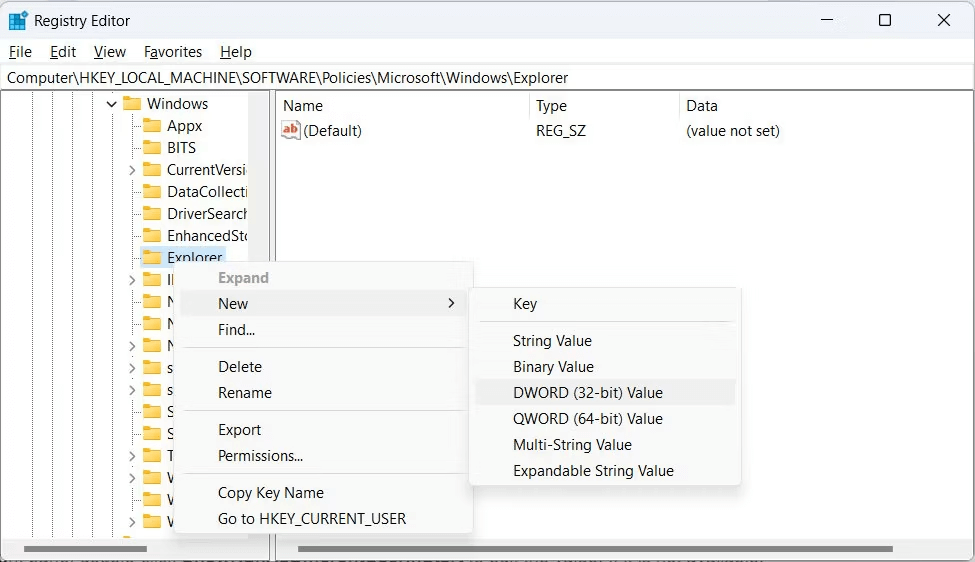
Step 6: Double-click ShowRunAsDifferentUserInStart and set the Value Data to 1.
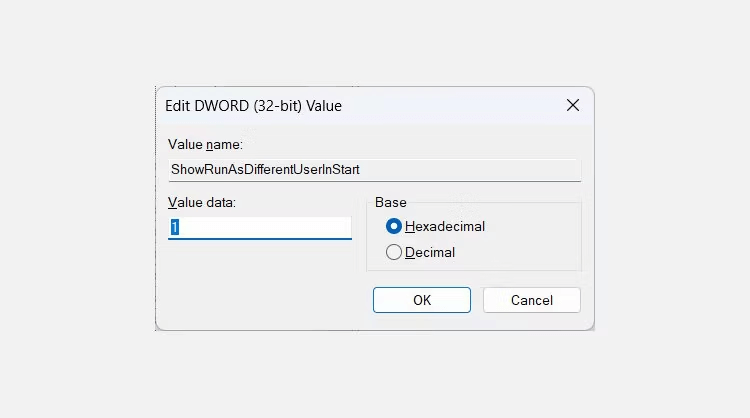
Note: By changing the Value Data to 1, you will enable the “Run as Different User” option, and by changing it to 0 you will disable this option.
Step 7: Click on OK and exit the Registry Editor.
Step 8: Reboot your PC.
Also Read: Ways To Open Windows 10 Registry Editor
The Ultimate Guide To Protecting Your Privacy With the “Run as Different User” Option in Windows 11
Running a Windows program or task as a different user might be helpful or useless depending on the situation. You have the authority to add or delete the option to do so from the Start menu as the administrator. However, we recommend using Settings or the Local Group Policy Editor to make this change, as editing the Registry can be risky. Remember that although users of your computer won’t be able to execute applications and processes as various users in Start, they can still do so by employing alternative techniques.
Please let us know in the comments below if you have any questions or recommendations. We would be delighted to provide you with a resolution. We frequently publish advice, tricks, and solutions to common tech-related problems.
Next Read:
Is It Safe to Optimize Windows Registry?
Best Registry Cleaners For Windows 10


Leave a Reply